You can adjust the colour balance in an image using the colour wheel or the Balance Tools Hue and Gain fields. The value of Hue determines the colour to add and the value of Gain specifies the amount of colour to use.


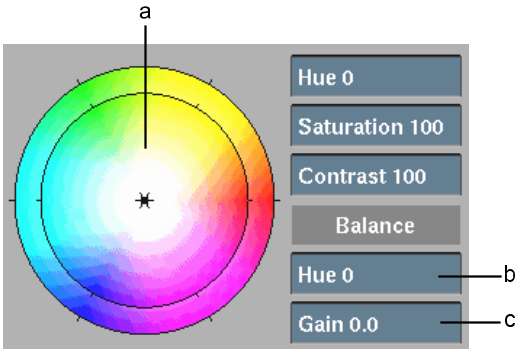
(a) Colour wheel (b) Hue field (c) Gain field
Pure red is the 0-degree point for hue on the colour wheel. When you increase the Hue value, you move counterclockwise on the colour wheel. When you decrease the Hue, you move clockwise on the colour wheel.
The centre of the colour wheel represents 0 Gain. As you increase the value of Gain, you move towards the edge of the colour wheel and add more of the selected colour to the image.
Creating and Modifying a Colour Balance Point
You can make colour balance points for each range (highlights, midtones, and shadows) or for all ranges simultaneously (master). Click inside the colour wheel to create a balance point for the current tonal range.
The current range's colour balance point is connected to the hub of the colour wheel by a line. You can constrain how the point is modified according to how you select it. If you select the line, the radius of the line Strength is constrained. If you select the point, the direction of the line Tint is constrained. You can make unconstrained modifications by clicking anywhere in the wheel, or by entering values in the Balance fields.

(a) Current colour balance point (b) Hue shift/saturation comparison (outside ring is Result; inside ring is Source) (c) Balance tools
Colour balancing is performed in RGB colour space. The luma of the image is not changed. For example, if Hue (tint) is set to 0 and Gain (strength) is set to 100%, pure red is added to the image. However, a black pixel remains black since it keeps the same luma value.
To change the colour balance in the image:
As you drag the cursor, a colour balance point follows the cursor. Depending on the range you are modifying, the colour balance points are shaded to make for easier identification (from light grey to black, in this order: Highlights, Shadows, Midtones, Master).
You can continue dragging outside of the colour wheel. The colour balance point is replaced by a triangle in the outer circle of the colour wheel. The triangles are also shaded depending on the range selected (from white to grey, in this order: Master, Highlights, Shadows, Midtones).


