Drawing a Tracer-aided
matte entails four basic steps.
To draw a Tracer-aided matte:
- Analyse the image to determine which
areas are appropriate for pickers and which areas are better served
by advanced gradients.
- Draw the garbage mask.
- Assign pickers to vertices where they
are needed.
- Adjust the softness borders, offsets,
tangents, vertices, and pickers (where used).
To analyse the image:
- Examine the edges of your talent to decide
which portions would benefit from advanced gradient treatment and
which would respond better to localized key treatment. If your clip
has colours that change greatly throughout the clip, using pickers
may be difficult.
For more information,
see
Applying Softness Using Pickers.
To draw the garbage mask:
- In the Modular Keyer or Batch, add a
context point further down the processing pipeline or processing
tree. You can then use the Context view to see the effect of the
matte on the result image.
NoteWhen using the Tracer
to pull a key from the Modular Keyer, remove the nodes before the
GMask node in the default pipeline.
- Display the Garbage Mask menu.
- From the View box, select Reference.
This view is a reference
image of the clip (it is not affected by your changes in the module).
- Draw a garbage mask around the subject
and close it by clicking the first vertex drawn. Use as many vertices
as required to adequately enclose the subject, but try to avoid
excessive vertices. This will minimize unnecessary tweaking and
manipulation later.
TipPlace more vertices
in areas with variation in the background.
To
assign pickers to selected vertices:
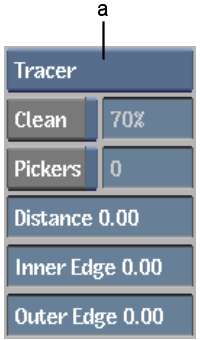
- From the Edge Softness box, select Tracer.
The Tracer menu appears,
and two softness borders (the green lines) are added to the mask.
- Select the vertices to which you want
to apply pickers. See
Selecting Vertices and Tangents.
- Enable Pickers.
NoteWhen one or more
pickers are enabled, mask characteristics are automatically set
to Outside disabled and a Colour value of 0 so that the mask will
be white inside and black outside. Do not set the Outside button unless
you want to reverse the effect.
A pair of pickers is
provided for each selected vertex.
- On vertices without pickers, the softness
borders delineate the area where a softness gradient is applied.
- On vertices with pickers, the softness
borders delineate the area to which softness is applied according
to the picker values.
To
fine-tune the matte:
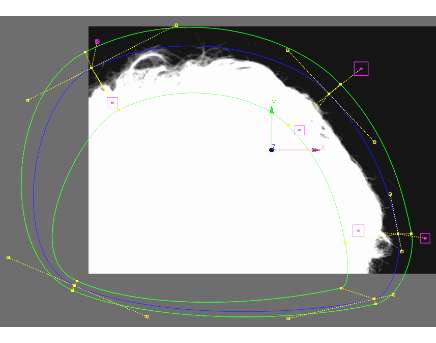
- Adjust the softness borders and mask
border by moving the vertices and tangents:
- The mask border should follow the general
contour of the subject as closely as possible.
- The outer softness border should completely
surround all details that you want to include in the matte—all
wispy details and edges must be within this line.
- The inner softness border should be well
within the area where softness control is needed.
When moving tangents,
you can opt to have the pickers follow the tangent movement (the
default behaviour), or be independent of tangent movement. To make
pickers independent of tangents, switch to Break mode and click
either picker. You can animate this behaviour. See
Animating a Tracer Mask.
NoteIf the tangents are
broken, the pickers are automatically unlinked from the tangents.
- For each pair of pickers, one requires
a sample of the area outside the mask, while the other requires
a sample of the mask interior.
Place one picker outside
the subject to sample values you do not want to include in the matte
(for example, a blue screen). Place the other picker within the
subject for a colour value sample of an area you do want included
in the matte. Try to select areas where the colour values do not change
too much throughout the clip.
- Click Matte or Result (Matte will provide
a clearer view) to see your progress.
- Scale the pickers by doing one of the
following:
- Select Scale edit mode, click within
the picker, and drag to the left to reduce the size or to the right
to increase the size.
- Select the picker and then drag the cursor
over the Sample Size field.
- Move the pickers around and enlarge or
reduce them to interactively see how you can obtain the best results.
This will require toggling between the Front and Matte views.
The following figure
illustrates the Matte view result of the pickers placed in the previous
figures.