Controlling a Mask's Effect


The Geom node contains all the information about how a mask affects the final transition. You can change this information in the Mask menu.

To control a mask's effect:

  1. Select Matte or Result.
  2. Select the mask in the image window.
  3. Click Mask.
  4. Set the mask opacity in the Opacity field.

    The Opacity field defines the effect the mask has on the matte. A value of 100% means the inside of the mask is completely opaque. A value of 50% means the inside of the mask is 50% transparent. A value of 0% has no effect on the image.

    Show small imageShow large image

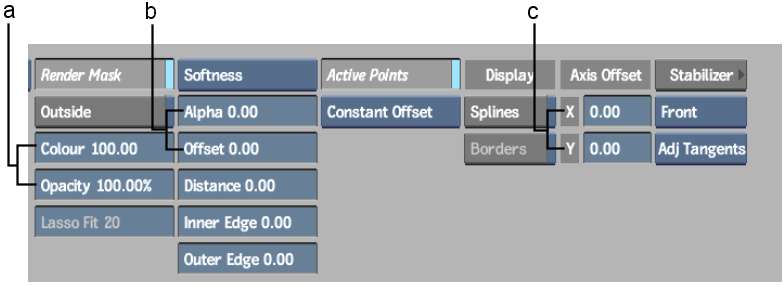
    (a) Colour and Opacity fields  (b) Alpha and Offset fields  (c) Axis Offset fields  

    Show small imageShow large image

    Mask with 0% opacity

    Show small imageShow large image

    Mask with 100% opacity

  5. Set the mask colour in the Colour field.

    The Colour field defines the blend between the outgoing and incoming image inside the mask. A value of 50% is a 50/50 blend between the outgoing and the incoming clip. A value of 100% displays only the outgoing clip. A value of 0% displays only the incoming clip.

    Show small imageShow large image

    Mask with 25% colour and 100% opacity

    Show small imageShow large image

    Mask with 75% colour and 100% opacity

  6. Set the mask softness. See Smoothening the Gradient of a Mask.
  7. Set the axis offsets in the Axis Offset fields.

    The Axis Offset fields defines how much a mask is offset from its axis.

  8. Enable Outside to apply the effect to the part of the image outside the mask shape.

Smoothening the Gradient of a Mask

You can adjust the softness gradient of a mask to smoothen the edges of your wipe. You can create a uniform gradient around the edge of the mask or use an advanced gradient to control the shape of the gradient at different parts of the mask.

To create a uniform gradient, you define how far you want the gradient to be offset from the edge of the mask and then set its transparency. To vary the shape of the gradient, you move vertices on inner and outer softness splines. The gradient will be based on how far each vertex point is offset from the mask.

For either type of gradient, you can smoothen the gradient towards the inside edge, the outside edge, as well as the area where the inside and outside adjustments have an effect.

To smoothen the gradient of a mask:

  1. From the Wipe Editor, click Mask.
  2. To create a uniform gradient around your mask, do the following:
    • If necessary, toggle the Edge Softness button to Softness.
    • Set the border of the softness gradient using the Offset field. Your gradient will be affected by how far the softness border is offset from the edge of the mask.
    • Set the transparency of the gradient using the Alpha field.
  3. To change the shape of a gradient at different parts of the mask, do the following:
    • If necessary, toggle the Edge Softness button to Advanced Gradient.
    • Adjust the distance of the inner and outer splines from the mask by adding and moving vertex points on the splines. If you do not see the inner and outer splines, enable Splines.
  4. Use the Inner Edge field to smoothen the softness gradient towards the inside.
  5. Use the Outer Edge field to smoothen the softness gradient towards the outside. Adjusting this value is especially noticeable if you are smoothening a transition from a black inside edge to a white outside edge.
  6. Use the Distance field to modify the area over which the Inner and Outer Edge adjustments have an effect.