The first step in pulling a key with the 3D Keyer is to set a range of colours to be keyed out from the front clip. This is called the tolerance range. All pixels in the key-in clip in the tolerance range are black in the matte.
To specify the tolerance range, sample the area that you want to key out in the image window. Take one or more samples until you are satisfied with the result. The tolerance range must not be too large or the edge of the composite will be too hard and the subject in the front clip will appear to be pasted into the back clip.


(a) Sampling box (b) Sampling Reset button
A red rectangle appears. The pixel values in the rectangle are used to define the tolerance range. Notice that the rectangle has a maximum size. This ensures that the result is computed quickly.
The tolerance sample in the RGB viewer is represented as an ellipsoid by default. The ellipsoid shows you the location, in RGB colour space, of the range of colours included in the sample. All colours in the tolerance ellipsoid are black on the matte.

(a) Tolerance ellipsoid
When the histogram is displayed, you can see the location of the sample in relation to the other colours in the image. When it is hidden, you can see the sample more clearly. As you work, show or hide the histogram using the following techniques:
The tolerance ellipsoid surrounds the exact colours sampled, which are connected in RGB space to form a 3D convex hull. You can see the convex hull in the ellipsoid by changing the tolerance display.

(a) Tolerance Convex Hull box (b) Tolerance Display box (c) Softness Display box
You can now see the convex hull, with vertices indicating the exact colour areas sampled.
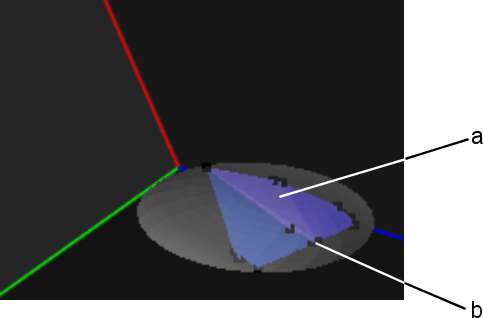
(a) Convex hull (b) Convex hull vertices
The convex hull contains the exact colour values of the tolerance sample, while the ellipsoid represents the actual area in which corresponding pixels will be black in the matte. The 3D Keyer uses the ellipsoid rather than the convex hull to determine the keyed out area because it is much faster to calculate.
You can change the shape of the convex hull directly in the RGB viewer to adjust the tolerance. The ellipsoid re-orients itself according to the new shape. See Reshaping the Convex Hull.


