Show in Contents

Add to Favorites

Home: Smoke

Creating Axis Soft Effects

Creating Axis Soft Effects

Accessing the Axis Editor

Creating Matte Containers
Containers are a convenient way
of grouping elements on the timeline. The elements, which can come
from different layers, can be edited as a unit and individually.
A matte container is a container with the RGB portion of an image
on one track and its matte on another. If the matte for a clip exists
separately from it, you can add the clip and its matte to the timeline
as a single element by creating a matte container for them.
For single-frame mattes
and virtual sources, there are special considerations. If the matte
consists of a single frame, it is automatically repeated to match
the duration of the front clip. If both the front and matte clips
are virtual sources, the matte container is created as a virtual
source. You can trim, slip or slide it to any extent.
You can create a matte
container in the following ways:
- Using the Axis soft effect quick menu
or editor.
- Using
the Ctrl hot key.
- By importing the RGBA file directly into
a matte container. See
Importing RGBA Files.
(This option does not repeat single-frame mattes to match the front clip.)
- Using
the Container Fx tool. See
Fx Tools.
To create a matte container using the
quick menu:
- Load your fill to the timeline and apply
a soft Axis to it.
- In the Axis quick menu, click Matte.
- Select your external matte from the EditDesk.
NoteYou cannot use a
timeline element as your matte selection.
A matte container is
created.
To create a matte container using the
editor:
- Load your fill to the timeline and apply
a soft Axis to it.
- Enter the Axis Editor.
- Click Load Matte.
- Select your external matte from the EditDesk.
NoteYou cannot use a
timeline element as your matte selection.
The matte container is
created.
To create a matte container using the Ctrl hot key:
- Make sure your fill is on the Primary
video track of the EditDesk record timeline.
- Make sure your matte is on the Secondary
video track.
- Select the element(s) you want to use
for the fill.
- Select the element(s) you want to use
for the matte.
- Ctrl-click
the Container button.
The matte container is
created on the Primary video track.
- Apply a soft Axis to the matte container.
You now see the result
of the external matte with the matte container.
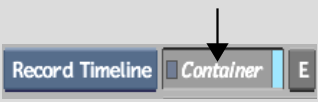
To enter a matte container:
- Double-click the matte container or click
E beside the Container button.
The matte container contains
two tracks: your fill on V1 and the external matte you selected
on V2. You edit the contents of a matte container the same way as
a normal container.
To mute a matte from the Axis Editor:
- Select the matte container.
- Enter the Axis Editor.
- Select Off from the Matte box.
The matte is temporarily
removed from the vertical edit.
To mute a matte from the timeline:
- Click the Container button.
The LED turns yellow.
NoteTo unhide the matte,
click the Container LED button so that it turns purple.