Before archiving to a tape device,
make sure:
- The selected device is a fixed, block-size device.
- The tape device is declared in the CLIPMGTDEVICE
KEWORD section of the software initialization configuration file.
- A tape is in the tape device. Some devices
are unavailable for several minutes after a tape is inserted, so
it is best to do this before opening the tape archive module.
To create a tape archive:
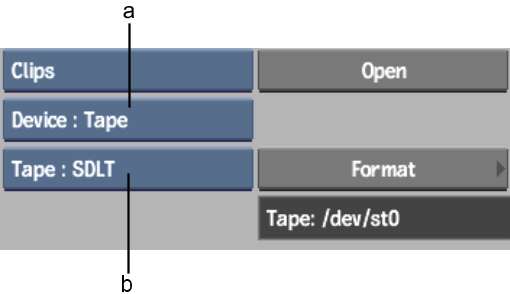
- Open the Archive menu.
- From the Archive Device box, select Tape
as your archiving device.
Options specific to the
tape device appear.
- If necessary, select a tape device from
the Device Name box.
NoteTape devices are
detected automatically when you first enter the Archive menu.
- Click Format.
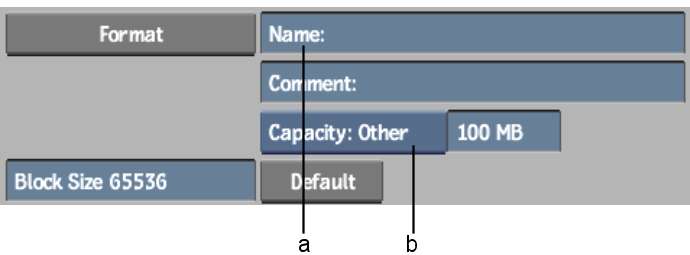
The Format menu appears.
- Enter the name for the archive entry
and any additional comments in the Name and Comment fields.
- Select the capacity of the tape from
the Capacity box.
The Capacity box displays
tape sizes that correspond to tapes generally used by the selected
device. If you cannot find the description of the tape, select Capacity:
Other and use the adjacent field to enter the capacity of the tape
in MB.
- Select Default from the Block Size box
to use the default value from the software initialization configuration
file. Alternatively, specify an appropriate block size in the adjacent
field.
- Click Format and then Confirm to continue.
A new archive is created
on the tape, and is opened. Save the current project, clip libraries, EditDesks,
reels, soft edits, or individual clips. See
Saving to an Archive.
NoteWrite down the archive
name and creation date on the tape label. This will help you to
select the appropriate OTOC if you need to restore the archive.