You can archive entries from any local or shared clip library.
When you archive entries, there are two methods for organizing the entries: Normal and Compact. Both methods perform some optimization to save space in the archive. The Compact method creates a backup set, which acts like a container that holds the archived material. It appears in the archive as an entry called Backup Set, and all selected entries are within it. Each time you use Compact, a new backup set is created. When entries are archived using the Normal option, the entries appear directly in the archive.
With Normal archives, if a frame appears more than once in a source clip, the frame is archived only once. This saves space on the archive and is most noticeable if your clips contain many still shots.
In a Normal archive, each source clip is archived individually, making restoring individual clips easier and faster and ensuring that frames are output to tape in play order. This makes clips viewable on a VTR archive.
Compact archives optimize archiving. If a frame appears more than once in any clip being archived, the frame is archived only once. No image data for duplicate frames is archived. This saves a significant amount of space on the archive if your clips contain a lot of duplicate frames.
When you create a Compact archive, the archived material is stored in a backup set. You can expand the backup set in the archive library to view and select the clips. You can restore selected clips from a Compact backup set without having to restore the entire archive.
Compact archives are the recommended archive type for Autodesk® Smoke® and Backdraft Conform projects since they are usually archived as a whole.
To archive entries from a clip library:


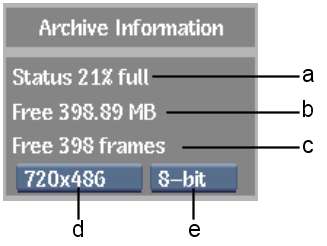
(a) Percentage of space used (b) Available space in MB (c) Available space in frames (d) Resolution box (e) Bit Depth box
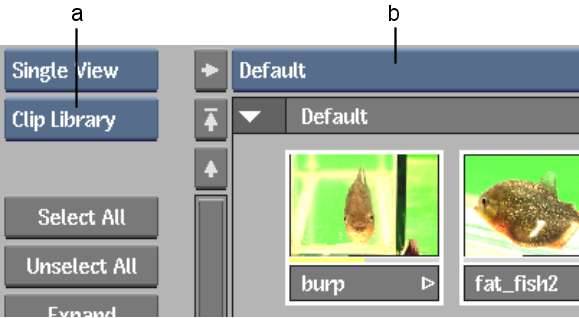
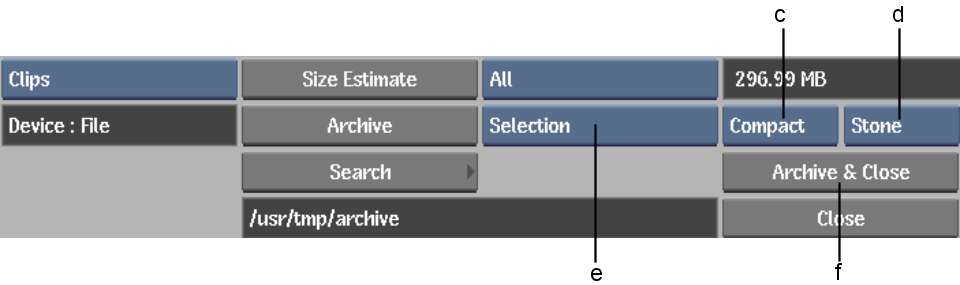
(a) Library Type box (b) Clip Library box (c) Backup set box (d) Archiving Mode box (e) Entry Type box (f) Archive & Close button
Images courtesy of Technicolor (formerly Toybox) and Das Werk
| Select: | To: |
|---|---|
| Compact | Maintain a highly organized archive and save space on the device. |
| Normal | Archive without using a backup set. Entries are archived directly to the table of contents. Source clips remain in play order on tape. |
| Select: | To: |
|---|---|
| Stone | Write the clip to the framestore and archive the content of the media file. |
| Linked | Archive only the path to the media file. |
| Select: | To archive: |
|---|---|
| Project + Shared | Project EditDesk, setup directory, clip libraries, shared clip libraries, and metadata |
| Project | Project EditDesk, setup directory, clip libraries, and metadata |
| Project Libraries + Shared | Current project clip libraries and imported (shared) clip libraries |
| Project Libraries | Current project clip libraries |
| Selection | Selected entries |
The selected entries are saved to the archive. If the archives do not fit in the first file, tape device, or VTR tape archive, perform the following steps.
Messages reflecting the process status are displayed in the message bar. When your intervention is required, follow the instructions.
Backdraft Conform automatically archives the material onto the tape and updates the header information to account for the material being split onto more than one tape. When this process is complete, the related message appears.
The procedure for archiving to Tape 2 is the same as for Tape 1. Follow steps 10 to 12.
The corresponding message appears when all the selected material has been archived successfully.


