This is the Auto-Capture menu.


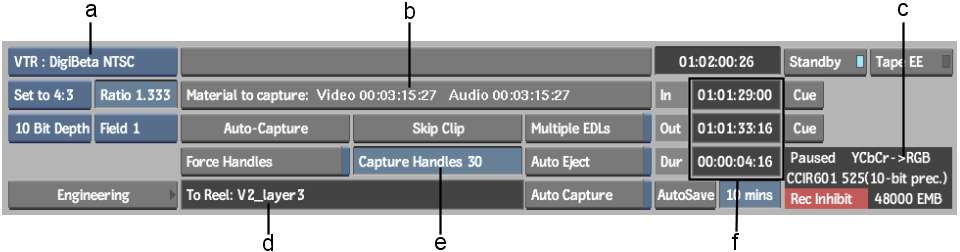
(a) Device Name box (b) Material to Capture status bar (c) VTR Status display area (d) Library Reel field (e) Capture Handles field (f) Timecode fields
Device Name boxSelect the device from which you will be capturing media.
Material to Capture status barDisplays the time remaining for capturing the selected video and audio.
Auto-Capture buttonClick to display the capture options. From the menu that appears, select the appropriate option for the capture.
| Select: | To: |
|---|---|
| Capture This Tape | Capture clips on the currently loaded tape. |
| Skip This Tape | Skip the current cassette and proceed to the next tape. |
| Abort Capture | Abort the auto-capture. |
Captured events are indicated in the event number column by an x sign.
Skip Clip buttonSkips the clip being captured. The capture is aborted and the events are marked as “skipped.” The next time you click Auto-Capture, the capture is started at the first event following the skipped clip. To reset, exit and enter the Auto-Capture menu.
Multiple EDLs buttonCaptures multiple EDLS.
VTR Status display areaDisplays the current status of the VTR. Different information is displayed under certain conditions. Depending on the model of the VTR, you may be able to change the Tape EE and Standby boxes. See Verifying the VTR Status.
Engineering buttonClick to display options for auto-capturing an EDL. See Setting Video Input and Output Engineering Menu Controls.
Library Reel fieldDisplays the Library Reel.
Force Handles buttonEnable to ensure that the clip contains the number of handles that you want. The next time that you capture the EDL,the clips that do not have as many handles as defined in the Capture Handles field are recaptured. By default, clips are not recaptured if the specified material already exists on the reel, as defined in the Source In and Source Out entries of the EDL.
Capture Handles fieldEnter the number of extra frames to use as handles before and after the specified material. Capture handles are set by default based on the project frame code mode. If specifying more handles causes material to overlap, or if fewer than 10 frames separate events, the material is captured as a single clip.
When capturing using keycode data, if the keycode for the frames in the handles does not follow the keycode for the captured segment sequentially, then those handles are not captured.
Auto Capture buttonEnable to automatically begin capturing when you insert the tape into the VTR.
Auto Eject buttonEnable to automatically eject a tape after it has been captured. The last tape of a capture session is not ejected.


