Chapter 20, Video Capture and Video Playout
| Controlling the VTR | Playout Menu Options | ||
Chapter 20, Video Capture and Video Playout |
|||
 Selecting a Raster for Capture
Removing Pulldown when Capturing
Performing a Live Capture from a Non-Controlled Source
Use the Capture menu to digitize material from an external source. You can digitize in any one of the following ways:
Digitize one event at a time by capturing from timecode values. See Capturing from Timecode.
Batch digitize from a Log file. See Logging and Batch Digitizing.
Batch digitize from an imported EDL. See Auto-conforming an EDL.
Perform a live capture from non-controlled sources. See Performing a Live Capture from a Non-Controlled Source.
For certain video formats, you can remove pulldown when capturing. See Removing Pulldown when Capturing.

Whenever capturing material, you must select a raster. For a list of the supported rasters, see Supported Video SDI and GFX SDI Rasters.
Note: When you select a drop frame (DF) video format, the timecodes are calculated in Drop Frame mode.
In the Video Device SDI group, toggle the Video/Graphics option box to display your video card (AVIO). See Capture Menu Options.
Select an option from the Link Type box. Select Single for a 4:2:2 video signal, and Dual for a 4:4:4 video signal.
Toggle the Format option box to the required raster format (SD, HD, Film, or Audio).
In the Raster list, select the raster that matches the material to capture.
 "Show full-size image")
Note: If clicking on a raster in the Raster list does not select the item, that format is not available for capture on that system.
(Optional) Remove 3:2 pulldown frames on capture. See Removing Pulldown when Capturing,
Depending on the type of source material you are working from, you may need to remove 3:2 pulldown frames at capture time. For more information about 3:2 pulldown, see About 3:2 Pulldown.
Note: Inconstant cadence material (i.e. re-edited material) may produce jittery results.
Click Pulldown.
Use the VTR to shuttle to the first frame you want to capture.
 "Show full-size image")
|
Enable the Pulldown Field button that matches the field composition of that frame.
You can set in and out points to select the material to capture from an external video source.
Set the in point. Use one of the following techniques:
Enter the in point timecode by typing the value directly in the In field.
Navigate to the in point using the VTR transport controls, and then, in the Capture from group, click Set next to the In field.
 "Show full-size image")
Set the out point. Use one of the following techniques:
Enter the out point timecode by typing the value directly in the Out field.
Use the VTR transport controls to navigate to the out point, and then, in the Capture from group, click Set next to the Out field.

 "Show full-size image")
In capturing from timecode mode, you capture one shot by marking the length of the shot with in and out timecode values. You can either enter the timecode values manually or scrub the VTR to the in and out points.
Click Editing, and then click Capture.
The Capture menu appears.
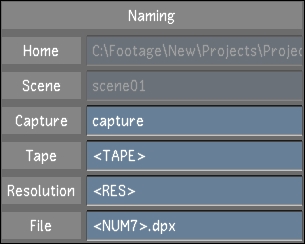
In the Naming group, enter values in Capture and Tape. See Capture Menu Options.
 "Show full-size image")
Select a raster for capture. See Selecting a Raster for Capture.
In the Sync Mode list, select a synchronization option. See Capture Menu Options.
In the Video Capture Format list, select a file format. See Capture Menu Options.
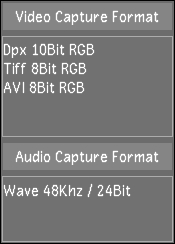
 "Show full-size image")
Note: The AVI format is only available on Windows workstations.
(Optional) Set video and audio capture delays. See Capture Menu Options.
Select the video and audio tracks to capture. See Capture Menu Options.
Set the in and out points. See Setting In and Out Points.
In the Capture from group, click TC. When the button turns red, click it again to confirm the action.
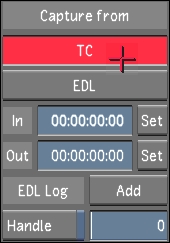
 "Show full-size image")
The capture starts. The VTR shuttles back to the in point and begins capturing. The VTR's current timecode and remaining timecode are displayed in a field located to the left of the playback controls. While capturing, both timecodes update and appear in red.
 "Show full-size image")
|
|
During capture, the message "Capturing from tape..." appears in the Player, and progress bars display shot, tape, and overall progress. There is no video displayed in the Player during capture.
 "Show full-size image")
|
|
|
(Optional) To pause the capture process to access additional capture options, press Esc, and then do one of the following:
Press Esc to abort the capture.
Press E to restart the capture.
Press S to skip the current tape.
You can log shots and batch digitize them. To do this, you shuttle through the tape, mark in and out points that correspond to the sections you want to digitize, and then add those sections to a list of shots to digitize all at once.
Note: This operation only logs and captures video.
Click Editing, and then click Capture.
The Capture menu appears.
Select a raster for capture. See Selecting a Raster for Capture.
In the Video Capture Format list, select the file format that you want to create during the capture operation.
In the Naming group, enter values in the Capture and Tape fields. See Capture Menu Options.

|
Warning: It is important that you enter a tape name to avoid overwriting previously captured files. |
Set the in and out points. See Setting In and Out Points.
In the EDL Log group, click Add to add the selected material to the events list.

 "Show full-size image")
To view the events list, click Editing, and then Assemble.
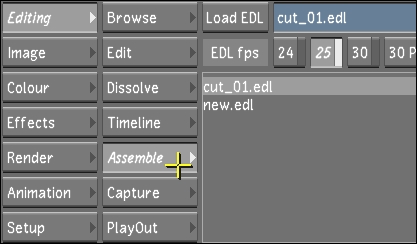
 "Show full-size image")
You need to mark the captures before returning to the Capture menu: click in the Event column to select an entry, or click Select All, and then click Mark for Capture.The entries marked for batch digitization appear in the Assemble menu.

 "Show full-size image")
Continue adding entries to the events list as needed.
(Optional) To delete an entry from the events list, select it from the Assemble window and click Delete Selected. Click it a second time to confirm the action. To clear the list, click Delete All.
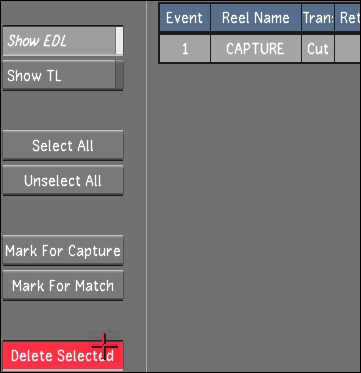
 "Show full-size image")
When you are ready to digitize, return to the Capture menu.
In the Capture from group, click EDL once and then confirm the action by clicking EDL a second time.

 "Show full-size image")
You can automatically digitize material using instructions contained in an EDL, and then assemble the digitized events into a cut which appears in the Storyboard and the Timeline.
You can batch digitize from an EDL that has been placed in the current scene's sacc_data directory. This directory is located under <HOME>\<scenename>\.
Make sure your EDL file is in the scene's sacc_data directory.
Note: If the file is in the wrong location, it will not show up in the EDL list.
Click Editing, and then click Capture.
Select a raster for capture. See Selecting a Raster for Capture.
Click Assemble to access the Assemble window.
Select an EDL file from the EDL list. Ctrl-click the EDL list to refresh it.
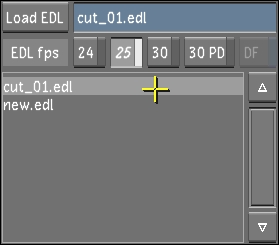
 "Show full-size image")
Click Load EDL to display the EDL contents in the Assemble menu.
Select individual events to capture (Ctrl+click), a group of events (Shift+click), or click Select All.
Click Mark for Capture.
 "Show full-size image")
The selected events are marked as Need Capture under the Media column of the EDL events.
Click Capture.
In the Video Capture Format list, select the file format that you want to create during the capture operation. See Capture Menu Options.
In the Naming group, enter values in the Capture and Tape fields. See Capture Menu Options.
Click EDL once, and then confirm the action by clicking EDL a second time.
The Capture starts.
When capture is completed, add the new shots to the Shot bin. See Loading Shots into the Shot Bin.
Go back to the Assemble menu and assemble the EDL. See Assembling an EDL.
Click Browse to display the Browse menu.
Enter the name for the new cut in the Cut name field.
Click New.
The new cut is saved and named after the captured EDL.
You can capture live from any non-controlled source. A non-controlled source is any source with an SDI Out, such as another Lustre workstation, or a Smoke or Flame workstation. For example, you have footage residing on a Flame workstation that you need. You can connect to that workstation and input the footage directly, without going through tape output and input.
Connect the SDI Out of the non-controlled source to the SDI In on the video card of the Lustre workstation.
Click Editing, and then click Capture.
Select a raster for capture. See Selecting a Raster for Capture.
In the Capture from group, enter in and out points in the In and Out fields.
This is done in order to set the duration of the capture. The values can be anything, as long as they reflect the desired duration.
 "Show full-size image")
To start the capture, Ctrl+double-click TC.