Chapter 7, Editing
| Editing with the Storyboard | Changing Playback Speed | ||
Chapter 7, Editing |
|||
 Trimming the Head and Tail of a Shot
Changing In and Out Points for a Shot
Sliding the Cut Point between Shots
Use the Trimming tools to adjust the frames used in your edits. When you trim, you are either adding frames to or removing frames from the head or tail of the shots in your cut.
Be aware that timeline Solo and Ripple mode affects how the shots are trimmed in the Edit menu. If Solo is enabled, the Trim In/Trim Out and Mark In/Out tools default to Ripple End behaviour. If Solo is disabled, the Trim In/Trim Out and Mark In/Out tools behave according to the Timeline Ripple mode (see Trimming Ripple Mode and Slip & Slide Ripple Mode) and apply to the layer that the focus point is on.
You can trim by entering exact frame values, by dragging frames interactively, or by marking in and out points. You can also trim by sliding the cut point between shots or slipping the frames used in a shot.

When trimming, you will occasionally need information about the frames and timecode in your shots and cuts.
You can find shot information in the Edit menu.
For example, refer to the Src In field to determine if you can add a few frames to the start of the shot, or check whether you changed the length of the timeline by checking the value in the Length field.
You cannot enter values directly in these fields. They are updated when you scrub through the shot or Storyboard. For each field, the actual frame number is displayed, as well as the corresponding timecode value.
 "Show full-size image")
|
|
|
|
|
|
|
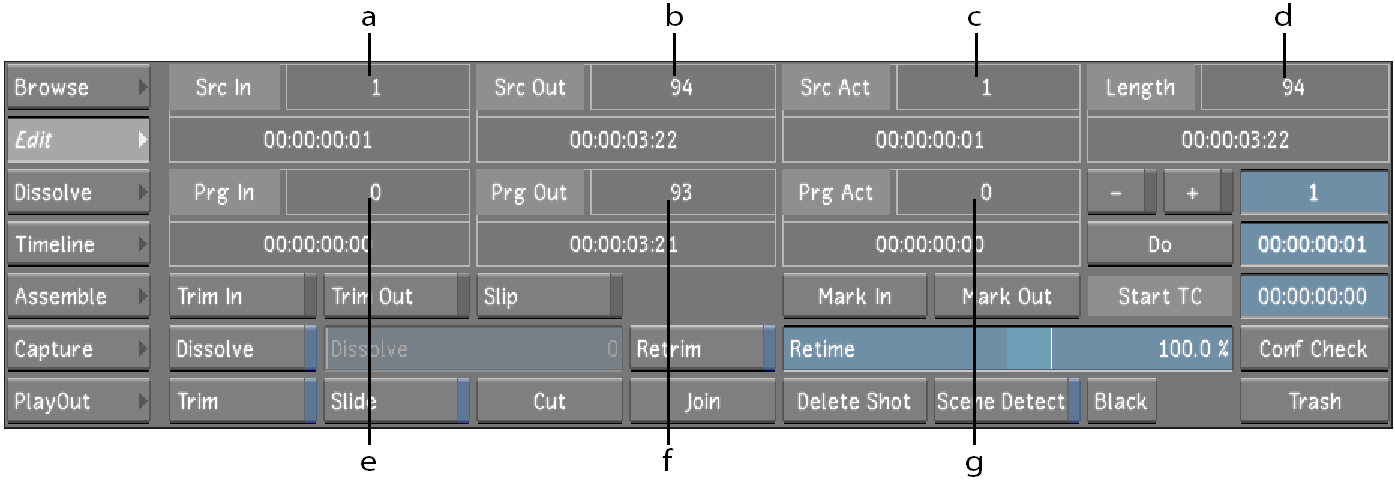
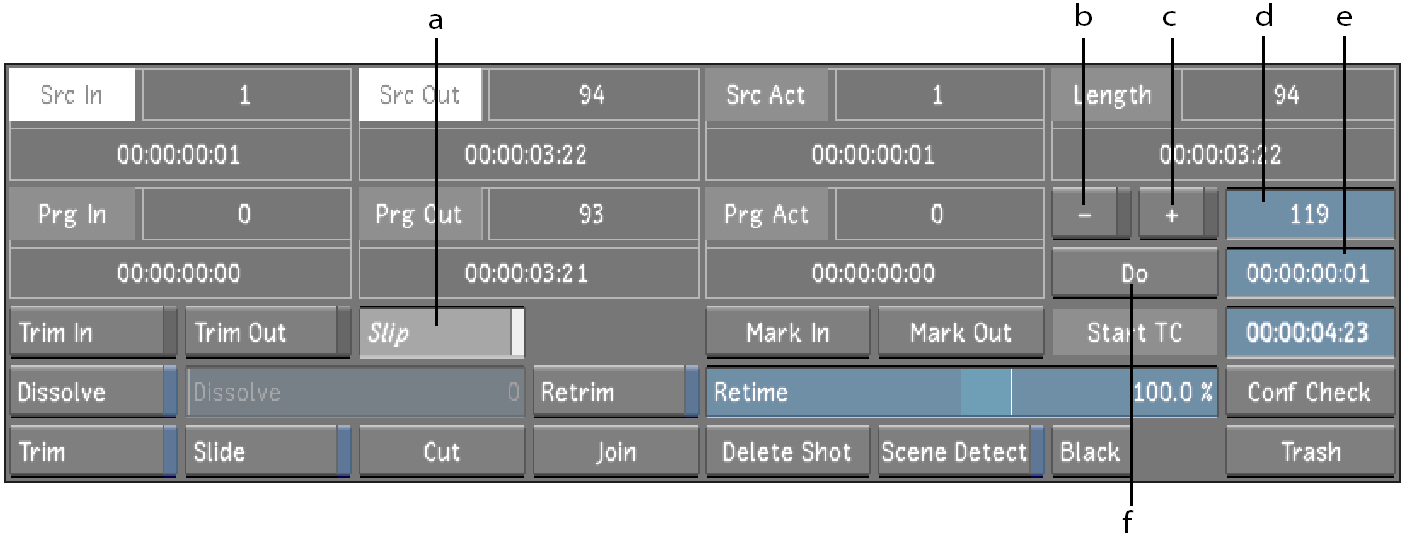
Use the following fields to view shot information.
Src In--Displays the selected shot's Mark In frame number and timecode.
Src Out--Displays the selected shot's Mark Out frame number and timecode.
Src Act--Displays the absolute frame number of the current frame in the source material.
Length--Displays the total length of the current shot in the timeline in frames and timecode.
Prg In--Displays the program in point for the selected shot.
Prg Out--Displays the program out point for the selected shot.
Prg Act--Displays the current program frame number of the timeline.
Note: The appropriate fields are highlighted when you enter an editing mode, indicating where editing operations affect your frames.
You can trim frames from the head or tail of one or more shots. The head is the first source frame that you specify to use in the shot. The tail is the last source frame that you use in the shot.
You specify the number of frames to trim from either the head or tail. If you do not want to change the overall length of your timeline, when you add frames to, or subtract frames from, one end of a shot, you should subtract from or add the same number of frames to the other end.
Remember that you cannot add more frames to a shot than the available number of handles. Also, you cannot trim a shot completely out of existence. If you want to delete a shot, use the Delete Shot button. See Deleting Shots.
Select the shot you want to trim in the Storyboard. The selected shot's border turns red. To select multiple shots on the Storyboard, right-click each shot. The borders turn aqua.
Note: You can only add frames if your shots have available handles.
Click Editing in the main menu, and then click Edit.
The Edit menu appears.

 "Show full-size image")
|
|
|
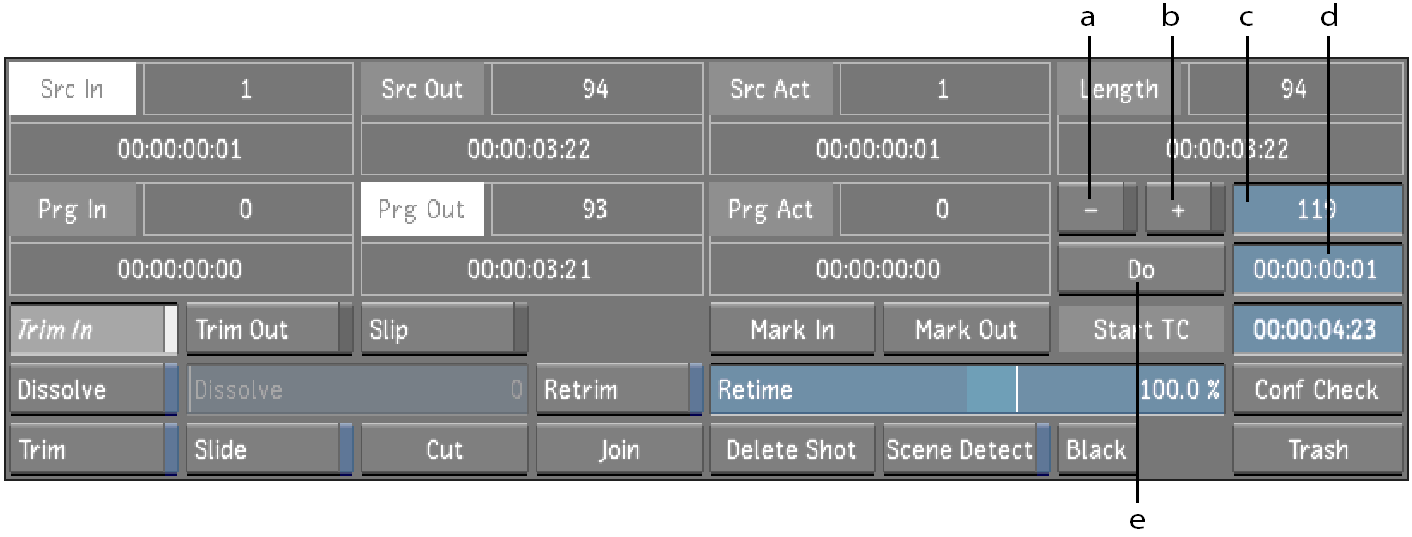
Click Trim In to go into Trim In mode.
Src In and Prg Out are highlighted because these values are changed by the Trim In operation.
Add frames to or remove frames from the mark in (or head):
Click + to add frames.
Click - to subtract frames.
 "Show full-size image")
|
|
|
|
|
Note: If you do not click either + or -, the trim operation removes an absolute number of frames.
Do one of the following:
Click the Do field, then click the frame field and enter the number of frames to add or subtract by using the numeric keypad. The frame number is converted into the corresponding timecode value.
Click the Do field and enter the timecode for the number of frames to add or subtract. The timecode is converted into the corresponding frame number.
Note: Ctrl-click the field to clear it.
Click Do.
The specified number of frames is added to or subtracted from the shot(s). The Length field is updated to display the number of frames now used.
Select the shot you want to trim in the Storyboard. The selected shot's border turns red. To select multiple shots on the Storyboard, right-click each shot. The borders turn aqua.
Note: You can only add frames if your shots have available handles.
Click Editing in the main menu, and then click Edit.
The Edit menu appears.
 "Show full-size image")
|
|
|
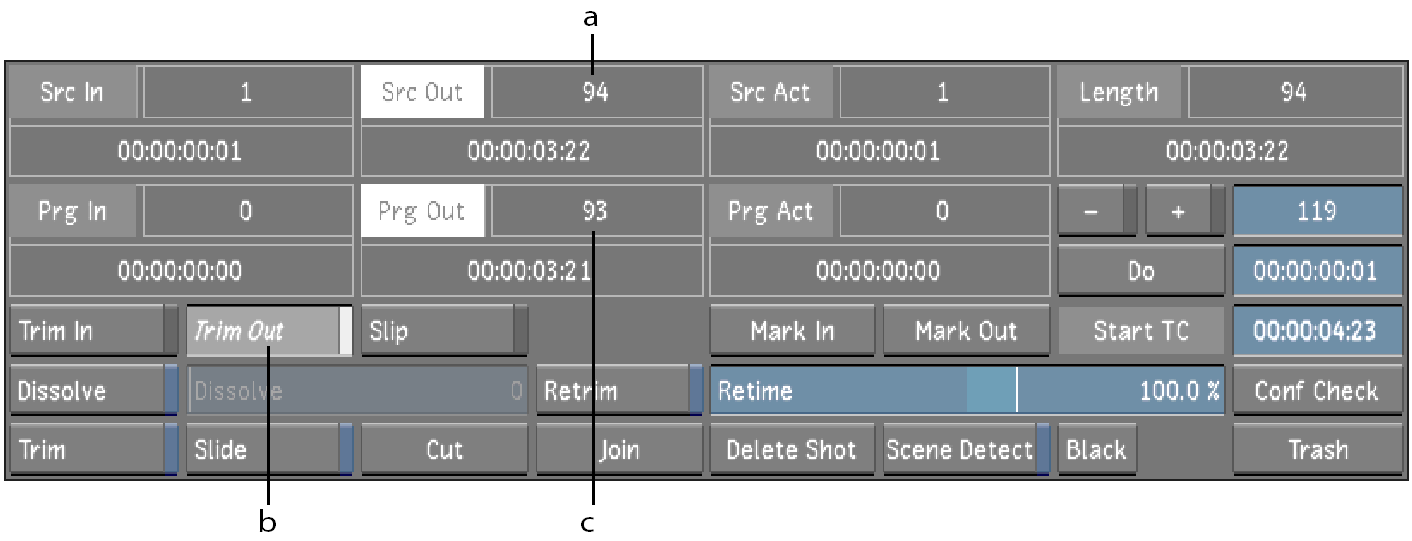
Click Trim Out to go into Trim Out mode.
Src Out and Prg Out are highlighted because these values are changed by the Trim Out operation.
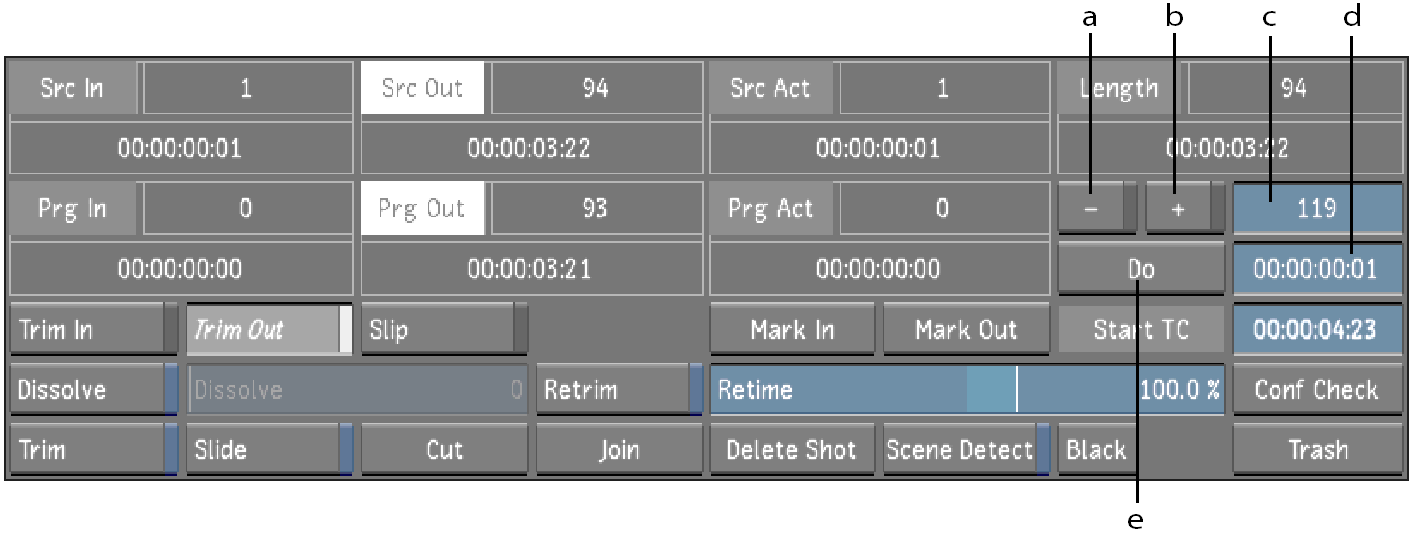
Add frames to or remove frames from the mark out (or tail):
Click + to add frames.
Click - to subtract frames.
 "Show full-size image")
|
|
|
|
|
Note: If you do not click either + or -, the trim operation removes an absolute number of frames.
Do one of the following:
Click the Do field, then click the frame field and enter the number of frames to add or subtract by using the numeric keypad. The frame number is converted into the corresponding timecode value.
Click the Do field and enter the timecode for the number of frames to add or subtract. The timecode is converted into the corresponding frame number.
Note: Ctrl-click the field to clear it.
Click Do.
The specified number of frames are added to or subtracted from the shot(s). The Length field is updated to display the number of frames now used in the shot.
You can slip the frames used in one shot without adjusting the shot's position in the timeline. You may need to slip your shot to synchronize action in the picture to the audio or because unwanted frames are appearing at either the head or tail.
Select the shot you want to slip in the Storyboard. The selected shot's border turns red. To select multiple shots on the Storyboard, right-click each shot. The borders turn aqua.
Note: You must have available handles to slip a shot.
Click Editing in the main menu, and then click Edit.
The Edit menu appears.
 "Show full-size image")
|
|
|
|
|
|
Click Slip to go into Slip mode.
Src In and Src Out are highlighted.
Slip forward or backward:
Click + to slip forward.
Click - to slip backward.
Do one of the following:
Click the Do field, then click the frame field and enter the number of frames you want to offset the shot by. The frame number is converted into the corresponding timecode value.
Click the Do field and enter the timecode for the number of frames to offset the shot by. The timecode is converted into the corresponding frame number.
Note: Ctrl-click the field to clear it.
Click Do.
The shot or shots are offset by the specified number of frames. The Src In and Src Out fields are updated to display the frames used.
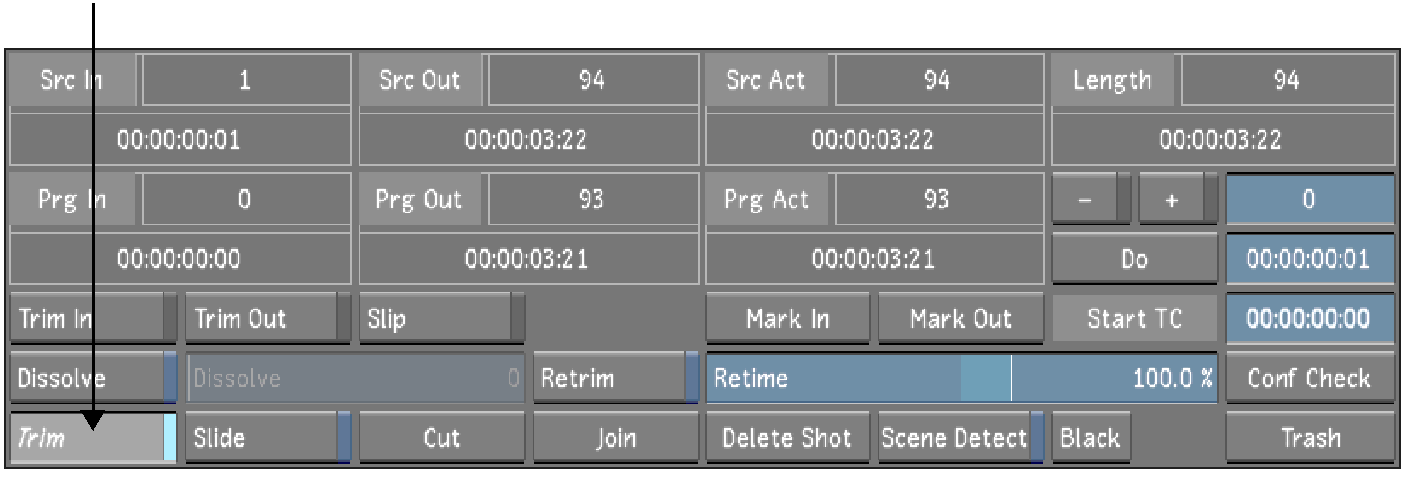
You can trim frames interactively. When you trim interactively, you scrub the Player to add frames to, or remove frames from, the in or out point.
In the Storyboard, select the shot you want to trim.
Click Editing in the main menu, and then click Edit to display the Edit menu.
Enable Trim.
 "Show full-size image")
Hint: If the Editing While Grading button is enabled in the User settings, you can start interactively trimming shots from any menu by pressing Shift+T. For more information about the Editing While Grading button, see System & Menu Settings.
In Trim mode, you see the first frame of the shot in the left viewer, and the last frame in the right viewer.
Do one of the following:
To trim frames at the head, click the left viewer and then drag the cursor left to add frames or right to subtract frames.
To trim frames at the tail, click the right viewer and then drag the cursor right to add frames or left to subtract frames.
For greater control of the trim operation, middle-click as you drag to decrease the start frame by one frame or right-click to increase the offset by one frame.
To exit the Interactive Trim mode, do one of the following:
Click Trim.
Press the Esc key.
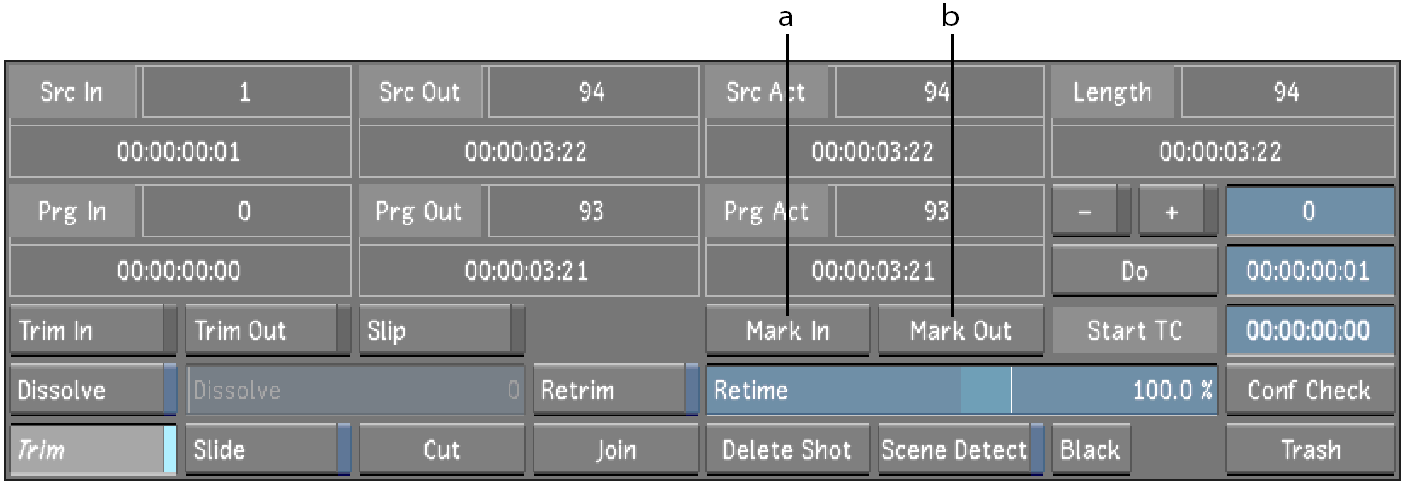
You can change the in and out points for a shot. This is like trimming, except you can only shorten a shot by changing the in or out points.
The in point is the first frame used in a shot. The out point is the last frame. Setting a new in or out point shortens the total length of a shot. The frames that you remove by changing the in or out point become available handles that you can use in later trimming operations.
In the Storyboard, select the shot you want to modify, and then scrub to the frame you want to mark as the in point.
Click Editing, and then click Edit.
The Edit menu appears.
 "Show full-size image")
|
|
Click Mark In.
The extra frames are trimmed from the head of the shot.
Scrub to the frame you want to mark as the out point.
Click Mark Out.
Extra frames are trimmed from the tail of the shot.
Note: You must go into one of the Trim modes to add frames back to the head or tail of the shot.
You can interactively move the cut point between two shots forward or backward, if handles are available. Using Slide does not adjust the overall length of your timeline. By removing frames from one side of the cut, you automatically add frames to the other side.
You may want to slide the cut point to synchronize the cut to audio or simply to use different frames in your shot.
In the Storyboard, select the shot to the right of a cut point.
Click Editing, and then click Edit to display the Edit menu.
Click Slide.

 "Show full-size image")
Hint: If the Editing While Grading button is enabled in the User settings, you can start interactive visual sliding between the current and the previous shot from any menu by pressing Shift+R. For more information about the Editing While Grading button, see System & Menu Settings.
In Slide mode, you see the outgoing frame before the cut in the left viewer and the incoming frame after the cut in the right viewer.
Drag in either viewer to move the cut point.
If both clips have available handles, drag to the left or right to move the cut point.
Frames are added to one side of the cut and subtracted from the other to keep the total timeline duration the same. When you run out of handles, you can no longer continue sliding in the same direction.
For greater control of the slide operation, middle-click the mouse to decrease the cut point by one frame or right-click to increase the cut point by one frame.
To exit the Interactive Slide mode, do one of the following:
Click Slide.
Press the Esc key.
The timeline is updated when you exit Slide mode.
You can cut a shot into two shots. This is useful when you want to insert cuts between scenes, or if you need to apply separate grades within a shot.
Note: If working on field-based material, you cannot apply a cut between two fields of an image.
In the Storyboard, scrub to the position where you want to introduce the cut.
Click Editing, and then click Edit to display the Edit menu.
Click Cut.
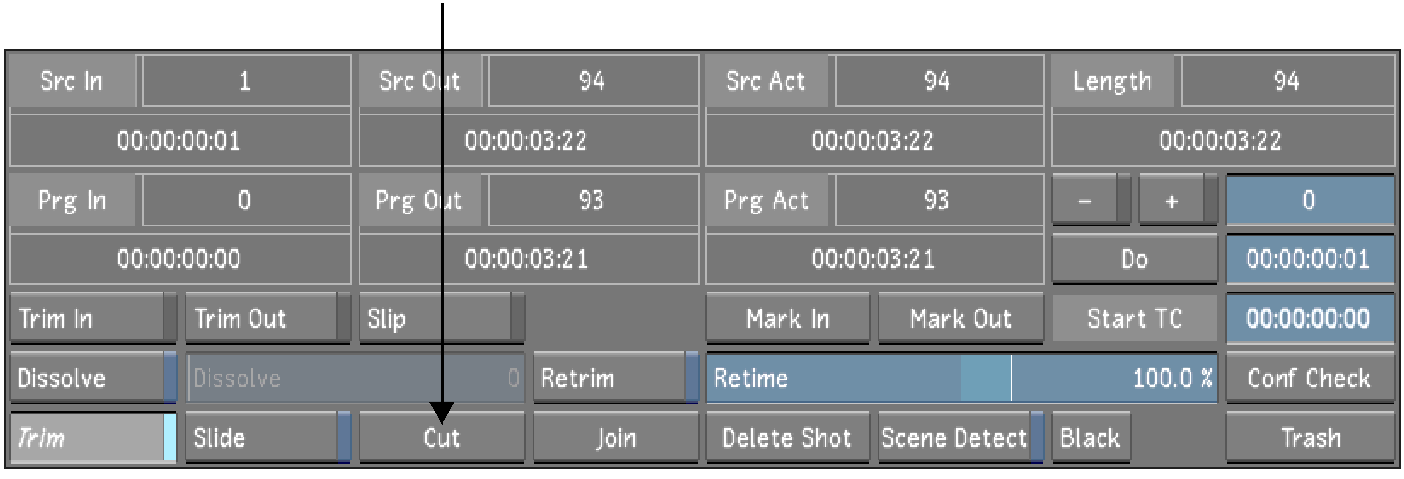
 "Show full-size image")
The shot is cut into two separate shots.
Hint: If the Editing While Grading button is enabled in the User settings, you can insert a cut from any menu by pressing Shift+C. For more information about the Editing While Grading button, see System & Menu Settings.
You can rejoin a shot that is cut. The shots have to come from the same original source, must be adjacent in the Storyboard, and must be incrementing timecode. Join recreates the original sequence, even if there is material missing from the current Storyboard. For example, if you create a cut and trim out something in the middle of the original shot, you can join the shots back together and the missing frames are put back.
In the Storyboard, select the right-most (also known as the B-side) of the previously cut shots.
Click Editing, and then click Edit to display the Edit menu.
Click Join.
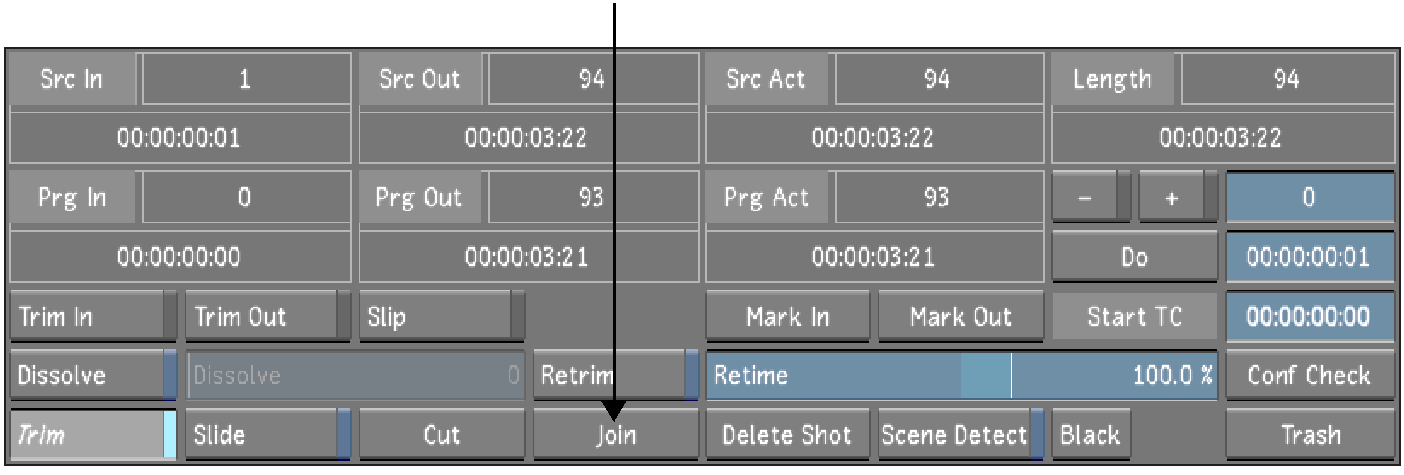
 "Show full-size image")
The shots are joined together.
Hint: If the Editing While Grading button is enabled in the User settings, you can join shots from any menu (except the Colourist Multi-Layer Timeline) by pressing Shift+J. For more information about the Editing While Grading button, see System & Menu Settings.