Decals can be assigned to objects either by using
an existing decal or by applying any non-decal material as a new
decal in the scene.
Assign an existing decal to objects
- Select the object or objects you want
to assign a decal to.
- Press the M key
(or select Material > Materials).
Several material categories are displayed.
TipIf you cannot select
objects or view the Material library, press Tab to
change from Presentation to Edit mode.
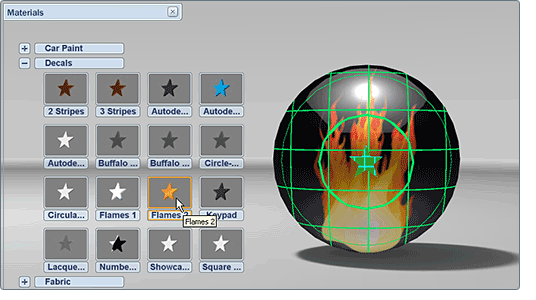
- Click on the Decals category
to see a list of library decals, or click on the Materials in
this Scene category to see decals you have
already used.
Decals in the materials
list have an icon in the shape of a star with the color of the decal material.
- Select a decal from the list.
The decal you choose is assigned to the selected
objects and the decal grip (a green star) is selected. The objects
the selected decal is applied to are highlighted in green.
- To edit the decal material (not the underlying
material) press Ctr+M (or select Material
> Material Properties... ) while the decal
grip is selected.
- To interactively adjust the decal texture
position on the object, press Shift+M to Move Texture with
the manipulator (which also opens the Material Properties dialog
box).
- To remove the material interface from
the display, press the M key.
The same decal material
cannot be assigned to a single object more than once. To work around
this, duplicate the decal material using the right-click menu in
“Materials in this Scene”. Assign the duplicate to the object.
Assign an existing material as a decal
- Select the object or objects you want
to assign a decal to.
- Press the M key
(or select Material > Materials).
- Click and hold the right mouse button
over any material to see a menu of options.
- Select Assign to Selection as
Decal.
The material you choose is assigned to the selected
objects as a decal, and a new decal material is created in the Materials
in this Scene list.
NoteIf
the material you Assign to Selection as
Decal is not a decal material, the decal texture
defaults to a star image.
- To edit the decal material (not the underlying
material) press Ctr+M (or select Material
> Material Properties... ) while the decal
grip is selected.
- To interactively adjust the decal texture
position on the object, press Shift+M to Move Texture with
the manipulator (which also opens the Material Properties dialog
box).
NoteLibrary materials Assigned
to Selection as Decal initially use Planar mapping, and
are Autofit to the selected objects.
- To remove the material interface from
the display, press the M key.
Replace a material on an object without
replacing its decal
- Select the object that has the decal
assigned to it.
- Right-click the material you want in
the Materials interface.
- Select Assign to Selection.
The material is assigned
and the decal is left intact.