Set up a turntable
- Press B to show
the Behaviors interface.
- Click the arrow beside the Create button
and select Turntable.
- Double-click over the name field of the
new behavior and type in its name.
This will help you identify
the turntable if you create several turntables.
- Press and hold the right mouse button
over the turntable icon, and select Properties from
the menu.
The Turntable Properties
window appears.
- Select the objects you want to place
on the turntable.
Drag a selection box
around an entire object to make sure all of its component objects are
selected.
- From
the right-button menu, select Add selection to turntable.
The number of selected
objects is shown in the window.
- Click
the Turntable Controls button
to play the turntable.
- If you need a simple turntable, you may
not need to change any other settings. The following settings are
available should you want to change the behavior of the turntable:
Play the turntable animation
- Press B to see the Behaviors interface.
- Click and hold the right mouse button
over the turntable you want to play.
- Select Turntable Controls from
the menu.
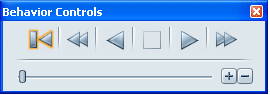
The Turntable Play Controls
window appears.
The
window provides the following controls:
|
|
Play the animation forwards/backwards.
|
|
|
Stop the animation.
|
|
|
Nudge the animation forward or
backward, degree by degree (when you want to focus in on a design
feature):
|
|
|
Reset the animation (the objects
return to their original position at 0 degrees) Tip! Click
this button before you start to modify your scene again.
|
|
|
Speed up or slow down the animation.
The new speed becomes the default value in the Turntable Properties
window.
|
|
|
Move the turntable to a particular
point.
|
Add turntables to Storyboards
Turntables
can be added to Storyboard slides and triggered with different playback options
when the slide is played. For more information, see
Add behaviors to a slide.
To learn more about Storyboards,
see
Set up a storyboard.
Adjust how objects rotate
around the turntable pivot
After you set up the turntable animation
and play it, you may want to change the pivot so that the assigned
objects rotate more tightly or loosely. For example,
- If the pivot is positioned at the center
of the assigned objects, the turntable animation will behave as
a traditional showroom animation.
- The further the pivot is positioned from
the assigned objects, the greater distance the objects will travel
around the scene.
By default, the pivot
is at the origin of the environment.
Change the pivot location
- Press B to see the Behaviors interface.
- Press and hold the right mouse button
over the turntable icon, and select Properties from
the menu.
The pivot appears when
the Turntable Properties window is open:
- Move the pivot along the floor by dragging
its green or red handles.
- Click the Move objects to pivot button
to center the assigned objects over the pivot.
Or, click the Move
pivot to objects button to move the pivot
to the center of the objects.
- Enter
absolute values in the Turntable Pivot X
and Y fields (and Z, if using rotisserie) to precisely position
the pivot, or adjust the automatic or interactive positioning.
Add more objects to the turntable
- Select the objects you want to add.
- From the Behaviors interface, click and hold
with the right mouse button over the turntable icon and select Add
selection to from the menu.
(Or, from the Turntable
Properties window, click the Choose button
and select the menu choice Add selection to.)The
selected objects are included in the turntable animation.
Remove selected objects from the turntable
animation
- Select
the objects you want to remove.
- From the Behaviors interface, select
the turntable, click and hold with the right mouse button, and select Remove
selection from.
(Or, from the Turntable
Properties window, click the Choose button
and select the menu choice Remove selection from.
The selected objects are removed from the objects associated with
the turntable animation, and will no longer turn when the animation
is played.
Remove all objects from the turntable
- From the Behaviors interface,
select the turntable, click and hold with the right mouse button
over the behavior icon, and choose Select Contents.
All objects associated
with the turntable animation are selected.
- From the turntable’s right mouse button
menu, select Remove selection from.
All of the objects are
removed from the turntable animation.