This example is somewhat more involved in that it uses the Eval time function within a Reaction node—see Time Functions and Basic Compositing in Reaction.
This example has two parts. First you'll set up the display and then you'll create the animation.
NoteIt is assumed that you currently have a Player, Schematic, and Composition Browser open. With the focus on Schematic, use
Ctrl + N (Windows and Linux) or Cmd + N (Mac OS) to create a new composition.
Before you begin, make sure that you set the Player display settings as follows.
To set Player display settings for Reaction:
- Open the Gate UI and swipe south to display the Player options.
The Player control panel is displayed across the bottom of the screen. By default the Display tab is selected and you can
immediately access the display settings and options.
- Select Tool Output to view the results of the Reaction composition in the Player.
- Under Guides, select Frame Outline.
- Under Reaction, select Interactivity.
To create an animation in Reaction using expressions:
- From the Tools tab, drag the Reaction tool to the dependency graph in the Schematic view, and connect it to the Output node.
NoteUsually, before you composite or add effects such as an animation in Reaction, you typically set the background. The background
is the rendering plane for the composition and sets the format. If you connect a Reaction tool to an image or tool output
in an existing dependency graph, the background is set automatically. You can change the background at any time.
- Select the Reaction tab.
- In the Player controls, change the composition's total number of frames to 100.
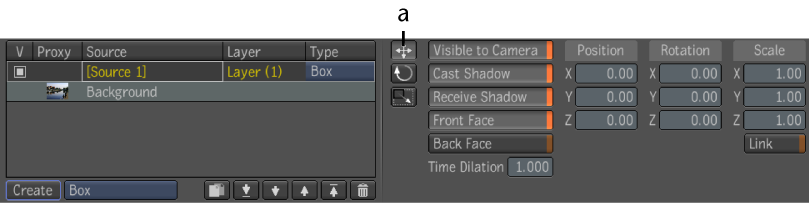
- At the bottom of the Layer Editor, select Box and click Create.
A new layer (a cube) is added to Reaction. Rename the layer by clicking in its text field and pressing F2. Type in the new name, Box1, and press Enter.
Depending on which preset you have chosen to view, the box you have created most likely takes up the entire Player view.
- Select the Reaction tab.
NoteTo help you create an appropriate view of the animation, you can modify the Player view by adjusting the zoom—see
Zooming and Panning.
- Use the Translate tool to move the box to the bottom-left corner of the view by grabbing the X or Y axis with the cursor.
If you do not see the axes icon in the Player, go to the Player display options and select Tool Output under Display, and
Icons under Guides.
- Mark the X and Y Position attributes for keyframing.
- Select Autokey.
- Using the Translate tool, create a motion path with the cube in Autokey to the right-hand side of the Player view. Try to
span all 100 frames.
- Play the animation.
- Select the Reaction tab and create a second box, Box2, layer by following steps 5 through 8.
- Right-click in Box2's X Position attribute value field and select Set Expression.
The Expresso Calculator appears.
- Insert the following expression.
- Repeat steps 12 and 13 for Box2's Y Position attribute, but make sure the Position token is replaced with a Y.
- Play the animation.
This expression indicates that the X and Y Position attributes of Box2 are being driven by the X and Y Position attributes
of Box1. There is also a time offset of one second (or number of frames per second) added to the expression.
NoteUnfortunately, it is beyond the scope of this guide to provide examples of all the expressions and possible combinations of
functions that you can use to drive animations. The examples provided are just a small sampling of what is available. It is
strongly suggested that you explore the use of expressions as they can prove to be an extremely powerful tool in creating
complex effects and saving time.
 Except where otherwise noted, this work is licensed under a Creative Commons Attribution-NonCommercial-ShareAlike 3.0 Unported License