


Keyframe two characters
on separate animation layers
This workflow is useful if you have two characters interacting closely in your scene. You want to key both characters at the same time, but you also want to organize your keyframes separately, making it easier to go back and tweak them individually.
You can use a similar workflow if you have a complex single character with many custom controls and body parts. For example, if you have a custom control for each of the character’s fingers, you can animate each control on a separate layer.
To keyframe two characters on separate layers
The layers are named AnimLayer1 and AnimLayer2 by default. You will use these two empty layers as parents to organize two layer hierarchies, one for each character.
 to create
an animation layer. Rename the layer “Char1_Hips”.
to create
an animation layer. Rename the layer “Char1_Hips”.
By default, all of the hips attributes are added to the layer. See Add and remove attributes from animation layers for information on adding and removing other attributes.
 -drag
to parent the Char1_Hips layer to the Character1 parent layer.
-drag
to parent the Char1_Hips layer to the Character1 parent layer.
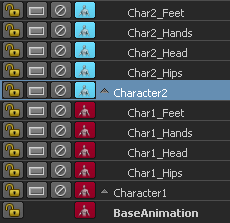
Now that you have the two layer hierarchies set up, you can select the hips of both characters and keyframe them at the same time. The keyframes for each character are automatically set on their separate layers. (See also Keyframe objects on animation layers.)
Notice that the Char1_Hips
and Char2_Hips layers both display a green “traffic light”  . This
indicates that both layers are active and will receive keyframes
when you set a key.
. This
indicates that both layers are active and will receive keyframes
when you set a key.