Animation Layer Editor menu bar


The Animation Layer Editor includes three main menus:

Layers menu

The Layers menu contains the following items.

Create Empty Layer

Creates an empty animation layer.

Create Layer from Selected

Creates an animation layer that (by default) contains all of the selected object’s attributes.

Create Override Layer

Creates an empty animation layer set to Override mode.

Create Override Layer from Selected

Creates a new animation layer that (by default) contains all of the selected object’s attributes, and sets the layer to Override mode.

Create Layer Options

The Create Layer Options let you set which modes new layers will use. Select from the following options:

Passthrough (Override Only)

Sets new Override layers to Passthrough mode. See Override-Passthrough mode.

Rotation Accumulation By Component

Sets new layers to use By Component Rotation Accumulation mode. See Rotation Accumulation.

Rotation Accumulation By Layer

Sets new layers to use By Layer Rotation Accumulation mode.

Scale Accumulation Multiply

Sets new layers to use Scale Multiply Accumulation mode. See Scale Accumulation.

Scale Accumulation Additive

Sets new layers to Additive Scale Accumulation mode.

Add Selected Objects

Adds attributes of the selected object(s) to the selected animation layer(s). See Add and remove attributes from animation layers.

Add Selected Objects >

Opens the Add Objects To Animation Layers Options, letting you add groups of attributes to the layer. Select from the following options:

All keyable

Adds all of the selected object’s keyable attributes to the selected layer.

From Channel Box

Lets you add attributes selected in the Channel Box to the selected layer. When this option is selected, you can select attributes in the Channel Box and use Layers > Add Selected Objects to add them to the selected layer.

All Keyable Except

Lets you add all keyable attributes except attributes of a certain type. Use the list to select which attribute types to exclude:

  • Translate
  • Rotate
  • Scale
  • Dynamic
  • Boolean
  • Enum
Remove Selected Objects

Removes all attributes of the selected object(s) from the selected layer(s).

Extract Selected Objects

Extracts the selected object from the selected layer and places it on a new layer. The new layer is named after the selected layer, plus the suffix _extract.

Select Objects

Selects all objects in the scene that have attributes assigned to the selected layer(s).

Copy Layer

Creates a duplicate of the selected layer(s), containing all of the same attributes and animation.

Copy Layer (No Animation)

Creates a duplicate of the selected layer(s) containing all of the same attributes (and none of the animation).

Merge Layers

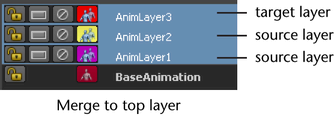
Merges the selected animation layers. See Merge animation layers.

Merge Layers >

Opens the Merge Layer Options. Select from the following options.

NoteSeveral of the Merge Layer Options are the same as those in the Bake Simulation Options window.

Merge To

Set which direction you want the merge to occur in the stack. Select from the following options:

Top Selected Layer

Merges the selected layers to the selected layer that is highest in the stack. (The highest layer in the stack is the ‘target’ layer, all other layers are ‘source’ layers.)

Bottom Selected Layer

Merges the selected layers to the selected layer that is lowest in the stack. (The lowest layer is the ‘target’ layer, all other selected layers are ‘source’ layers.)

Layers Hierarchy

Sets whether child layers have to be selected to be included in the merge. Select from the following options:

Selected

Child layers must be selected to be merged.

Include Children

Child layers of any parent layer being merged are included, even if they are not selected individually.

NoteIf Include Children is turned off, parent layers are not deleted after the merge, even if you have Delete Baked Layers on. The objects and animation from the parent layer are merged and the empty parent layer stays parented to its child layer(s).

Result Layer Mode

Sets the mode of the result layer. Select from the following options:

Automatic

Sets the layer to Additive mode unless any of the merged layers is in Override mode. If any merged layer is in Override mode, the result layer is in Override mode.

Additive

Sets the result layer to Additive mode.

Override

Sets the result layer to Override mode.

Delete Baked (Merged) Layers

When on, animation layers are deleted after their objects and animation are merged.

NoteIf Include Children is off, parent layers will not be deleted even if you have Delete Baked Layers on.

When off, empty animation layers are kept in the stack after their objects and animation are merged.

Sample by

Sets the frequency with which Maya evaluates the animation layers and generates keys. See Sample By in the Bake Simulation Options.

The default value is 1.

Smart Bake
Increase Fidelity
Fidelity Keys Tolerance
Extract Non-Layered Animation for Selected Objects

Extracts any non-layered animation from selected objects onto a new layer. See Extract animation to or from an animation layer.

Extract Non-Layered Animation for All Objects

Extracts any non-layered animation for all objects in the scene onto a new layer. See Extract animation to or from an animation layer.

Select All

Selects all animation layers in the stack.

Select Branch

Selects all child layers in the hierarchy below the selected parent layer(s).

Select Layer Node

Selects the animation layer node and displays the node’s attributes in the Channel Box.

Export Layer

Lets you export a selected layer as a separate file. The exported file includes the layer node, its animation curves and blend nodes. See Import and export animation layers.

Export Branch

Lets you export the entire hierarchy of layers below a selected parent layer.

NoteYou can only export one branch at a time.
Membership

Opens the Relationship Editor for animation layer(s) so you can add and remove attributes. See Add and remove attributes from animation layers.

Attribute Editor

Opens the Attribute Editor for the selected animation layer.

Delete

Deletes the selected layer(s) and all associated animation curves. See Delete or empty animation layers.

Empty

Removes all attributes and deletes animation curves from the selected layer.

Delete Empty Layers

Deletes any layers in the stack that have no attributes assigned.

Layer Mode

Sets the main animation layer mode. (See Animation layer modes for more information.) Choose from the following options:

Additive

Sets the layer to Additive mode.

Override

Sets the layer to Override mode.

Passthrough

Sets the layer to Override-Passthrough mode.

Rotation Interpolation

Lets you set whether objects with rotation attributes on animation layers use Euler or Quaternion Slerp interpolation. You can set this mode for selected objects on a layer, for all objects on a layer, or for selected objects on all layers.

For more information on these interpolation types, see also Quaternion Slerp and Independent Euler.

Select from the following options:

  • Euler for selected objects on layer
  • Euler for all objects on layer
  • Euler for selected objects on all layers
  • Quaternion Slerp for selected objects on layer
  • Quaternion Slerp for all objects on layer
  • Quaternion Slerp for selected objects on all layers
NoteNo keys (including tangents) are modified when you switch between Quaternion Slerp and Euler interpolation modes.

See also Animated rotation in Maya.

Rotation Accumulation

When the same rotation attributes are added to multiple animation layers in the stack, this option lets you set how the rotation curves of the selected layer combine with any preceding layers that share the same attributes.

Select from the following options:

By Component

Rotation values are weighted per component and the result rotation curves are calculated by adding each independent Euler XYZ value.

By Layer

Rotation values are weighted per layer, and the result rotation curves are calculated using concatenated quaternion values.

NoteThis calculation can vary depending on whether layers are in Additive or Override mode. For Additive layers, the calculation involves adding weighted rotation values. For Override layers, the calculation uses a Quaternion Slerp blend between layers.

Scale Accumulation

When the same scale attributes are added to multiple animation layers in the stack, this option lets you set how the scale curves of the selected layer combine with any preceding layers that share the same attributes.

Select from the following options:

Multiply

Independent XYZ scale values per layer are calculated using the layer weight value as an exponent, and result scale curves are calculated by multiplying each independent XYZ scale value.

Additive

Result scale curves are calculated by adding each independent XYZ value.

Package Into Assets

Creates an asset for each animation layer in the stack, and for the BaseAnimation. The related nodes for each layer (including the layer node, blend nodes, and animation curves) are automatically placed in the asset.

See Package animation layers into assets.

Options menu

The Options menu contains the following items:

Key in Selected Layer(s)

When this keying mode is active, keyframes are set only in animation layer(s) you have selected. Use this keying mode if you want to keep your workflow simple and manually select each animation layer to set keys on it.

ImportantWhen using this keying mode, you must select the BaseAnimation bar to set keys on objects that are not included on animation layers.

If the attributes you are keying are not found in the selected animation layer, or if the selected layer is locked, no keyframes are set.

Each attribute can be keyed on only one layer at a time, so if you select more than one layer, Maya determines which of the selected layers receive keyframes.

For example, if the last selected layer in the stack does not contain one of the attributes you are keying, or if that layer is locked, Maya checks the next selected layer, and so on. If none of the selected layers includes the attribute, or if all selected layers are locked, no keyframes are set.

See also Keyframe objects on animation layers.

Key in Last Active Layer(s)

When this keying mode is active, Maya automatically determines which animation layer receives keyframes, regardless of which layer you have selected. Use this keying mode if you want Maya to place keyframes on the best layer automatically, without you manually selecting the layer first.

When you use this mode, Maya places keyframes on the last active layer for the object or attribute you are keying. The last active layer is the last layer in the stack that contains the keyed attribute and is currently unlocked.

If the last layer is locked, keyframes are set on the next active layer in the stack, and so on. If the selected object or attribute has no unlocked animation layers, keyframes are set on the BaseAnimation.

See also Keyframe objects on animation layers.

Hybrid

This is the default and recommended keying mode for animation layers, and it combines the functionality of the Key in Selected Layer(s) and Key in Last Active Layer(s) modes.

When you use this keying mode, keyframes are set on the animation layer you have selected. If no layers are selected, or if the selected layer does not contain the objects or attributes you are keying, Maya automatically places the keyframes on the last active layer in the stack. (The last active layer is the last layer in the stack that contains the keyed attribute and is currently unlocked.)

If the object or attribute being keyed has no unlocked animation layers, keyframes are set on the BaseAnimation.

See also Keyframe objects on animation layers.

Make New Layers Current

When on, a new layer is selected as the current active layer in the stack when it is created. When off, adding a new layer does not change which layer is currently selected and active in the stack.

Insert New Layers After Current

When on, new layers are added to the stack immediately above the currently selected layer. If multiple layers are selected, the new layer is added above the top-most layer. When off, new layers are added to the top of the stack.

Select Children Under Collapsed Parent

For layers organized into hierarchies, this option sets how layers are selected when a parent layer is collapsed.

When on, a layer hierarchy is treated as a single layer if the parent layer is collapsed. Selecting the collapsed parent selects all child layers, and deselecting the collapsed parent deselects all child layers.

When off, child and parent layers are treated independently, so child layers can stay selected when their parent layer is collapsed. Selecting the collapsed parent does not select the child layers.

See also Animation layer hierarchy for more information on parent and child layers.

Lock Muted Layer

When on, muted animation layers are also locked so they cannot receive keyframes. When off, muted animation layers are unlocked and can still receive keyframes.

Template Curves of Locked Layers

When on, animation curves are templated when you lock the associated animation layer. See Template the curves of locked animation layers.

Auto Ghost Selected Objects

Turns on ghosts for selected objects when any layer Ghost button is turned on. This is the default layer ghosting option. See also Display ghosts for layered animation.

Auto Ghost Objects in Layer

Turns on ghosts for all objects associated with a layer when its Ghost button is turned on.

Turn On Ghosts Manually

Lets you turn on ghosts by manually selecting the Animate > Ghost Selected option from the main menu bar. You can then use the layer Ghost buttons to turn on ghosts per layer.

Buttons on Right

Moves the Animation Layer Buttons to display on the right-hand side of the Animation Layer Editor. By default, the layer buttons display on the left-hand side of each animation layer.

Reverse Layer Stack

Flips the display of animation layers in the stack.

By default, animation layers display bottom-to-top. This means the BaseAnimation bar is pushed toward the bottom of the pane as new layers are added at the top of the pane.

Reverse Layer Stack flips the stack display so that layers display top-to-bottom. New layers are added at the bottom of the pane.

Show menu

The Show menu includes the following options:

All Affected Layers

When on, only layers that contain attributes of objects selected in the scene display in the Animation Layer Editor.

All Layers

When on, all animation layers display in the Animation Layer Editor, regardless of what is selected in the scene.

Other Animation Tools

When you turn on From Layer Editor Show Options in the Graph Editor, Dope Sheet, or Time Slider, this menu lets you specify which animation layers display in those other animation tools. See also Filter the display of animation layers.

Select from the following options:

All Affecting

Shows all affected animation layers. (All layers that contain attributes of objects selected in the scene.)

Active

Shows only active layers.

Selected

Shows only selected animation layers.

Active and Selected

Shows both active and selected animation layers.

NoteSee Animation layer states for information on when a layer is active, affected, or selected.
Namespace

This option provides the same function as Show Namespace in the Render Layer Editor.

Floating Window

Opens the Animation Layer Editor as a window separate from the Channel Box.