Lesson 3: Setting up simple
muscles
In the previous lessons, you set up the Muscle deformer with only capsules and bones. This gives you a good foundation to build your additional skinning from. In this lesson you learn how to create simple muscles and set up muscle deformation on your mesh.
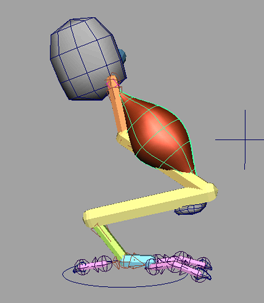
This file has the dragon leg with all the muscles and bones connected with default and basic Sticky weights applied to the capsules.
While you can convert and rig any existing NURBS surface to be a muscle, Maya Muscle provides a tool to easily build and set up muscles interactively. In the next steps you use the Muscle Builder to create simple muscles.
A muscle shape is generated from the start Attach Object (Attach Obj 1) to the end Attach Object (Attach Obj 2). You may want to change your scene view to wireframe or X-ray mode while you work.
For this tutorial, you can leave the parameters in the Build tab at their default settings. If you want, you can adjust the simple muscle settings. See Build tab to learn about the attributes available.
Once your muscle is generally placed and set, you can sculpt the muscle shape into something more specific.
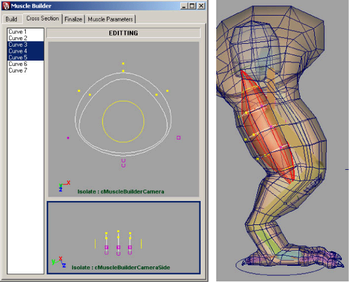
Sculpt the simple muscle shape
This tab has three main sections. The list on the left shows you each cross section of your muscle. Typically the first and last cross sections are adjusted. There are two view panels showing you the view of all of your muscle cross sections down the length and from the side.
Selecting one or more items in the Cross Section curve list selects those curves. You can then move them in the view panels here, or in the scene view.
The cross sections are now active for editing and the view panels automatically switch to component mode so you can directly edit the points of the cross section curves.
You are now finished sculpting your muscle. In the next steps you finish the building process and rig the muscle to deform properly.
This tab lets you choose how to deform and rig your muscle. For further information about the attributes of the Finalize tab, see Finalize tab.
A warning dialog box appears to notify you that this operation will finalize the cross sections of this muscle. The dialog box also lets you select the base name of the muscle and controls.
We recommend that you find a useful and readable naming scheme so that you can easily select and weight the muscles in the Muscle Paint window later. For example, if you create a muscle located near the upper leg, on the rear side in the center, you could name it "hamstringCenter".
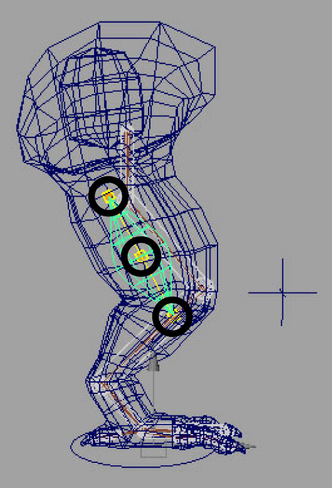
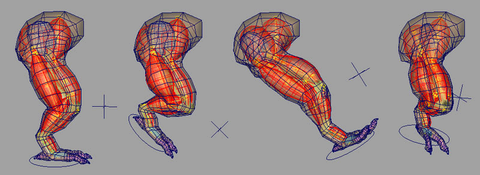
The muscle is rigged and a cMuscleObject shape node is created. In wireframe mode, you can see three yellow box controls. These controls can be animated and have Jiggle settings on them that are created and constrained to the proper capsules.
This section lets you customize the deformers on the selected muscles. You can also directly manipulate some of the controls in the Attribute Editor or Channel Box.
To see the deformer attributes in the Channel Box, select the muscle surface.
Before you set the muscle squash and stretch, it's a good idea to set the minimum and maximum length of the muscle. By default, the muscle’s minimum squash is set to half its original length, and its maximum stretch is set to double its original length. When the muscle length changes to these settings, you get the maximum amount of volume change.
To adjust the squash and stretch length settings
Setting the minimum and maximum stretch length values cause the squash/stretch settings to more directly affect the visual output, since they are more closely related to the actual lengths the muscle is changing by. This can also help stop stretching from losing volume. In addition, this makes the Dampen On Squash and Dampen On Stretch values work properly.
Make sure you have the muscle surface selected so that changes you make in the Muscle Builder affect the muscle. The stretch settings let you set the basic X- and Z-axis radial volume change for the start, middle and end of the muscle.
If you are getting flipping when the muscle contracts, changing the Up-Axis can fix this. When the muscle is bent, the aim values set how the tips orient themselves.
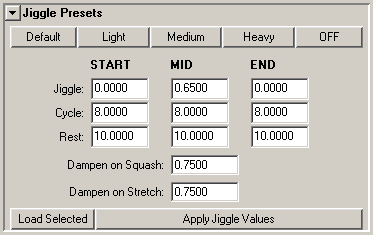
For Jiggle on simple muscles, you have overall control from the start to the middle to the end of the muscle. If you rig a muscle and create more than three movers, you can also directly set specific Jiggle values on the yellow movers. You can experiment to see the effect of the Jiggle Presets located on the Muscle Parameters tab of the Muscle Builder window.
In this lesson you learned how to:
Because you rigged the simple muscle with the cMuscleSplineDeformer, you can also do custom muscle shaping to get exact control over how the muscle looks at various lengths. For further information see cMuscleSplineDeformer node and Set up a Muscle Spline deformer
As you build more simple muscles, note that in some cases, you may want muscles and bones to penetrate. For example when using Shrink Wrap, it's better to have a solid mass of muscles even if they penetrate than to have gaps or spaces between them.
You can now go back to the Build tab, select new settings, and continue building more muscles for your rig using the techniques you have learned. A completed muscle rig for this lesson called DragonLeg_Muscles_End.mb.
 for
for