This is a deformer node that implements the main
skin deformer node. It supports multiple connections from cMuscleObject,
cMuscleDirection and cMuscleSmartCollide nodes for basic skinning
and Sliding. It can also operate standalone for Caching, Relax,
Jiggle, Self Collision and so on.
Main attributes
The
Muscle skin deformer has several important attributes that are not
all directly tied to any specific feature.
- Envelope
-
The common Maya envelope
setting that specifies the resulting amount of deformation applied
by the deformer. Setting this to 0 has the same effect as disabling
the nodeState setting, and effectively
turns the deformer off.
Cache
Sets the state of the
caching algorithm.
- disabled
-
The cache feature is
not used.
- write-file
-
Writes out the cache
to a separate ASCII file each time the frame is changed.
- read-file
-
Reads in the cache from
external files.
- write-node
-
Writes cache data directly
onto the Muscle deformer node each time the frame is changed.
- read-node
-
Reads cache data from
the Muscle deformer node.
- Show Warnings
-
This option turns on
the display of warning messages output to the script editor. This
is an important option, as it lets you know if you have sticky weights
set for muscles that were not bound properly to the points. When
this occurs, Muscle deformation can slow down. To see if you have
invalid bindings, turn on showWarnings and
examine the script editor. You can then select
Muscle > Skin Setup > Auto-Fix Invalid Sticky Bind Points from
the main menu bar to correct them.
- User Scale XY/Z
-
These attributes let
you connect the master scaling node for your rig into the deformer.
This way distance-based values, like force items, can work properly
when the rig is scaled up or down.
Sticky attributes
The Muscle deformer includes
the following attributes that affect how Sticky deformation works:
- Enable Sticky
-
Enables and disables
sticky deformation.
Relative Sticky
Lets you select whether
Relative Sticky mode is on or off.
- off
-
Turns Relative Sticky
mode off. Sticky weights move the point on the mesh fully, like
a skinCluster.
- relative
-
Turns Relative Sticky
mode on. cMuscleObjects are deformed in such a way that you do not
get a double-transform when a skinCluster is used below Muscle.
For more information,
refer to
Relative Sticky deformation.
- Force Normalize
-
Since Muscle Objects
can have their Sticky values affected by their Sticky
Strength attribute, and because you can choose not to normalize
weights with Relative Sticky mode, you can force normalization of
the weighting during deformation. When on, all Sticky weight values
are normalized to 1.0 during deformation.
- Sticky A/B/C
-
These attributes determine
which set of Sticky weights you are using. These values can be blended,
although you typically have only one set on at a time. The values
for these attributes are internally normalized so that you do not
get a double transform. For example, setting stickyA/B/C to 1, 1,
0, actually results in a 0.5 0.5 0 result.
Sliding attributes
The following are the
basic Sliding settings on the Muscle deformer:
- Enable Sliding
-
When set to 1.0, sliding
is enabled if you have painted Sliding weights for the object you
want to slide.
Paint weights only where
sliding is needed for that object. You can also paint Direction
weights as described earlier to get more control over the direction
of the slide.
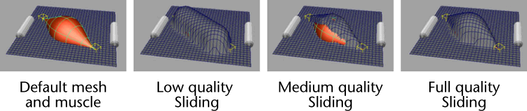
Quality
Sets the quality of the
sliding calculations. Higher values look better but are slower.
- Full
-
True capsule, polygon
bone and NURBS muscle sliding is calculated.
- Medium
-
Any NURBS muscles are
slightly lowered in quality to give faster performance. Often, you can
use Medium quality and get an acceptable level of sliding. Polygon
bones are not changed by Medium quality.
- Low
-
All objects including
both polygon meshes and NURBS objects are converted to capsules internally.
This provides some idea of what sliding looks like, although it
is not very accurate. For best results, your geometry of any polygon
objects should have the length of the geometry down the object’s
local Y-axis. This gives the most accurate capsule replacement.
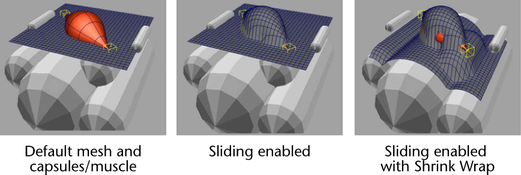
- Shrink Wrap
-
Normally, sliding only
occurs when a capsule/bone/muscle pushes outward farther than the surface
of the mesh. The Shrink Wrap attribute lets
sliding occur even if the objects are lower than the skin. In effect,
it causes the skin to look not only outside but also inside, and
moves the skin mesh to the object that is the farthest out. This
can be useful to get tighter muscle definition, or even as a modeling
tool. If there is no object to slide onto, the point is left where
it is.
- Use Bind
-
- Allow Neg Fat
-
This is used when useBind is
on. When active, this allows points to stay below any muscle/bone
if the muscle/bone was originally intersecting the model when the
fat was bound. If off, the mesh is always on the surface. If useBind is
off, this attribute has no effect.
Displace attributes
- Enable Displace
-
Disables or enables the
entire displacement computation for the Muscle deformer.
- Collision Displace
-
Determines how the Collisions attributes
for other deformation features work. For example, when a Smooth
operation is done, you can have it smooth, but still “re-slide”
with muscles still colliding against muscles or bones that are sliding
on the surface of the mesh. When enabled, these “re-collisions”
not only include sliding muscles/bones, but also include displace nodes.
When off, operations like Jiggle, Relax and Smooth do not re-compute
displacement deformation even if their Collision mode is set to
on.
Force attributes
- Enable Force
-
Enables or disables the
force calculation.
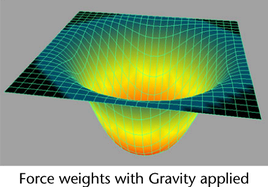
- Gravity Strength
-
Specifies the amount
points move in the gravity direction. This amount is multiplied
by the Force point weights for each point.
- Gravity X/Y/Z
-
Sets the gravity direction
for points to move when affected by gravity.
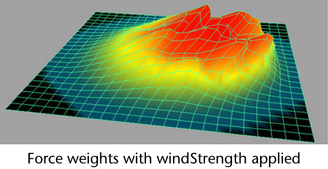
- Wind Strength
-
Set the amount of point
motion based on wind/noise. Larger values move points more.
- Wind Dir X/Y/Z
-
Sets the general direction
points move based on wind. These values are normalized, so 1, 1,
0 actually becomes 0.5, 0.5, 0 internally.
- Wind Speed
-
Sets the rate of change
in the wind as time passes. Smaller values cause slower changes
to the noise displacement. Larger values make a faster change over
each frame.
- Wind Noise
-
Typically 0 to 1. This
sets how much the wind effect is noisy versus just the painted weight value.
At a value of 0, the points simply move in the wind direction with
no visible noise. At 1, the points move in a random way, with the noise
changing based on the windSpeed.
Values over 1 cause extra displacement.
- Wind Noise Scale
-
Sets the visible feature
size of the noise. Larger values make the noise/wind bumps larger,
and tend to result in a smoother looking displacement. Smaller values
cause smaller noise bumps.
- Wind Noise Dirty
-
Sets how dirty the noise
or wind looks. Even with a large windNoiseScale,
increasing this value causes sharper and more frequent changes to
the displacement. The lowest value is 1.
NoteWind is applied in
a world-space. This means even if the Wind Speed is
0, moving your object around in space causes the noise to change.
Jiggle attributes
The following are the
Muscle deformer settings for Jiggle:
- Enable Jiggle
-
When off, the jiggle
calculation is disabled for speed. When on, per point skin jiggle
is calculated.
- Jiggle Collisions
-
Allows sliding collision
to be handled during jiggle effects. This way, if a point hits something it
would normally slide or push out from, it still slides. The enableSliding option
must be on for this to work. Note that jiggle does not do self-collision.
- Reset Frame
-
Sets the base frame at
which (and earlier), Jiggle has no effect and is reset. This can
be useful if you are animating more than one shot in a file, and
the character moves rapidly from one frame to the next. You can
key this value with a stepped keyframe to adjust it to reset at
the start of each shot.
- Jiggle Min/Jiggle Max
-
Once you have painted
Jiggle weights, this sets the actual amount or strength of Jiggle
applied on those points.
- Cycle Min/Cycle Max
-
Once you have painted
Cycle weights, this sets the frame time it takes for each point
to bounce based on the painted weights.
- Rest Min/Rest Max
-
Once you have painted
rest weights, this sets the frame time it takes for each point to
stop moving and come to rest.
Relax attributes
The following are the
Muscle deformer settings for Relax:
- Enable Relax
-
When off,
this disables the Relax calculations for speed. When on,
Relax is enabled.
Relax Mode
Sets the type of Relax
calculation applied.
- normal
-
Sets up Relax to wrinkle
when points are compressed and pull when points are stretched. The
amount of wrinkle is less than with Wrinkle mode.
- pull
-
With this mode, wrinkling
does not occur at all, and relax only operates when the points are pulled
farther apart or stretched.
- wrinkle
-
Operates like "pull",
with both wrinkling or pull effects affecting the mesh, however
the amount of wrinkle is increased. Wrinkle weights affect the wrinkle
section, Relax weights affect the pull effects.
- Relax Collisions
-
When on, collisions with
sliding bones or muscles occur during relax calculations. This often
gives the desired result of Relax when sliding is used. The enableSliding attribute
must be on for this to work. Collisions also occur with displace
nodes if collisionDisplace is on and displacement
is in use.
- Relax Iterations
-
Sets the number of calculations
performed for Relax. Higher values are more accurate and stable,
but take longer. Values in the range from 8 to 64 usually work well.
Often, a middle value of 24 or 36 provides enough stability and deformation.
If increasing the number only changes the mesh slightly, using the
lower value usually suffices.
- Relax Strength
-
Sets the overall strength
of the Relax. This is an easy way to lower the effect of the entire
Relax calculation instead of repainting weights. If your mesh flies
apart, lowering this value can help.
- Wrinkle Strength
-
For the Wrinkle mode,
sets the amount of wrinkling that occurs as the mesh compresses. Values
over 1 are allowed.
- Relax Compress
-
Like Relax
Strength, but applied only to points as they compress.
- Relax Expand
-
Like Relax
Strength, but applied to points as they expand or are
pulled farther apart.
Smooth attributes
The following are the
Muscle deformer settings for Smooth:
- Enable Smooth
-
When off, this disables
the smooth calculations for speed. When on, the Smooth feature is enabled.
- Smooth Collisions
-
When on, collisions with
sliding bones or muscles occur during Smooth calculations. This often
gives the desired result of Smooth when sliding is used. The enableSliding attribute
must be on for this to work. This also collides with the cMuscleDisplace
node if Displace mode is active and collisionsDisplace is
on.
- Smooth Iterations
-
Sets the number of calculations
performed for smooth. Higher values cause more smoothing, but take
longer. Values in the range from 8 to 64 usually work well. A middle
value of 24 or 36 often provides enough stability and deformation.
If increasing the number only changes the mesh slightly, using the
lower value usually suffices.
- Smooth Strength
-
Sets the overall strength
of the Smooth. This is an alternative way to lower the effect of
the entire Smooth calculation without repainting weights.
- Smooth Compress
-
The Smooth operation
can change the look of the default mesh. Using Smooth
Compress instead of Smooth Strength causes
painted points to be smoothed only if that part of the mesh is undergoing
compression. This can be used to help with areas that pinch.
- Smooth Expand
-
The Smooth operation
can change the look of the default mesh. Using Smooth
Expand instead of Smooth Strength causes
painted points to be smoothed only if they are pulled farther apart.
- Smooth Hold
-
Normally, Smooth causes
a mesh to lose volume since it smooths in all three directions.
Applying Smooth Hold makes the smooth
occur less in the direction of the normal of the point. This means
that points can still smooth out, but lose less volume. Values between
0.5 and 0.8 are recommended.
Collision attributes
The following attributes
on the Muscle deformer let you adjust how Self Collision works:
- Self Collison
-
Enables or disables the
Self Collision calculation. Can be set to off for speed,
then turned on before render or final checking.
- Self Tolerance
-
Sets the internal tolerance
used by the computations. This is multiplied by other values internally,
and does not need to be adjusted.
- Self Falloff
-
When a collision occurs,
the points around are bulged out to preserve volume. This value represents
the distance that the points falloff to zero over for the volumization
effect. Larger values mean a larger area is volumized.
- Self Volumize
-
Sets the amount or strength
of points that are volumized/bulged out to preserve volume.
- Self Blur Iterations
-
When a collision occurs,
points are moved/flattened to resolve the collision. This effect
can be blurred out to affect other points surrounding the collision
to result in a more smooth/soft look. This sets how many iterations occur
for this calculation.
- Self Relax Iterations
-
After self collision,
points within the falloff region can be relaxed with the Relax algorithm. This
sets how many iterations are used.
- Self Relax Strength
-
After self collision,
points within the falloff region can be relaxed with the Relax algorithm. This
sets how strong the relax effect is.
- Self Smooth Iterations
-
After self collision,
points within the falloff region can be smoothed with the Smooth algorithm.
This sets how many iterations are used.
- Self Smooth Strength
-
After self collision,
points within the falloff region can be relaxed with the Relax algorithm. This
sets how strong the relax effect is.
- Self Smooth Hold
-
For the self collision
smoothing, this sets the amount of smooth hold during the smooth operation.
At higher values, points are not allowed to smooth along their normal
and retain volume more.