


Lesson 2: Simulating the
pants in a static stance
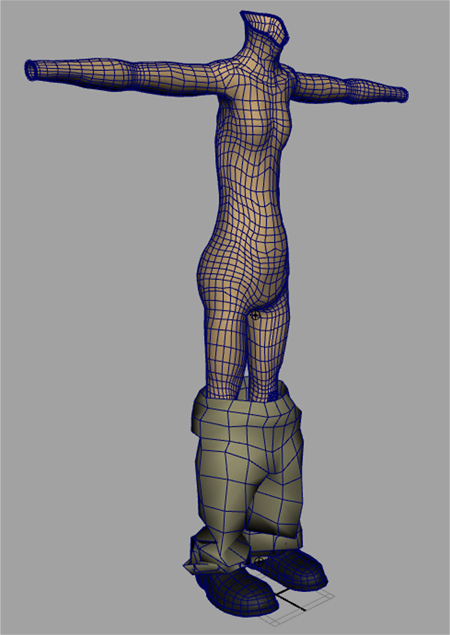
Before simulating nCloth on an animated character, it is important to ensure that your nCloth simulates correctly while the character is at rest or in a static stance. By allowing the nCloth to settle, it is easier to identify problems in the simulation and apply the proper adjustments before your simulation becomes too complex and hard to diagnose.
To ensure the lesson works as described, do these steps before beginning:
This file can be found in the nClothAdvancedTutorials directory that you set as your Maya project.
Constrain the pants to the body
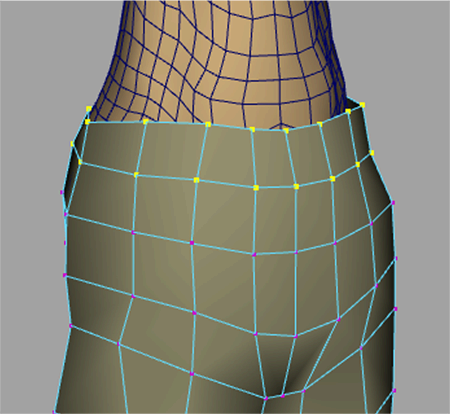
When you play back the simulation, you notice that the nCloth pants are now colliding with the body and shoe objects, but they are falling off the character’s body. To keep the pants from falling, create a Point to Surface constraint to constrain the nCloth pants object to the nRigid_Body object’s waist area. For more information about nConstraints, see Constraining Nucleus objects.
To constrain the pants to the character’s body
 -click
the nCloth and select Vertex from
the marking menu that appears.
-click
the nCloth and select Vertex from
the marking menu that appears.
Dolly and tumble the camera to ensure that only those vertices in the first two rows are selected.
 -select
the nRigid_Body object and select
nConstraint > Point to Surface.
-select
the nRigid_Body object and select
nConstraint > Point to Surface.
For this lesson, leave the dynamicConstraintShape attributes at their default values.
Edit the pants' Dynamic Properties attributes
When you play back the simulation, you notice the following:
When simulating nCloth on a character that is standing still, edits to the nCloth’s Dynamic Properties attributes may only produce subtle changes to the cloth’s behavior since gravity and wind are the only forces working on the nCloth. When the nCloth is simulated on an animated character, changes in the cloth’s behavior will be more noticeable as these forces begin to generate velocity, collisions, and self collisions, causing your nCloth to deform in different areas and in different directions. Therefore, to simplify your simulation set up, you can give your nCloth some of its unique characteristics by editing some Dynamic Properties attributes using a static simulation.
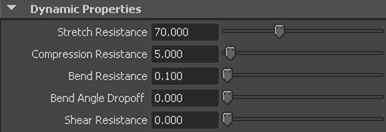
Stretch Resistance and Compression Resistance are important attributes in determining the nature of your cloth. These properties iterate resistance on the links and cross links on each quad of the nCloth mesh. Stretch Resistance works to stabilize the pulling or stretching effect which results from the Nucleus forces, such as gravity and wind. Compression Resistance works to stabilize the compressing or squeezing effects on the links as a result of Nucleus forces.
For example, to create nCloth that behaves like heavy denim, burlap, or thick leather, higher Stretch Resistance values are required, while lighter materials, such as silk or cotton, use lower Stretch Resistance.
The higher you set these two attributes, the more the nCloth resists deformation, although they tend to increase simulation time. For more information about Stretch Resistance and Compression Resistance, see Stretch Resistance and Compression Resistance.
Be aware that adjusting one Dynamic Properties attribute can affect other attributes. For example, increasing your nCloth's Mass makes it heavier, which may require an increase in Stretch Resistance to compensate. A useful method for editing your nCloth's Dynamic Properties attributes is to set one attribute at a time, and then playback the simulation to observe how the adjustment affects your nCloth.
To edit Stretch Resistance and Compression Resistance
When you play back the simulation, notice that the nCloth pants still come to a rest state after 40 frames of simulation. Increasing Damp can bring your simulated nCloth to rest sooner as it dissipates the energy generated from your nCloth Stretch Resistance working against the pull of the Nucleus Gravity. You can also use Stretch Damp to dissipate this energy.
Other attribute settings to consider
Before proceeding with your simulation, consider adjusting the collision Thickness attribute for each nCloth and passive collision object to optimize the collision detection between them. When using a workflow that includes a wrap deformer, you will want to ensure that the nCloth collision volume (Thickness) allows room for the wrapped mesh without causing interpenetrations with the nRigid_Body and nRigid_Shoes objects.
