You can create rigid
bodies from NURBS surfaces and polygonal surfaces. In the following
steps, you create some polygonal surfaces to be used for the rigid
bodies.
To create polygonal objects for the rigid
body simulation
- Make sure you’ve done the steps in
Preparing for the lessons.
- In the Time and Range Slider, set the
start frame to 1 and end frame to 200.
- Select
Create > Polygon Primitives > Cube >
 .
.
- In the Polygon Cube Options window,
select Edit > Reset Settings (to make
sure the tool is set to its default, and then set the following
options and click Create:
- Width : 2
- Height: 4
- Depth: 0.25
- Axis: Z
- With the polygon still selected, select
Edit > Duplicate Special > .
- In the Duplicate Special Options window,
select Edit Reset Settings. Set the
following options and then click Duplicate Special:
- Translate:
0 3 0
- Number of copies:
5
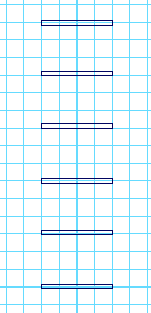
This creates five copies
of the polygon, each one placed 3 units above the lower one.
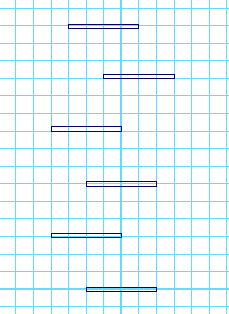
To position the objects for the rigid
body simulation
- Position the objects as shown in the
side view in the following illustration. To position the planks
precisely, select each plank individually and use the Channel
Box to enter the appropriate value from this list:
- pCube1 - Translate Z:
0
- pCube2 - Translate Z:
2
- pCube3 - Translate Z:
0
- pCube4 - Translate Z:
2
- pCube5 - Translate Z:
-1
- pCube6 - Translate Z:
1