


Learning Resources > Tutorials > Getting Started with Maya > Dynamics > Lesson 2: Rigid bodies
and constraints >
Creating hinge constraints
A Hinge constraint constrains rigid bodies along a specified axis. You can use a Hinge constraint to create effects such as a door on a hinge, a link connecting train cars, or a pendulum of a clock. In this example, the Hinge constraint constrains the plank to a position in the scene view.
In the following steps, you’ll add Hinge constraints to the center of the planks, which automatically turns the plank into a rigid body. You will do this for each plank. By default, Maya automatically creates a rigid body when you use a field or rigid body constraint to control its motion.
 .
.
By default, the initial orientation is set to 0, 0, 0, which orients the hinge constraint to lie parallel to the Z-axis in world space. By setting the orientation to 90 in the Y-axis, the hinge constraint is rotated 90 degrees around the Y-axis, which orients the constraint parallel to the X-axis.
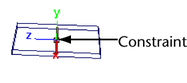
By leaving the Set Initial Position at its default setting, the hinge constraint is created at the rigid body’s center of mass.