In this section, you will adjust the Render Globals parameters to improve the quality of the rendered image. Then, you will render the scene again, and save your work.
You will begin by re-rendering the scene from the last tutorial.

Watch Part 1 of the tutorial.
For information on how to open a file, see Opening the tutorial file.

A dialog box appears, asking if you want to delete all objects, shaders, views, and actions. Click Yes.

 (Windows) or
  (Mac) or click the Save button.
The file browser closes and the render begins.
When rendering begins, the Render Monitor opens.

The render is displayed.

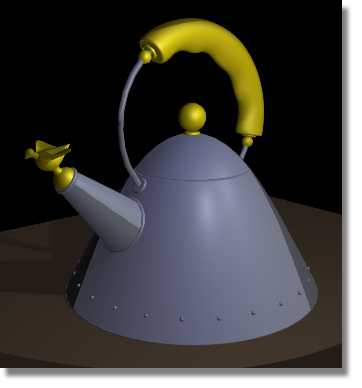
The body of the teakettle has a chrome material assigned to it, the grip has a plastic yellow material assigned to it, and the table top has a flat brown material assigned to it.
Also, you can see that the render is very faceted, especially any area with relatively high curvature, like the metal handle and the base of the teakettle. This faceting is often called “nickeling,” after the faceted edges on old Canadian and American five-cent pieces. There are two variables that affect the quality of the render. The first is the overall quality setting that you assign to the rendering process in general, and the second is the tessellation of the model.
Editing the Render Globals parameters

The Render Globals window allows you to set all the variables for the quality of the final render, including the size and type of image.
A pop-up menu appears.

Global Quality Level is one of the most important variables in the Render Globals window, because it specifies the quality of the final render. LOW produces a faster image, but the render quality will be significantly reduced: the final result will be faceted, and may not contain all the reflections that would be achieved with a higher setting.
HIGH produces a very high quality image, but the image will also take longer to compute.
The rendering process is an iterative process. The typical rendering process is to set some variables in the scene and then render a test image to see the results, then change one or some variables and re-render the scene to see the new results.
For this reason, when you are starting the rendering process, you will typically render the scene using LOW or MEDIUM Global Quality Level, to make the rendering speed faster. After you have achieved the look you are happy with, you will render the scene at HIGH Global Quality Level to achieve a better quality result.


When an image is rendered, its surface is divided into triangles. This process is called tessellation. Each surface of a model has a specific tessellation value. When the tessellation value is low, the surface is divided into few triangles and it may appear faceted when rendered, even if the Global Quality Level is set to HIGH. In some cases, the only way to reduce the faceting is to increase the model's tessellation value. Tessellation value is another important variable in the quality of a final render.
Mesh Tolerance is the maximum allowable distance (measured in centimeters) between a NURBS surface and its tessellated version. By setting Mesh Tolerance to a low value, you increase the quality of the final render. (What actually happens is that the tessellation value for the entire scene increases.)
The file browser opens to the pix directory of the Lessons project.
Click the Save button to overwrite the previous file named render3.
A dialog box appears, asking if you want to overwrite or replace the file. Click OK.
The rendering process begins.
The entire model is much smoother; in particular, the handle and the base of the teakettle are no longer faceted.
For information on creating the Lessons project or saving your work, see Saving your work.


