The Graphite Modeling Tools interface takes the form of a highly customizable, context-sensitive toolbar containing four tabs: Graphite Modeling Tools, Freeform, Selection, and Object Paint. Each of these comprises a number of panels and tools whose availability depends on the context.
The ribbon can assume a horizontal or vertical configuration and either configuration can float or be docked. The horizontal version can be maximized (Show Full Ribbon) or minimized to tabs or panel titles. By default, the ribbon is horizontal, minimized to panel titles, and is docked immediately above the viewports (below the main toolbar), as shown in the following illustration.

The basic unit of ribbon organization is the panel; each panel contains a related set of tools. The main panel on the Graphite Modeling Tools tab is the Polygon Modeling panel. This panel contains global controls for making the other panels available, switching sub-object levels, toggling soft selection, and more.
This section includes some basic procedures for getting started with the modeling ribbon. For more information about using and configuring the ribbon, be sure to read Modeling Ribbon Controls.
To activate the modeling ribbon:
By default, 3ds Max starts with the horizontal configuration of the modeling ribbon open, minimized to panel titles, and docked to the top of the interface, just above the viewports. If you close it and quit the program, it does not automatically reopen when you restart.
 (Graphite Modeling Tools (Open)).
Each of these commands is a toggle: If the ribbon is closed, the command opens it; if the ribbon is open, the command closes it.
To switch the ribbon orientation:
By default, the ribbon uses a horizontal configuration, but you can change it to vertical using the right-click ribbon menu. The vertical ribbon feature set is identical to that of the horizontal ribbon, except that it can be docked left and right, rather than top and bottom.
 Switch To Vertical Ribbon. If the current orientation is vertical, the command is Switch To Horizontal Ribbon.
After a short pause, the ribbon reopens in the new orientation.
To minimize or maximize the ribbon:
The ribbon in its horizontal orientation has three different minimized states in addition to the maximized state. This procedure describes how to switch among them:
 minimize/maximize toggle on the ribbon. If you hold the mouse over the button, a tooltip describes what happens when you
click.
minimize/maximize toggle on the ribbon. If you hold the mouse over the button, a tooltip describes what happens when you
click.
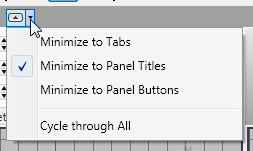
Choosing an option not only minimizes ribbon to the indicated status, but also determines how the (maximized) ribbon minimizes when you click the minimize/maximize button.
To restore the ribbon to the default setup:
If you’ve reconfigured the ribbon significantly by hiding and floating panels and so on, you can return to the default setup with a command on the ribbon right-click menu:
After a brief pause, the ribbon reopens in the default configuration: horizontal and minimized to panel titles.
To convert an object to editable poly or Edit Poly format:
For most ribbon functions to be available, a single editable poly or Edit Poly object must be selected, and the corresponding stack level must be active. If the object you want to work with is not in the required format, you can use the ribbon to convert it.

This converts the object or applies the modifier, respectively, and switches to Modify mode if necessary.
To start using the modeling ribbon with an editable poly or Edit Poly object:
You can use the modeling ribbon tools with a selected editable poly or Edit Poly object when the corresponding stack level is active and the software is in Modify mode.
Once you become familiar with the ribbon, you can accomplish just about any polygon-modeling task without resorting to the Modify panel. At that point, you can hide or minimize the command panel most of the time while working in 3ds Max, thus recovering valuable screen real estate.
To use the ribbon tools, Modify mode must be active; that is, the Modify panel must be the current command panel (whether or not the command panel is displayed).
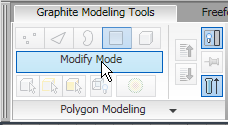
If it says Modify Mode, click the button to switch to Modify mode. If it says anything else, proceed to the next step without clicking.
If the Editable Poly or Edit Poly stack level is active, the applicable panels then become available. If the ribbon is maximized or minimized to panel titles, the panels are readily apparent. If the ribbon is minimized to tabs, you can see all available open panels on a tab by clicking the tab (see Minimize/Maximize).
If the object is already in a required format but has modifiers other than Edit Poly applied, one of which is active, you need to switch to the Editable Poly or Edit Poly stack level. Use the Next/Previous Modifier buttons on the Polygon Modeling panel.
For instance, consider an editable poly object with the Cloth modifier applied. When the Cloth modifier is active on the stack, the ribbon looks like this:

Note that the wide button on the Polygon Modeling panel shows the modifier name.
The Next/Previous Modifier buttons enable navigation up and down the stack, respectively. When navigation in only one direction is possible, the other button is disabled.
In this example, you would click  (Previous Modifier), thus accessing the Editable Poly level of the modifier stack.


