Command entry:
Create panel


(Helpers)
Camera Match
CamPoint
Command entry:Create menu
Helpers
Camera Point
CamPoint helper objects are used by the Camera Match utility to reproduce in a camera the same settings (position, roll, and FOV) that were used by a real-world camera to shoot a background
image. This allows you to view your scene from the same perspective as the background image, which is a key step to mixing
computer-generated and photographically-generated images in a single composited shot.
Place CamPoint objects in the scene at locations that will be visible in the background photograph. By comparing the X/Y/Z
position of several camera point objects to their analogous positions in a background image, the Camera Match utility is able
to determine the real-world camera’s settings, and use these settings to either create a new camera or move/reset an existing
camera to match them.
Clicking CamPoint displays the Keyboard Entry and Camera Match Point rollouts, which you use to create and name the camera
points.
Procedures
To create a camera match point:
- On the Create panel, click (Helpers).
- Choose Camera Match from the drop-down list, then on the Object Type rollout, turn on CamPoint.
You are now ready to create a camera point.
- Click in the viewport to create a CamPoint helper object. Alternatively, you can use the keyboard to create a CamPoint object
by expanding the Keyboard Entry rollout, entering values in the fields, and then clicking Create.
To position camera match points in your scene, do one of the following:
- Create your camera match points using keyboard entry. Use this if you have accurate actual measurements of the locations of
the points.
- Build geometry that matches your scene geometry, and then snap the points to the geometry using snaps. Use this technique
when you don’t have measurements and can approximate the geometry.
- Create your camera match points interactively, and then use Transform Type-In to move them to the correct locations.
Interface
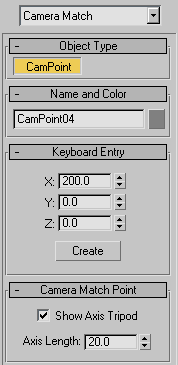
Name and Color rollout
Lets you name the CamPoint object before you create it. If you want to name it after you create it, change its name in the
Modify panel.
Keyboard Entry rollout
- X, Y, Z
-
Let you enter the X, Y, and Z coordinates where a CamPoint object will be inserted. Field values reflect the current Unit
setup.
- Create
-
Inserts the CamPoint object into the scene.
Camera Match Point rollout
- Show Axis Tripod
-
Controls whether an axis tripod is displayed with the Camera point object. Default=on.
- Axis Length
-
Controls the length of the axis tripod. When Show Axis Tripod is on you can watch the tripod change length in the viewport
while you adjust the spinner arrows. When Show Axis Tripod is off, you can still make adjustments the Axis Length value, but
the axis tripod won't be displayed.