


The Motion Flow Graph provides tools for adding clips to the dialog window, calculating optimized transitions, setting random script transition values, moving and deleting clips, and displaying clip dependencies. Clips display as icons and transitions appear as arrows in the Motion Flow Graph.
The Motion Flow Graph displays when you click Show Graph on the Motion Flow rollout on the Motion panel.

Motion Flow Graph
The first step in Motion Flow mode is to add clips in the Motion Flow Graph for use in scripts. Clips represent all or part of a BIP file. Transitions represent different paths through the clips in the Motion Flow Graph. A transition looping back to the same clip represents a cycle or loop.
If a biped is using a shared motion flow, then the title of the graph dialog says "Shared Motion Flow Graph", followed by the name of the shared motion flow. Shared Motion Flows are used to control multiple bipeds with one shared motion flow.
There are two ways to create clips in the Motion Flow Graph. The first method lets you create a blank clip to which you later assign a BIP file. The second method lets you create multiple clips at once by choosing a several BIP files at once.
To create clips in the Motion Flow Graph:
 Select a biped
 Motion panel.
 (Motion Flow Mode).
 (Show Graph) to open the Motion Flow Graph.
 (Create Clip).
Clip icons will appear in the Motion Flow Graph that are named clip1, clip2 and so on.
 (Select Clip/Transition).
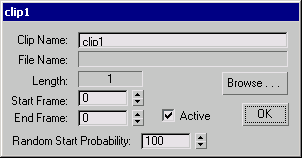
The selected icon displays the clip name in the Motion Flow Graph; this clip can now be used for script creation.
 (Select Clip/Transition) again and load BIP files for the other clips you created.
To create multiple clips in the Motion Flow Graph:
(Show Graph) to open the Motion Flow Graph.
 (Create Multiple Clips).
Use the file dialog to choose the location of your BIP files.
Once processed, multiple clips appear in the Motion Flow Graph window.
