


The Reflect/Refract map produces a reflective or refractive surface. To create reflection, assign this map type as the material's Reflection map. To create refraction, assign it as the Refraction map.
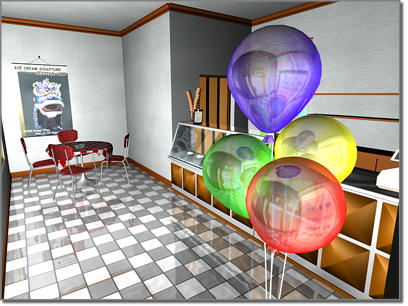
Reflect/Refract map used for the balloons
This map works by using six renderings in the form of a cube that surrounds the objects. Reflect/Refract views the cubic maps from the perspective of the pivot point of the object, mapping them onto the object's surface as a spherical reflection map.
You can choose to generate the cubic maps automatically, or to load previously created maps.
A reflective surface reflects the surrounding maps like a mirror. A refractive surface creates the illusion that the surrounding maps are seen through the surface.
When you choose automatic cubic maps, 3ds Max generates the maps based on the perspective of the mapped object's pivot point. Automatic maps are based on the geometry of the scene.
The advantage to using automatic maps is that the six views are automatically generated at rendering time and can be easily updated for each frame of an animation. The disadvantage is that regenerating the maps increases rendering time. In addition, the maps exist only for the rendering and can't be edited or otherwise manipulated.
In the Material Editor, automatic reflections or refractions reflect or refract the background of the sample slot.
When you choose to load cubic maps from files, you use the controls in the From File group. The advantage to using From File is that the bitmap files already exist and take less rendering time. In addition, you can edit the bitmap images. The disadvantage is that it's more difficult to use bitmaps to render an animation because first you need to create the animated bitmaps.
You can automatically load six bitmaps at once if the six bitmaps have valid cubic-map file names. The first part of all six file names must be the same, and the last part is an underscore followed by a two-letter abbreviation of the map position, as shown in the following table:
| Last Part of Cubic Map File Name | Meaning |
|---|---|
| _UP | Up |
| _DN | Down |
| _LF | Left |
| _RT | Right |
| _FR | Front |
| _BK | Back |
For example, if you have six bitmaps on disk, labeled view_up.bmp, view_fr.bmp, view_lf.bmp, and so on, when you click one of the file buttons and choose the bitmap for that position, all six views are loaded.
If you select a bitmap whose name doesn't follow the convention, or you select one with a valid cubic-map name but assign it to the wrong button, only that bitmap will be loaded.
Since all assigned bitmaps must be the same size, when you assign a new bitmap to one of the windows, the sample slot doesn't update automatically. This avoids generating an error message each time you assign a bitmap. Once you've assigned all six maps and are sure they are square and the same size, click the Reload button to update all of the maps and redisplay the sample slot.
You can also use the Reload button to see your changes after you've edited one of the cubic maps by using a paint program.
The controls in the Render Cubic Map Files group let you generate the maps automatically and save them to disk. Use the To File button to specify the folder and file name of the Up (_UP) bitmaps. Click Pick Object and Render Maps, and then click the object to map. 3ds Max creates the files and also assigns them to the six From File map buttons.
Rendering cubic maps has the same effect as automatic with the advantage that map rendering doesn't have to take place at scene rendering time. The disadvantage is that you can't create an automatically animated reflections or refractions this way.
The cubic maps can be animations instead of bitmaps. Be sure that each is square and all have the same resolution. If you want the animated reflections to match animated changes in the scene, use automatic maps and set them to render every Nth frame.
To generate and save cubic maps:
A file dialog is displayed. Type a name for one of the six cubic bitmap files. You're specifying the name of the Up bitmap. There are two ways to do this:
After selecting the object, a window opens temporarily that shows the six views as they render and are saved to disk. Their file names then appear on the six buttons in the From File group. Each of the six file names is identical, except for a two-letter suffix indicating the direction of the rendered view.
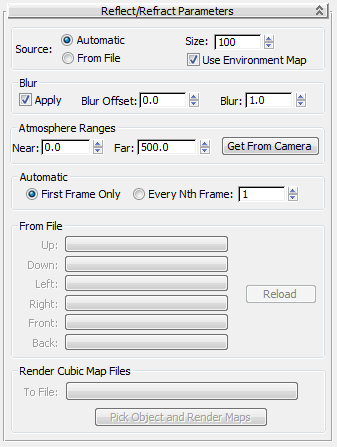
Automatically generates by looking out in six directions from the pivot of the object with the material, then mapped onto the surface during rendering. When on, the options in the Automatic group are active, letting you choose whether the maps will be generated only once, or regenerated at specified frames in the animation.
When off, environment maps are ignored by Reflect/Refract map during rendering. It's useful to turn this off when you have mirrors in the scene and you're rotoscoping against a flat screen environment map. A screen environment map does not exist in 3D space the way the other environment-map types do, and will not render properly.
Affects the sharpness or blurriness of the generated map based on its distance from the object. The farther away the map is, the greater the blurring. Blur is primarily used to avoid aliasing. It's a good idea to use a small amount of blurring for all maps in order to avoid the scintillation or aliasing that can occur when pixel details are reduced off in the distance. Default=1.
If your scene contains environmental Fog, the cubic maps must have near and far range settings to properly render the fog from the point of view of the object assigned the material. The Near and Far spinners in this group let you specify a fog range relative to the object.
Uses the Near and Far atmosphere range settings of a camera in the scene. Click this option, and then select the camera.
These values aren't dynamically linked to the camera object. They are simply copied from the camera's range values at the time you click the camera. If the camera's range values later change, the map's Near and Far values remain the same.
This controls are active only when Automatic is the active source for the Reflect/Refract maps.
Tells the renderer to create animated auto maps based on the frame rate set by the spinner.
These controls are active when From File is active as the Reflect/Refract source. Here you assign the six bitmaps to be used as the cubic maps.
Assigns one of the six cubic maps. If the map is one of a set of six with the correct file name, all six are loaded.
If the map doesn't follow file naming conventions, or you assign it to a button of a different position (_UP to Front, for example), only that map is assigned. You must assign the others manually.


 Material Editor