Command entry:
Select an object.


Modify panel
Modifier List
Object Space Modifiers
Point Cache
Command entry:Select an object.
Modifiers menu
Cache Tools
Point Cache
The Point Cache modifier lets you store modifier and sub-object animation to a disk file that records only changes in vertex
positions, and then play back the animation using the information in the disk file instead of the modifier keyframes.
Point Cache is useful when the computation required for vertex animation becomes so excessive that it causes animation playback
to run slowly or drop frames. Another use for this modifier is to apply the same animation to a number of objects, varying
the Start Time and Strength settings for each so they don't all move identically.
The Point Cache modifier is also available in a world-space version, for which usage is the same.
Special Point Cache Features
Special features in the Point Cache modifier include:
Compatibility with Autodesk Maya
Following is a suggested workflow for using Point Cache for working on an animation project in both 3ds Max and Autodesk Maya:
- Create a deforming mesh (such as Skin, Cloth, and so on).
- Apply the Point Cache modifier.
- Save the cache in XML format with referenced MC files.
- Save the mesh in FBX format.
- Bring the mesh into Maya.
- In Maya, load the cache data onto the mesh using the XML file to load the referenced MC files.
- Modify the animation in Maya and save it, overwriting the XML and MC files.
In 3ds Max, use the Point Cache Reload command; this updates the animation to that saved from Maya.
Special Features in Point Cache
Both versions of the Point Cache modifier provide enhanced animation capabilities, including:
- Adjustable playback ranges and a playback graph, to animate which cache frame is played back. This lets you load a cache and
then animate it, slowing down, stopping, reversing, etc.
- Nth-frame sampling, so you can sample every few frames to save disk space if sampling every frame is unnecessary, or record
multiple samples per frame for improved motion blurring.
- The "strength" is adjustable in Absolute mode, so you can easily blend the cache with what is below in the stack.
- Improved cache file management.
- Pre-loaded caches to speed up playback.
Procedures
To use the Point Cache modifier:
- Use one or more modifiers to animate an object. For example, you might apply a Bend modifier, and then set keyframes for the Angle parameter to make the object bend back and forth.
- Click
 (Play Animation).
If the animation is a good candidate for caching, the playback will drop many frames with Real Time Playback turned on, and
will run slowly with Real Time Playback turned off.
- From the Modify panel Modifier List, choose Object-Space Modifiers Point Cache.
- On the Parameters rollout Record group, set values for Start Time and End Time.
- If you plan to render the cached animation using motion blur, decrease the Sample Rate setting.
- Click the Record button, and use the Save Cache dialog to specify a cache file. To export the animation to another program,
such as Autodesk Maya, use the XML file format; otherwise, use the PC2 file format.
3ds Max records the animation to the cache file. When finished, the cache file name appears in the Cache File group.
- In the Record group, click Disable Modifiers Below.
This turns off all the object's modifiers below Point Cache so that only the cached vertex animation will appear when you
play back the animation.
- Click (Play Animation) again.
This time the animation plays back quickly and smoothly.
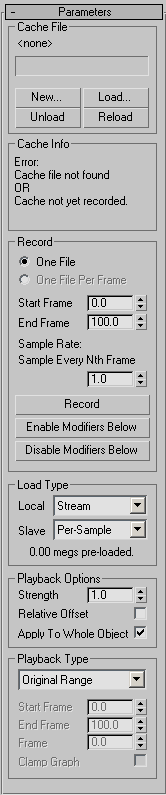
Interface
Cache File group
Contains settings for recording vertex animation.
- [file name]
-
After you specify or load a cache file, its name appears in this field.
- New
-
Creates a new, empty cache file. After setting a new file, use Record to create the cache data.
You can save the file in either of two formats:
- XML:Saves the basic cache information in an XML file, and the animation data in one or more MC files (The XML file includes references
to the MC files). The modifier uses multiple MC files if you set the Record group option to One File Per Frame. When recording
multiple MC files, the modifier gives them the name [file name]Frame[frame number}.mc; for example, Cylinder01Frame10.mc. If you set a non-integer value for Sample Rate, the modifier appends the sub-frame cache file names with Tick[tick number].
- PC2:Saves all cache information and data in a single PC2 file. When you use this format, the One File Per Frame option is unavailable.
- Load
-
Loads a vertex animation from a cache file on disk into the Point Cache modifier. If the number of vertices in the cache does
not match the number of vertices in the object, the Cache Info group reports an error, and the animation doesn’t take effect.
Load supports these file formats: XML, PC2, PTS.
- Unload
-
Temporarily frees the current cache file, so it can be edited or deleted externally.
- Reload
-
Reopens the current cache file, if previously unloaded.
Cache Info group
Displays cache statistics in read-only format, including the number of files, point count, evaluations (number of samples),
sample rate, start and end frames, and errors, if any.
Record group
Contains settings for recording cached animation.
- One File/One File Per Frame
-
Choose whether to save the cache in a single file, or in a separate file for each frame of recorded animation. The latter
option is available only when using the XML file format.
- Start Frame
-
Sets the first frame for recording the vertex animation. Default=first frame of the active time segment.
Using decimal fractions lets you start at a sub-frame setting when using a Frame:Ticks time display.
- End Frame
-
Sets the last frame for recording the vertex animation. Default=last frame of the active time segment.
Using decimal fractions lets you start at a sub-frame setting when using a Frame:Ticks time display.
- Sample Rate
-
Sets the number of frames between each recorded sample. When rendering with motion blur, which uses sub-frame sampling, decrease
this value. Default=1.0.
At the default value of 1.0, Point Cache records one sample per frame. Increasing the value causes a sample to be recorded
every Nth frame. For example, a value of 10.0 records every tenth frame. Decreasing the value causes multiple samples to be
recorded for each frame. For example, if you set Sample Rate to 0.1, Point Cache records 10 samples per frame at evenly spaced
intervals.
- Record
-
Stores the vertex animation to a disk file. If no cache file is specified, or the specified file doesn't exist, activates
the Save Points dialog, which lets you specify a path and file name for the cache file. Click Save to record the file, and
then load it into the Point Cache modifier, ready for playback.
TipTo change the path or file name, use Cache File group
New and specify a different cache file.
- Enable Modifiers Below
-
Turns on all stack modifiers below the Point Cache modifier. Use this when you want to change modifier settings.
- Disable Modifiers Below
-
Turns off all the object's stack modifiers below Point Cache so that only the cached vertex animation appears when you play
back the animation.
Load Type group
These options apply only to PC2 and PTS files; when the cache file type is XML they are unavailable.
- Local
-
The method the modifier uses to load the cache file. The options are:
- Keeps the cache file open for fast access, but loads only a single frame at a time to conserve memory. This is the default
mode.
- Opens the cache file, reads a single frame, and then immediately closes the file. This is slower than the Stream method, but
is useful if many users are reading/writing the same set of cache files since the cache files won't be locked open as you
read from them.
- Loads the entire cache file into memory for fast access, and then closes the file. This is particularly useful in networked
situations, or when a few cache files are used by many objects in one scene. In the latter case, using this option prevents
each object from thrashing the disk on playback.
Be conservative in using this, as it can consume a great deal of memory. However, if one cache file is used by several objects,
the cache is loaded into memory only once.
- Slave
-
These options apply if 3ds Max is running as a network-rendering client; see the preceding for details. In this situation, only Per-Sample and Pre-Load
are available, and the default option is Per-Sample, so the clients don't lock files.
- [label]
-
This read-only field displays the size of the pre-loaded data when Local is set to Pre-Load.
Playback Options group
- Strength
-
Affects the motion relative to the original animation. Default=1.0. Range=-10.0 to 10.0.
When modifiers below the Point Cache modifier are enabled, the Strength value is used only when Relative Offset is on. When
modifiers below the Point Cache modifier are disabled, the Strength value is always used.
At 1.0, the animation plays back the same as recorded. With strengths between 0.0 and 1.0, the animation is relatively restrained.
At strengths greater than 1, the animation is exaggerated. With negative Strength settings, the motion is reversed.
- Relative Offset
-
Enables offsetting the animated vertex positions relative to their positions as recorded, based on the Strength setting. Default=off.
NoteWhen you turn on Relative Offset and play back a cached animation with the modifiers turned on, the cached vertex positions
are calculated relative to their positions as calculated by the modifiers. For example, if you record a Bend animation to
a cache file, and then play it back with both Relative Offset and the Bend modifier on and Strength=1.0, all vertex positions
are doubled, resulting in exaggerated motion.
- Apply To Whole Object
-
When off, only the active vertex selection is animated. In this case, for the cache animation to be visible, the selection
must include at least some of the originally animated vertices.
Playback Type group
- Playback Type
-
Specifies how playback occurs:
- Plays back the cache over the range it was originally recorded, so the animation will always be the same as the original.
- Plays back the cache from a custom start time, set by Start Frame, but the animation length and playback speed will be the
same as the original animation.
- Lets you set start and end frames within which the current cache plays back. Using a range that is smaller than the original
record range plays the cache back faster, while specifying a larger range plays the cache back slower.
- Lets you animate which cache frame is played at any given time.
For example, if you record a cache from frames 0 to 100 and then want it to play back twice as fast forward and then in reverse,
choose this option, turn on Auto Key, set the Frame parameter to 0.0 at frame 0, 100.0 at frame 50, and then back to 0.0 at
frame 100. The function curve of this parameter in Track View shows how the cache is played back. Animating the Frame value
lets you achieve unusual effects such as slowing a cache down over time, creating a ping-pong effect during playback, etc.
- Start Frame
-
The frame number at which the cached animation starts playing back. Using decimal fractions lets you start at a sub-frame
setting when using a Frame:Ticks time display. Available only when Playback Type is set to Custom Start or Custom Range. Default=0.0.
- End Frame
-
The frame number at which the cached animation starts playing back. Using decimal fractions lets you start at a sub-frame
setting when using a Frame:Ticks time display. Available only when Playback Type is set to Custom Range. Default=0.0.
- Frame
-
Lets you animate playback of the cache; for details, see Playback Graph, above.
- Clamp Graph
-
Controls what gets loaded when the Playback Graph frame is out of the original recorded range.
Take an example in which the playback frame is set to 105, but the original cache was recorded over frames 0-100. With Clamp
Graph on, the loaded frame will be 100. If it's off (the default), the cache will "wrap around" and load frame 5.
This lets you loop caches more easily. In the above example, you could simply have a two-key playback graph. The first key
would be at frame 0 with a value of 0.0, and the second would be at frame 100 with a value of 100.0. You would then set the
out-of-range type for the Frame parameter (Playback Frame in Track View) to Linear, and the cache would loop back smoothly to the beginning
at frame 101.