Procedures
To create a Scatter object:
- Create an object to be used as a source object.
- Optionally, create an object to be used as a distribution object.
-
 Select the source object, and then on the Object Type rollout, click Scatter.
NoteThe source object must be either a mesh object or an object that can be converted to a mesh object. If the currently selected
object is invalid, the Scatter button is unavailable.
You now have two choices. You can either scatter the source object as an array without using a distribution object, or use
a distribution object to scatter the object. See the following procedures.
To scatter the source object without a distribution object:
- Choose Use Transforms Only in the Scatter Objects rollout
 Distribution group.
- Set the Duplicates spinner to specify the desired total number of duplicates of the source object.
- Adjust the spinners on the Transforms rollout to set random transformation offsets of the source object.
To scatter the source object using a distribution object:
- Make sure the source object is selected.
- Choose the method by which you want to clone the distribution object (Reference, Copy, Move, or Instance.)
- Click Pick Distribution Object, and then select the object you want to use as a distribution object.
- Make sure that Use Distribution Object on the Scatter Object rollout is chosen.
- Use the Duplicates spinner to specify the number of duplicates. (This is not necessary if you're using the All Vertices, All
Edge Midpoints or All Face Centers distribution methods.)
- Choose a distribution method in the Scatter Object rollout Distribute Object Parameters group under Distribute Using.
- Optionally, adjust the Transform spinners to randomly transform the duplicates.
- If the display is too slow, or the meshes too complicated, consider choosing Proxy on the Display rollout or decreasing the
percentage of displayed duplicates by reducing the Display percentage.
Most of the spinner values are animatable, so you can animate things like the number of duplicates, their transformations,
and so on.
Interface
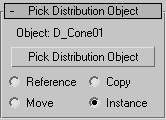
Pick Distribution Object rollout
Contains the options for selecting a distribution object.
- Object
-
Displays the name of the distribution object selected with the Pick button.
- Pick Distribution Object
-
Click this button, then click an object in the scene to specify it as a distribution object.
- Reference/Copy/Move/Instance
-
Lets you specify how the distribution object is transferred to the scatter object. It can be transferred either as a reference, a copy, an instance, or moved, in which case the original shape is not left behind.
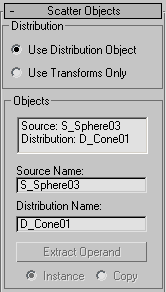
Scatter Objects rollout
The options on this rollout let you specify how the source object is scattered, and let you access the objects that make up
the compound Scatter object.
Distribution group
These two options let you choose the basic method of scattering the source object.
- Use Distribution Object
-
Scatters the source object based on the geometry of the distribution object.
- Use Transforms Only
-
This options doesn't need a distribution object. Instead, duplicates of the source object are positioned using the offset
values on the Transforms rollout. If all of the Transform offsets remain at 0, you won't see the array because the duplicates
occupy the same space.
Objects group
Contains a list window showing the objects that make up the Scatter object.
- List Window
-
Click to select an object in the window so that you can access it in the Stack. For example, if your distribution object is
a sphere, you can click Distribution: D_Sphere01, open the Stack list, and select Sphere to access the sphere's parameters.
- Source Name
-
Lets you rename the source object within the compound Scatter object.
- Distribution Name
-
Lets you rename the distribution object.
- Extract Operand
-
Extract a copy or an instance of the selected operand. Choose an operand in the list window to enable this button.
NoteThis button is available only on the Modify panel. You can't extract an operand while the Create panel is active.
- Instance/Copy
-
This option lets you specify how the operand is extracted: as either an instance or a copy.
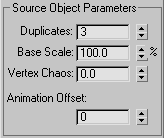
Source Object Parameters group
These options affect the source object locally.
- Duplicates
-
Specifies the number of scattered duplicates of the source object.
This number is set to 1 by default, but you can set it to 0 if you want to animate the number of duplicates, beginning with
none. Note that the Duplicates number is ignored if you're distributing the duplicates using either Face Centers or Vertices.
In these cases, one duplicate is placed at each vertex or face center, depending on your choice.
- Base Scale
-
Alters the scale of the source object, affecting each duplicate identically. This scale occurs before any other transforms.
- Vertex Chaos
-
Applies a random perturbation to the vertices of the source object.
- Animation Offset
-
Lets you specify the number of frames within which each source object duplicate's animation is offset, at random, from the
original. So, for example, if you set Animation Offset to 10, each duplicate will start animating at a random frame between
0 and 10. At the default setting of 0, all duplicates move identically.
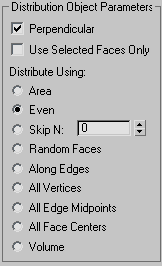
Distribution Object Parameters group
These options affect how the duplicates of the source object are arranged, relative to the distribution object. These options
have an effect only when a distribution object is used.
- Perpendicular
-
When on, orients each duplicate object perpendicular to its associate face, vertex, or edge in the distribution object. When
off, the duplicates maintain the same orientation as the original source object.
- Use Selected Faces Only
-
When on, limits distribution to the selected faces passed up the Stack. Perhaps the easiest way to do this is to use the Instance
option when picking the distribution object. You can then apply a Mesh Select modifier to the original object and select only
those faces you want to use for the distribution of the duplicates.
Distribute Using
The following options let you specify how the geometry of the distribution object determines the distribution of the source
object. These options are ignored if you're not using a distribution object.
- Area
-
Distributes duplicate objects evenly over the total surface area of the distribution object.
- Even
-
Divides the number of faces in the distribution object by the number of duplicates, and skips the appropriate number of faces
in the distribution object when placing duplicates.
- Skip N
-
Skips N number of faces when placing duplicates. The editable field specifies how many faces to skip before placing the next
duplicate. When set to 0, no faces are skipped. When set to 1, every other face is skipped, and so on.
- Random Faces
-
Applies duplicates randomly over the surface of the distribution object.
- Along Edges
-
Assigns duplicates randomly to the edges of the distribution object.
- All Vertices
-
Places a duplicate object at each vertex in the distribution object. The Duplicates value is ignored.
- All Edge Midpoints
-
Places a duplicate at the midpoint of each segment edge.
- All Face Centers
-
Places a duplicate object at the center of each triangular face on the distribution object. The Duplicates value is ignored.
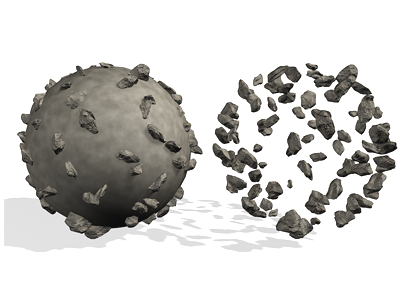
- Volume
-
Scatters objects throughout the distribution object's volume. All other options restrict distribution to the surface. Consider
turning on Display rollout Hide Distribution Object with this option.
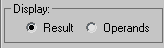
Display group
- Result/Operands
-
Choose whether to display the results of the scatter operation or the operands before the scattering.
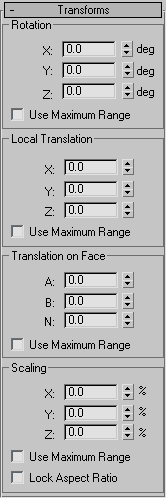
Transforms rollout
The settings in the Transforms rollout let you apply random transform offsets to each duplicate object. The values in the
transform fields specify a maximum offset value that's applied randomly with a positive or negative value to each duplicate.
Thus, if you set a rotation angle of 15 degrees, duplicates are rotated randomly from -15 to +15 degrees. For example, one
duplicate might be rotated 8 degrees, another -13, another 5, and so on. You can use the Transform settings with or without
a distribution object. When there is no distribution object, you must adjust the Transform settings in order to see the duplicates.
Rotation group
Specifies random rotation offsets.
- X, Y, Z deg
-
Enter the maximum random rotational offset you want about the local X, Y, or Z axis of each duplicate.
- Use Maximum Range
-
When on, forces all three settings to match the maximum value. The other two settings become disabled, and the setting containing
the maximum value remains enabled.
Local Translation group
Specifies translation of the duplicates along their local axes.
- X, Y, Z
-
Enter the maximum random movement you want along the X, Y, or Z axis of each duplicate.
- Use Maximum Range
-
When on, forces all three settings to match the maximum value. The other two settings become disabled, and the setting containing
the maximum value remains enabled.
Translation on Face group
Lets you specify the translation of duplicates along barycentric face coordinates of the associate face in the distribution object. These settings have no effect if you're not using a distribution
object.
- A, B, N
-
The first two settings specify the barycentric coordinates on the surface of the face, while the N setting sets the offset
along the normal of the face.
- Use Maximum Range
-
When on, forces all three settings to match the maximum value. The other two settings become disabled, and the setting containing
the maximum value remains enabled.
Scaling group
Lets you specify the scaling of duplicates along their local axes.
- X, Y, Z %
-
Specifies the percent of random scaling along the X, Y, or Z axis of each duplicate.
- Use Maximum Range
-
When on, forces all three settings to match the maximum value. The other two settings become disabled, and the one containing
the maximum value remains enabled.
- Lock Aspect Ratio
-
When on, maintains the original aspect ratio of the source object. Typically, this provides uniform scaling of duplicates.
When Lock Aspect Ratio is off, and any of the X, Y, and Z settings contain values greater than 0, the result is non-uniform
scaling of duplicates because the values represent random scaling offsets in both positive and negative directions.
Display rollout
Provides options that affect the display of the Scatter object.
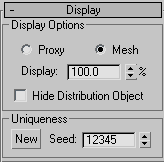
Display Options group
These options affect the display of the source and destination objects.
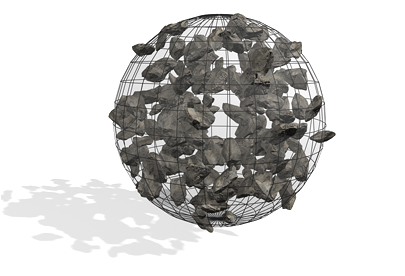
- Proxy
-
Displays the source duplicates as simple wedges and speeds up viewport redraws when manipulating a complex Scatter object.
This has no effect on the rendered image, which always displays the mesh duplicates.
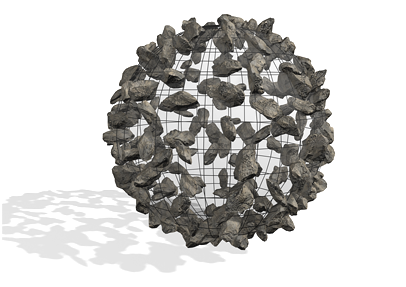
- Mesh
-
Displays the full geometry of the duplicates.
- Display %
-
Specifies the percentage of the total duplicate objects that appear in the viewports. This has no effect on the rendered scene.
- Hide Distribution Object
-
Hides the distribution object. The hidden object does not appear in the viewport or in the rendered scene.
Uniqueness group
Lets you set a seed number upon which the random values are based. Thus, altering this value changes the overall effect of
the scattering.
- New
-
Generates a new, random seed number.
- Seed
-
Use this spinner to set the seed number.
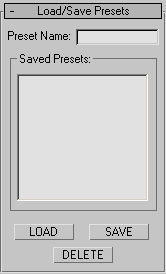
Load/Save Presets rollout
Lets you store preset values to use in other Scatter objects. For example, after setting all of your parameters for a specific
Scatter object and saving the settings under a specific name, you can then select another Scatter object and load the preset
values into the new object.
- Preset Name
-
Lets you define a name for your settings. Click the Save button to save the current settings under the preset name.
Saved Presets group
A list window containing saved preset names.
- LOAD
-
Loads the preset currently highlighted in the Saved Presets list.
- SAVE
-
Saves the current name in the Preset Name field and places it in the Saved Presets window.
- DELETE
-
Deletes the selected items in the Save Presets window.
NoteAnimated parameter values subsequent to frame 0 are not stored.


 Create panel
  (Geometry)