As an alternative to the object’s own pivot, you can use the working pivot for applying transforms to any object in the scene. This allows you, for example, to rotate an object about an arbitrary, persistent point in the scene without interfering with the object’s own pivot.
You position and orient the working pivot using standard transform tools as well as some special options available on this rollout, and can activate it at any time. You can use it for editing geometry at the object and sub-object levels. Keep in mind, however, that the working pivot cannot be used as a transform center when creating animation (see Animation and the Transform Center).

Moving an object along the working pivot Z axis
 Main UI group Working Pivot category actions to create a set of controls that you can use anywhere in the 3ds Max interface. For example, you could create a custom Working Pivot toolbar with buttons that give you access to the Working Pivot commands while editing meshes.
 Hierarchy panel or your custom UI control.
By default, this sets the geometric center for rotate and scale transforms to Use Transform Coordinate Center ; that is, the working pivot position. To specify a different transform center, use the Use Center flyout.
Reference Coordinate System list, choose Working.
This keeps the current Use Center setting.
When any of the modular tools on this rollout is active, a message to that effect appears in each viewport below the viewport name. For example, when you activate Use Working Pivot, the viewport legend reads “USE WP,” as shown in the above illustration.
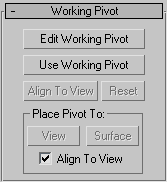
When on, makes the working pivot visible in the scene and lets you transform it.
When you first enter Edit Working Pivot mode, all transform tools use the Local reference coordinate system by default. You can change the coordinate system while working in this mode, and the tool remembers the reference coordinate system for each transform. Changing the transform, for example from Move to Rotate, recalls the last coordinate system for that transform during the current Edit Working Pivot session.
Exiting Edit Working Pivot restores the last active transform tool. For example, if you’re rotating an object, and you move the working pivot and then exit Edit Working Pivot mode, the Rotate tool will again be active.
When on, lets you transform the current selection (objects or sub-objects) with respect to the working pivot. The transform gizmo, when visible, moves to the working pivot location. In this mode you typically transform the selection by manipulating the gizmo rather than the selection.
This mode overrides the current transform space for all transforms. Exiting this mode restores the individual coordinate system for each transform tool.
By default, this sets the geometric center for rotate and scale transforms to Use Transform Coordinate Center ; that is, the working pivot position. To specify a different transform center, use the Use Center flyout.
You can activate Edit Working Pivot while using the working pivot; when you exit Edit Working Pivot, Use Working Pivot mode is restored.
Moves the working pivot to the pivot location of the selected object. With multiple selected objects, the working pivot moves to the pivot position of the last-selected object. With a sub-object selection, the working pivot moves to the geometric center of the selection (the averaged position of the selected sub-objects).
If the working pivot doesn’t appear onscreen, use Reset to move it to a known location.
These controls let you position the working pivot by clicking the mouse instead of with transform tools. To use, click the View or Surface button, and then click in a viewport to position the working pivot there. To exit, right-click the active viewport or click the button again. You’re then returned to the previous transform tool and working pivot mode if you were using one.
Places the working pivot on a surface you click on, or, if no surface is present where you click, the construction plane. This works like AutoGrid , and you can see the gizmo previewing the alignment to the normal of the surface as you move the cursor over it. Clicking places the pivot to the surface and aligns it to the normal (unless Align To View is on; see following).


