Command entry:
Customize menu

Customize User Interface
Toolbars tab
The Toolbars panel lets you edit existing toolbars and create your own custom toolbars. You can add, remove, and edit buttons
on existing toolbars, or you can delete the toolbars entirely. You can also create custom toolbars with both 3ds Max commands and scripts.
Procedures
To create and populate a toolbar:
- Choose Customize menu Customize User Interface Toolbars tab.
- Click New.
The New Toolbar dialog appears.
- Enter the name of the toolbar and click OK.
The new toolbar appears as a small floater. Like any floating toolbar, you can resize it and change proportions by dragging
the corners and edges.
- Use any of these three methods to add commands to the toolbar:
- Drag a command to the toolbar from the Customize User Interface dialog Action list. If the action has a default icon assigned to it (it appears next to the command in the action list), the icon
will appear as a button on your toolbar. If no icon is assigned to the command, the name of the command will appear as a button
on the toolbar.
- To copy an existing button, Ctrl+drag the button from any toolbar onto your toolbar.
- To move an existing button, Alt+drag the button from any toolbar onto your toolbar.
- If you don’t want the new toolbar to appear in the interface by default, choose it from the drop-down list on the right side
of the Customize User Interface dialog, and then turn on the Hide check box. Thereafter you can toggle the custom toolbar
by right-clicking a blank area of any toolbar and choosing the toolbar name from the context menu.
To add commands to a toolbar:
- Choose Customize menu Customize User Interface Toolbars panel.
Alternatively, right-click the label of a toolbar and then choose Customize.
- If necessary, open the toolbar to customize using either of the following methods:
- Right-click a blank area of any toolbar and choose the toolbar name from the context menu.
- Choose the toolbar name from the toolbars drop-down list on the right side of the dialog and then turn off the Hide check
box.
- Use any of these three methods to add commands to the toolbar:
- Drag a command to the toolbar from the Customize User Interface dialog Action list. If the action has a default icon assigned to it (it appears next to the command in the action list), the icon
will appear as a button on your toolbar. If no icon is assigned to the command, the name of the command will appear as a button
on the toolbar.
- To copy an existing button, Ctrl+drag the button from any toolbar onto your toolbar.
- To move an existing button, Alt+drag the button from any toolbar onto your toolbar.
To record a script and add it to a toolbar:
Use this method to record a series of commands into a MAXScript command sequence and then turn the script into a toolbar button.
You can then re-invoke that sequence at any time. No scripting knowledge is necessary.
- Choose Customize menu Customize User Interface Toolbars panel.
Alternatively, right-click the label of a toolbar and then choose Customize.
- Open a MAXScript Listener window by any of the following methods:
- Press F11.
- Choose MAXScript menu MAXScript Listener.
- Choose
 Utilities panel MAXScript MAXScript rollout Open Listener.
- Click or right-click the POV viewport label, and then from the POV viewport label menu, choose Extended Viewports MAXScript Listener.
- Choose MAXScript menu Macro Recorder, or, from on the Listener dialog, choose MacroRecorder Enable.
- Perform the actions you want to record.
The Macro Recorder records the actions you perform as a script in the upper portion of the Listener dialog (pink background).
- Highlight the lines you want in the recorded script, and then drag those lines directly onto a toolbar.
NoteYour macro might require some minor editing to remove extraneous steps or to refine the procedure.
You can edit the appearance of the text or icons on your toolbars with the Edit Button Appearance Dialog command, which is available when you right-click the toolbar button.
To add a button to the Quick Access toolbar:
To remove a button from the Quick Access toolbar:
- Click an item in the Quick Access toolbar list to highlight it.
- Click Remove.
3ds Max removes the button from the list and the Quick Access toolbar.
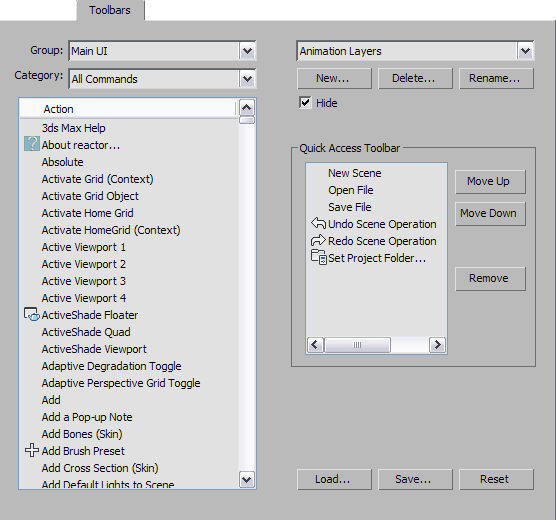
Interface
- Group
-
Displays a drop-down list that lets you choose the functional context you want to customize. Contexts include Main UI (user
interface), Track View, and Material Editor.
- Category
-
Displays a drop-down list of available categories of user-interface actions for the chosen group.
- Action list
-
Displays all available actions for the chosen group and category.
- [toolbars drop-down list]
-
Displays all existing toolbars.
- New
-
Opens the New Toolbar dialog. Enter the name of the toolbar you want to create and click OK. The new toolbar appears as a
small floater.
Once you’ve created a toolbar, there are three ways to add commands:
- Drag actions from the Action Window in the Toolbars panel of the Customize User Interface dialog onto your toolbar.
- Ctrl+drag buttons from any toolbar onto your toolbar. This action creates a copy of the button on your toolbar.
- Alt+drag buttons from any toolbar onto your toolbar. This action moves the button from the original toolbar onto your toolbar.
- Delete
-
Deletes the toolbar item displayed in the Toolbars list.
- Rename
-
Displays the Rename Toolbar dialog. Select a toolbar from the Toolbars list to activate the Rename button. Click Rename, change
the name of the toolbar, and click OK. The toolbar name changes in the toolbar floater.
- Hide
-
Toggles the display of the chosen toolbar in the toolbars list.
Quick Access Toolbar group
- [List of buttons]
-
Shows the buttons that currently appear on the Quick Access toolbar.
You can add a button to this list by dragging and dropping from the Action list.
- Move Up
-
Moves the selected button up in the list, which moves it to the left on the toolbar.
- Move Down
-
Moves the selected button down in the list, which moves it to the right on the toolbar.
- Remove
-
Removes the selected button from the list and the toolbar.
_____
- Load
-
Displays the Load UI File dialog. Allows you to load custom user interface (CUI) files.
- Save
-
Displays the Save UI File As dialog. Allows you to save any changes to the user interface in a CUI file.
- Reset
-
Restores the default setup (defaultUI.cui).