Command entry:
Create panel


(Space Warps)
Geometric/Deformable
Object Type rollout
FFD(Cyl)
Command entry:Create menu
Space Warps
Geometric/Deformable
FFD(Cyl)
Free-form deformations (FFDs) provide a method of deforming an object by adjusting the control points of a lattice. The offset
position of the control points to the original lattice source volume causes the distortion of the affected object. The FFD(Cyl)
space warp uses a cylindrical array of control points in its lattice. This FFD is available as both an object modifier and
a space warp. For information on the object modifier version, see FFD (Box/Cylinder) Modifiers.
You create FFD space warps as separate objects similarly to the way you create standard primitives: by dragging the mouse
in the viewport. The result is a lattice of control points. The source lattice of an FFD modifier is fitted to the geometry
it's assigned to in the stack. This might be a whole object or a sub-object selection of faces or vertices.
Because FFD space warps are separate objects, they carry their own adjustable dimension parameters among the creation parameters.
You can apply object modifiers to space warp objects. For example, you can use the Linked XForm modifier with a space-warp
FFD.
Procedures
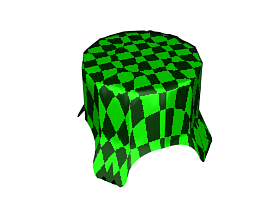
Example: Create an animated tablecloth:
This example shows how to use the FFD(Cyl) space warp to create a tablecloth that flies in and drapes itself over a table.
Begin by creating the table and tablecloth.
- Create a table from two cylinders. Make the table top with a radius of 30 units, and a height of 2 units. Make the "table stand" cylinder with a radius of 3 and a height of 60.
- Make a tablecloth from a box 100 units square and 0.5 units in height. Increase Length and Width Segments to 30, and keep Height Segments at 1.
- Position the tablecloth so it's level with or slightly above the table top, and a little less than 100 units to the left of the table edge, as seen from the Top view.
- Apply a nice wood grain to the table, and a checker to the tablecloth. (Set the checker tiling to about 15x15, and choose
any color for the checkers.)
Now, set up a cylindrical FFD space warp that will form the drape of the tablecloth over the table.
- From the Create panel Space Warps Geometric/Deformable, choose FFD(Cyl).
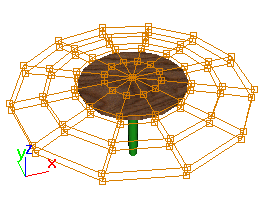
- In the Top viewport, create a cylindrical FFD space warp, centered on the table top, with a radius of 45 and a height of 5.
- Click the Set Number of Points button and, in the Set FFD Dimensions dialog, set Side points to 12, Radial points to 5, and Height points to 2.
- Move the entire FFD lattice up until it's just over the surface of the table, as seen from the Front viewport.
Next, adjust the control points of the lattice to drape over the table.
- Zoom Extents All Selected.
- On the Modify panel, in the stack display (below "Modifier List"), click the FFD(cyl) item so it turns yellow. This means
you've enabled direct access to the FFD space warps control point sub-objects.
- In the FFD Parameters rollout Selection group, turn on All X. This lets you select control points around the perimeter of the FFD cylinder.
- In the Top viewport, use the Select and Move tool and region-select the two visible control points of the two outer rings of control points at the nine-o'clock position. (This
is easier shown than described. You can actually region-select any number of vertices in the two outer concentric rings of
vertices. Because All X is on, all control points for the two rings will be selected.)
- On the status bar, click
 (Selection Lock Toggle) to lock the selection. In the Front viewport, drag the selected points halfway down the height of
the table.
(Selection Lock Toggle) to lock the selection. In the Front viewport, drag the selected points halfway down the height of
the table.
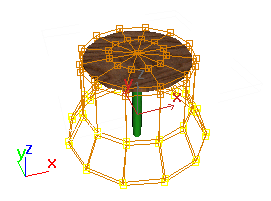
- Unlock the selection, and then region-select any control point in the outer ring to select all points in the outer ring.
- Lock the selection and, in the Front viewport, drag the outer ring of points down to the floor.
You now have a truncated cone shape over the table.
- Unlock the selection. In the Top viewport, again select all the control points in the two outer rings.
- Scale the selected control points in, until the radius of the inner ring of points is slightly larger than the table top.
- Select only the outer ring of points, and scale them so their radius is slightly larger than the inner ring.
If necessary, move the points, as seen from the Front viewport, down to touch the floor again.
You now have a lattice of control points draped over the table.
In this next series of steps, you'll bind the tablecloth to the FFD lattice, and then animate it to move over the table.
- In the stack display, click the FFD(cyl) entry again to exit the sub-object level. It turns gray.
- On the main toolbar, click
 (Bind To Space Warp), and drag between the FFD and the tablecloth.
- Select the FFD lattice.
- Choose Deform group All Vertices.
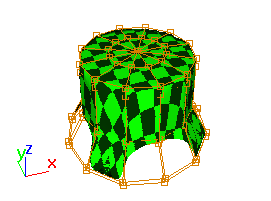
The tablecloth is immediately deformed because all vertices are now affected, including those outside the lattice volume,
and Falloff is set to 0. A falloff value of 0 means that the distance of the vertices from the lattice doesn't matter. Any
number greater than 0, however, limits the effect.
- Set the Falloff spinner to 0.4.
No longer influenced by the FFD space warp, the tablecloth returns to its square shape.
- Turn on
 (Auto Key), and go to frame 100.
- In the Top viewport, select the tablecloth, and move it until it's centered over the table.
- As the tablecloth nears the table, it droops down to the floor, sweeps up and over the table, and finally drapes itself over
the table.
- As you move the time slider back and forth and examine the animation, you might find that the bottom of the tablecloth is
deformed to the point where it's hanging below the floor. To fix this, turn off Auto Key, go to frame 100, select the lower
ring of control points, and move them up until the tablecloth is at the height you want it. You can also adjust the position
of the other control points to create drapes, and so on.
- On the Display command panel Hide by Category rollout, turn on Space Warps to hide the FFD space warp.
- Turn off
 (Auto Key).
- Set up appropriate lights and a camera, and
 play your animation.
Interface
This rollout lets you set the size and resolution of the lattice, and how it displays and deforms.
Dimensions group
These options let you adjust the unit dimensions of the source volume, and specify the number of control points in the lattice.
Note that the point dimensions are displayed beside the modifier name in the Stack list.
- Radius, Height
-
These two spinners display and let you adjust the length, width, and height of the lattice. To create the space warp, drag
the mouse in the same way that you would to create a standard Cylinder primitive. Note that these spinners don't exist in
the object-modifier version of the FFD.
- Label
-
Displays the current number of controls points in the lattice (for example: 4x8x4).
- Set Number of Points
-
Displays a dialog containing three spinners labeled Side, Radial, and Height, plus OK/Cancel buttons. Specify the number of
control points you want in the lattice, and then click OK to make the change.
- Side
-
The number of control points around the perimeter of the lattice.
- Radial
-
The number of control points, radially, from the center to the outer perimeter of the lattice.
- Height
-
The number of control points along the height of the lattice.
NoteMake changes to the dimensions before you adjust the positions of the lattice control points. When you change the number of
control points with this dialog, any adjustments you've already made to the control points are lost; however, you can undo
this use of the dialog.
Display group
These options affect the display of the FFD in viewports.
- Lattice
-
When on, lines are drawn connecting the control points to make a grid. Although viewports can become cluttered when these
extra lines are drawn, they help to visualize the lattice.
- Source Volume
-
When on, the control points and lattice are displayed in their unmodified state. This display is helpful when you're adjusting
the source volume to affect specific vertices that lie within or without it. See the All Vertices and Only in Volume options,
later in this topic.
Deform group
These options provide controls that specify which vertices are affected by the FFD.
- Only In Volume
-
When on, only vertices that lie inside the source volume are deformed. Vertices outside the source volume are not affected.
This is the default choice.
- All Vertices
-
When on, all vertices are deformed regardless of whether they lie inside or outside the source volume, depending on the value
in the Falloff spinner. The deformation outside the volume is a continuous extrapolation of the deformation inside the volume.
Note that the deformation can be extreme for points far away from the source lattice.
- Falloff
-
This spinner, enabled only when you choose All Vertices, determines the distance from the lattice that the FFD effect will
decrease to zero. When this spinner is set to 0, it's effectively turned off, and there is no falloff; that is, all vertices
are affected regardless of their distance from the lattice. The units of the Falloff parameter are specified relative to the
size of the lattice: A falloff of 1 means that the effect will go to 0 for points that are a lattice width/length/height away
from the lattice (depending on which side they are on).
- Tension/Continuity
-
Lets you adjust the tension and continuity of the deformation splines. Although you can't see the splines in an FFD, the lattice
and control points represent the structure that controls the splines. As you adjust the control points, you alter the splines
(which move through each point). The splines, in turn, deform the geometry of the object. By altering the tension and continuity
of the splines, you alter their effect on the object.
Selection group
These options provide additional methods of selecting control points. You can toggle any combination of the three buttons
to select in one, two, or three dimensions at once.
- All X, All Y, All Z
-
When one of these buttons is on and you select a control point, all control points along the local dimension specified by
the button are selected as well. By turning on two buttons, you can select all control points in two dimensions.
- About
-
Displays a dialog with copyright and licensing information.