General Preferences


Command entry:Customize menu Preferences Preferences dialog General tab

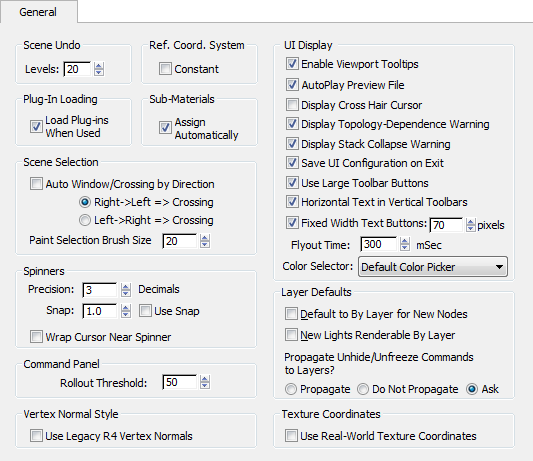
On the General panel of the Preference Settings dialog, you set options for the user interface and for interactivity.

Interface

Procedures

To set and toggle spinner snap:

  1. Do one of the following:
    • Choose Customize menu Preferences Preference Settings dialog General tab.
    • On the main toolbar, right-click (Spinner Snap).

    Either method brings up the General tab. The two controls for spinner snap are in the Spinners area of this panel.

  2. Enter a value in the Spinner Snap field.
  3. Turn on Use Spinner Snap.

    When you exit the dialog, Spinner Snap is on.

  4. As you work, use the Spinner Snap button to toggle the use of this setting.

To set the Undo level:

  1. Choose Customize menu Preferences Preference Settings dialog General panel.
  2. Change the value of Scene Undo Levels.

    The higher the value of Undo Levels, the more system resources are required. The default value is 20.

Interface

Scene Undo group

Levels

Sets the number of operations you can undo.

Reference Coordinate System group

Constant

Sets one coordinate system and transform center for Move, Rotate, and Scale on the Main toolbar. The coordinate system displayed in the coordinate dropdown list, and the transform center selected from the Use Center flyout, are used for all transforms.

Normally, each transform switches to the coordinate system and transform center used the last time the transform was active.

UI Display group

Enable Viewport Tooltips

When on, and not at a sub-object level, this function displays a tooltip when the cursor pauses over a non-selected object in the viewport.

AutoPlay Preview File

Starts the Media Player automatically at the end of a Make Preview.

Display Cross Hair Cursor

Displays the mouse cursor as full-viewport cross hairs, vertical and horizontal lines extending the full extent of the active viewport.

Each movement of the mouse is redrawn, so the cross hairs are relatively slow. If you want to create a keyboard shortcut, find Cross Hair Cursor toggle in Customize menu Customize User Interface Keyboard panel and specify the keys to use for the shortcut. To change the color of the cross-hairs cursor, go to Customize menu Customize User Interface Colors panel Viewports Cross Hair Cursor and use the color selector to change the cursor color.

Display Topology Dependence Warning

Toggles the topology dependence warning. This warning appears when you choose to edit a modifier or the base object at the bottom of the modifier stack of an object with modifiers and sub-object selections. The warning occurs because this action can affect the object topology adversely. You can also turn off the warning on the warning dialog. Default=on.

Display Stack Collapse Warning

Toggles the stack collapse warning, which appears if you choose to collapse the modifier stack. You can also turn off the warning on the warning dialog. Default=on.

Save UI Configuration on Exit

Restores panels and toolbars to the positions they were in the last time you used 3ds Max. Turn off this switch to restore panels to the state they were in before turning on this option.

Use Large Toolbar Buttons

Toggles between large and small toolbar buttons.

Horizontal Text in Vertical Toolbar

Ensures that text buttons are displayed horizontally.

If you create a vertical custom toolbar that uses text rather than image buttons, you can use this option to display either horizontal or vertical text.

Fixed Width Text Button

Specifies the maximum width of text buttons.

To use this feature, turn on the Horizontal Text In Vertical Toolbar switch, turn on this option, and then set a maximum display size for the text button in pixels. For custom vertical toolbars with text buttons, this option limits the size of the text display.

Flyout Time

Sets the pause, in milliseconds, between the mouse click and the flyout popping up from the button. Increase this setting only if you need an extra-long delay. Don't decrease the setting much or you might not be able to execute button commands before the flyout takes over.

Color Selector

Choose the default color selector, or a third-party plug-in color selector in the list. The color selector you choose here is used throughout 3ds Max whenever you specify a color.

Plug-In Loading group

Load Plug-Ins When Used

When on, loads plug-ins on demand, as they are needed.

Sub-Materials group

Assign Automatically

Enables the automatic creation of a Multi/Sub-Object material when you assign a material to a selection of face sub-objects in an editable object. Default=on.

When on, the assigned material becomes part of the new Multi/Sub-Object material, and is assigned to the face selection. When off, the assigned material is assigned to the entire object.

NoteIf the face selection comprises faces with different material IDs, assigning a material to the selection with Assign Automatically enabled results in 3ds Max assigning the first unused material ID to all selected faces, thus changing their IDs.

See also Drag and Drop Sub-Object Material Assignment.

Scene Selection group

Auto Window/Crossing by Direction

When on, the direction that you drag a selection area determines whether it is a window or crossing selection. This works for any selection area (rectangle, circle, fence, or lasso).

You can select which direction causes a window selection and which causes a crossing selection in the Scene Selection group. When you drag a window selection, the selection region is displayed with a solid line; when you drag a crossing selection, the selection region is displayed with dashed lines.

Right-> Left => Crossing

When you drag a selection region from right to left, it is a crossing selection. Conversely, when you drag left to right, it is a window selection.

Left-> Right => Crossing

When you drag a selection region from left to right, it is a crossing selection. Conversely, when you drag right to left, it is a window selection.

Paint Selection Brush Size

Sets the size of the brush used by Paint Selection Region .

Spinners group

Precision

Sets the number of decimal places displayed in a spinner edit field. Range=0 - 10 (where 0 is no decimal places).

Snap

Sets the click increment and decrement values for all of the spinners in 3ds Max.

Use Snap

Toggles spinner snap on and off.

Wrap Cursor Near Spinner

Limits cursor wrapping to an area close to the spinner when you drag to adjust spinner value.

Command Panel group

Rollout Threshold

The number of pixels in a rollout that should be scrollable in the command panel before the rollout is shifted into a separate command panel column.

This option is applicable only when the command panel displays multiple columns.

Layer Defaults group

Default to By Layer for New Nodes

When on, 3ds Max sets rendering, motion blur, display, and advanced lighting properties for all new objects to By Layer.

New Lights Renderable By Layer

When on and you create a light, 3ds Max gets its Object Properties Renderable setting from the properties of the active layer.

Propagate Unhide/Unfreeze Commands to Layers?

When you unhide or unfreeze an object on a hidden or frozen layer, this choice determines whether the command affects the object or its layer.

  • PropagateUnhiding or unfreezing an object in a layer unhides or unfreezes the layer.
  • Do Not PropagateUnhiding or unfreezing an object in a hidden or frozen layer affects only the object.
  • AskWhen this option is active and you unhide or unfreeze objects, a dialog appears asking if you want to apply the operation to the associated layers. If you do, the associated layers are unhidden or unfrozen. Otherwise the operation is applied only to the specified objects.

Vertex Normal Style group

Use Legacy R4 Vertex Normals

By default, 3ds Max uses a new, more accurate method for computing vertex normals from smoothing groups, which improves the way geometry displays in viewports and in rendered output. To use the method from older versions of 3ds Max, for compatibility, turn on this check box.

Texture Coordinates group

Use Real-World Texture Coordinates

Controls whether real-world texture coordinates are active or if the legacy method of applying texture coordinates is in use. When off, texture-coordinate behavior reverts to the legacy method and texture tile values have a default value of 1, and Real-World Map Size for primitives is off. Default = off for 3ds Max, on for 3ds Max Design.

When Use Real-World Texture Coordinates is on, the Use Real-World Scale (for 2D maps) and Real-World Map Size options are also on. Real-World Map Size is available for objects such as primitives and modifiers such as UVW Map.