Geometry imported from OBJ files appears in 3ds Max as editable mesh or editable poly objects. Import of associated materials and maps is supported.
NoteWhen you import an OBJ file by
dragging and dropping, by default the importer does not display the OBJ Import Options dialog. To see the dialog, hold down the
Ctrl key while you drag and drop.
Procedure
To import an OBJ file:
- From the

 Application menu, choose Import.
The Select File To Import dialog opens.
- Choose an OBJ file to open and click Open.
The importer dialog opens.
- Choose the objects to import and set the import parameters. For details, see the Interface section, following.
- Click Import.
During import, a dialog showing progress and the names of imported objects opens. If a name conflict occurs, a dialog opens
giving you the opportunity to skip or rename the object.
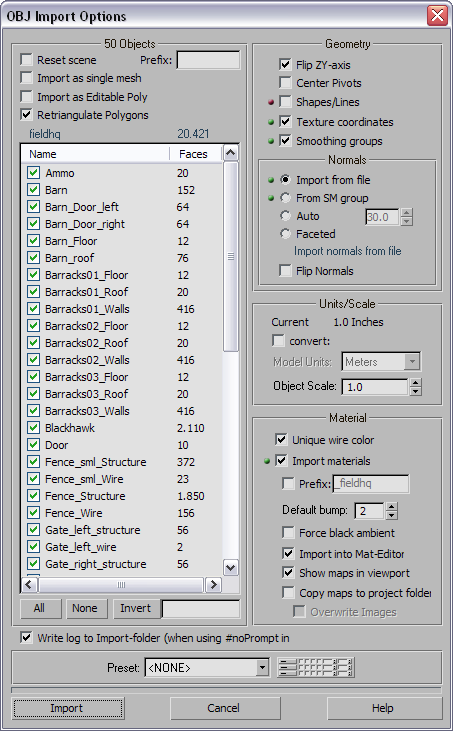
Interface
“LED” Icons for Options
The dialog indicates which features are in the OBJ file by means of red and green icons that look like LEDs.
-

-
This feature is present in the OBJ file.
-

-
This feature is not present in the OBJ file.
Objects group
- Reset scene
-
Deletes the current scene from memory before importing the OBJ file.
- Prefix
-
The importer prepends any text entered here to the name of each imported object.
- Import as single mesh
-
When on, the importer combines the contents of the OBJ file into a single editable mesh object, and gives the object the same
name as the file (without the file name extension).
For example, if you import as a single mesh a file named window_parts.obj, all separate objects in the OBJ file are combined into a single editable mesh object named “window_parts”.
- Import as Editable Poly
-
When on, imports the Wavefront geometry as Editable Poly objects rather than Editable Mesh objects. Default=off.
- Retriangulate Polygons
-
When on, ensures that imported polygons are triangular, as in Editable Poly surfaces. This can be useful when you import meshes
from a modeling program that doesn’t ensure triangular polygons. Default=on.
WarningRetriangulate Polygons can alter the vertex order, so when this option is on, exporting a mesh back to the OBJ format won’t
match the original mesh exactly. Some applications, such as Mudbox and ZBrush ® , depend on vertex order: if you are working with one of these, be sure to turn off Retriangulate Polygons.
TipWhen you import and export OBJ files used with a particular application, use
presets to ensure consistency.
- [file info]
-
Just above the list of objects in the file, appearing as read-only fields, are the name of the OBJ file and the total number
of faces in the file.
- [object list]
-
The objects in the imported OBJ file appear in this scrolling list. Each entry consists of an object name and the number of
faces in the object, plus a check box to the left of the object name for enabling and disabling import per object.
By default, import is enabled for all objects in the file. To toggle import for an individual object, click its check box
in the list. You can also use the controls at the bottom of the list to enable and disable import (see following).
- All/None/Invert
-
Use these buttons to modify the state of the import enable/disable check boxes. All enables all objects in the list; None
disables all objects; Invert reverses the state of each check box.
- [text field]
-
Enter search phrases with wild cards into the editable text field to the right of the Invert button to enable only objects
that satisfy the search criteria. For example, to enable all list items whose names start with “Sphere”, enter sph*.
You can also use the standard search character ? to represent a single character. For example, to enable all four-character
names starting with “Box”, use the search string box?.
Geometry group
- Flip ZY-axis
-
When on, transfers all Y-axis values to the Z axis and vice-versa. Use this when importing from Poser and other programs that
use Y as the vertical axis and Z as the depth axis.
- Center Pivots
-
Positions the pivot of each imported object at its center. When off, the pivots are positioned at the world center: (0,0,0).
- Shapes/Lines
-
Enables import of splines.
- Texture coordinates
-
When on, texture coordinates are loaded from the imported file, if present, and associated with the geometry.
- Smoothing groups
-
Normals Group
These controls affect how normals are imported (or generated, if necessary).
- (The default.) Imports the normals used in the OBJ file. If the OBJ file does not have normals, generates normals using the
imported smoothing groups. If the OBJ file does not specify smoothing groups, generates normals by assigning all faces smoothing
group 1.
- Generates normals from imported smoothing groups. If the OBJ file does not specify smoothing groups, or you turn off Geometry
 Smoothing Groups, generates normals by assigning all faces smoothing group 1.
- Generates smoothing groups based on the angle between faces.
The threshold angle for generating smoothing groups: if the angle between two faces is less than this value, both are assigned
to the same smoothing group. If the angle is greater than this value, the two faces are assigned to separate smoothing groups.
Default=30.0.
- All faces are assigned to smoothing group 0: that is, no smoothing is applied, and the imported mesh has a faceted appearance.
- Flip Normals
-
Flips the normal of all imported faces. It doesn’t matter whether the normals are imported or generated.
This option is mainly for use when you are importing a model that appears “inside out” if you don’t flip the normals. Such
models usually result when geometry is exported by an application other than Maya or 3ds Max.
Units/Scale group
- convert
-
Turn on to enable unit conversion. Default=off.
- Choose the unit to use when importing th e model. Most often, you will set this to the unit used in the original OBJ file.
- Object Scale
-
When Convert is off, determines the scaling for the contents of the OBJ file on import. The default value of 1.0 means no
scaling is performed.
Material group
- Unique Wire Color
-
Determines the wireframe colors assigned when importing multiple objects without materials. When on, each object is assigned
a different wireframe color. When off, each object is assigned the same wireframe color, picked at random.
- Import Materials
-
When on, imports materials from the MTL file associated with the OBJ file. Default=on.
When off, the remaining controls in this group are disabled.
- Prefix
-
Prepends the indicated text to the name of each imported material. Enter the prefix in the editable text field to the right
of the Prefix check box.
- Default bump
-
The default amount of bump maps if the value is not specified in the MTL file.
- Force black ambient
-
Sets the Ambient component of imported materials to black.
- Import into Mat-Editor
-
Brings imported materials into the Material Editor. If this is off at import time and you later want to edit a material, you
need to use Get Material first.
- Show maps in viewport
-
- Copy maps to project folder
-
When on, copies maps used by the OBJ file to the \scenassets\images subfolder of the current 3ds Max project folder. Default=off.
_____
- Write log to Import-folder
-
Saves a log file to the same folder as the OBJ file when importing via script.
Preset Group
- Preset
-
When importing from a specific application, choose that application from the list. Presets comprise all export settings, including
geometry and materials.
 [edit presets]
-
Click to open a dialog that lets you edit the presets. To change the map path for a preset, edit the map-path setting manually
or click the folder button at the right end of the row and navigate to the new path.
While the Presets dialog is open, you can choose a preset by clicking its name (the row highlights) and then clicking OK.
_____
- Import
-
Loads the designated files (OBJ + materials and maps) according to the current settings.
During the import, a dialog shows the progress. If a name conflict occurs, a dialog appears giving you the option to skip
the duplicate object or rename it.
- Cancel
-
- Help
-
Opens the help file to this topic.