Most often, you will want to use envelopes to correct the way skin behaves as the biped moves. However, you can override envelopes by manually assigning vertex properties. For example, you can remove the influence of inappropriate links from selected vertices. You can also change the weight distribution between links for a single vertex by using type-in weights.
 Vertex Type buttons are on.
Physique displays the vertices assigned to that link. If any vertices assigned to the link are out of place, reassign them to a different link, as described in the procedures that follow.
To remove a link's influence on vertices:
For example, you might want to remove the influence of the index finger links from the vertices of the middle finger.
 (Select Object) and select vertices in the viewports.
You must use Lock Assignments to ensure that these envelopes will not influence these vertices if envelope parameters are adjusted later.
To remove deformable vertices from a link's influence:
Vertex Type buttons are on, and then in the Vertex Operations group, click to turn on Select By Link.
Observe the assignments and determine which vertices are incorrectly influenced. Also note if the vertices are red (deformable) or green (rigid).
(Select Object), and in a viewport, select only the out-of-place vertices.
 (Rigid Vertices) and
  (Root Vertices). Leave
  (Deformable Vertices) on.
To override vertex assignments manually:
This technique is used when envelope assignments are inappropriate, and you want to have specific vertices influenced by a specific link.
Vertex Type buttons are on, and then select the vertices you want to reassign.
deformable (red) or rigid (green.)
This setting will disregard the effects of blending envelopes and vertex weights, and let you assign the selection to any link manually.
(Select Object), and in a viewport, select the vertices you want to make rigid.
(Rigid Vertices), and turn off (Deformable Vertices) and (Root Vertices).
This setting will disregard the effects of blending envelopes and vertex weights, and let you assign the selection to any link manually.
Small squares around the selected vertices indicate that the vertices are locked.
Controls for vertices in a mesh controlled by Physique are on the Vertex-Link Assignment rollout.
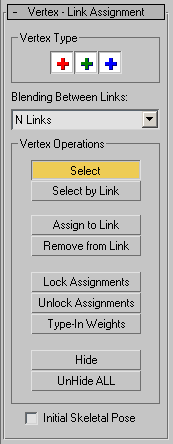
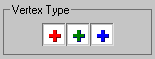
There are three vertex types, differentiated by color:
RedDeformable vertices that follow Physique’s deformation spline.
GreenRigid vertices that do not deform but just follow the link they are assigned to.
BlueVertices attached to the root node. Physique uses this color when it isn’t sure which link to assign the vertices to. These
vertices don’t deform but follow the center of mass object. You should reassign blue vertices to be either rigid or deformable.
While a button of the appropriate color is turned on, you can select vertices of that color. Turn off a button to avoid selecting vertices of that color. You can't turn off all three buttons at once.
Blending Between Links drop-down list
This list provides several options:
While this option is active, vertices can be assigned only to the envelopes they fall within. Envelopes are used by Physique in this case to define the blended weight of each vertex.
This is useful as a general default if you are developing characters for a game engine that doesn't support blending. At the Vertex sub-object level it is useful to override blending weights defined by envelopes, and assign vertices to links as either Rigid or Deformable. For example, after selecting vertices of the skull and face, turn on No Blending, turn on Rigid vertices, turn on Assign To Link, and then click the head link. This will override the head envelope vertex assignments and assign these vertices as rigid to the head link. Use Lock Assignments to lock any changes (see below).

Assigns the selected vertices to a link.
To assign the currently selected vertices to a link, turn on Assign To Link and then click the link.
Assign To Link has a dependency on the envelopes defined for each link, and you must set Blending Between Links to "No Blending" to override this. After vertices are assigned manually in this way, use Lock Assignments to keep them from being reassigned inadvertently during subsequent operations.
Lock will prevent any changes from being made to the weights and blending presently assigned to the selected vertices. After any manual assignment of vertices, they should be locked. Before using type-in weights, vertices must be locked. When manipulating envelopes in difficult areas of the character, you might choose to lock vertices that are working well before changing the envelopes to affect other vertices.
Displays the Type-In Weights dialog, which you use to enter a weight for selected locked vertices; only the weight for locked vertices can be changed.
To use this feature: select one or more vertices, then lock them. Click this button to display the Type-In Weights dialog, select a link from the drop-down list, and change the weight of that link to position the vertices (vertex positions update in the viewports as the weight changes).
You can use type-in weights for stubborn vertices that fall in blended regions between two or more envelopes. Subtle adjustments can be made to the vertex weights of specific links that would be difficult to achieve by adjusting envelopes alone.


 Modify panel