Shared Motion Flow allows you to assign one motion flow to multiple bipeds or crowds. Rather than building a motion flow network of clips for each biped, you can create a motion flow with all the clips and transitions to animate multiple bipeds. Random motion creation will use each biped's own motion flow. If a biped’s motion flow happens to be a shared motion flow, then the shared motion flow will be used to compute random motion.
A biped that shares a motion flow shares only the clips you have added to the Motion Flow Graph. Scripts are unique to each biped, although the scripts point to the clips of the shared motion flow. You can manipulate each biped's motion flow and scripts in the usual ways. You can create random motion on a biped that shares a motion flow, or create a motion flow script using the crowd system.
There are a few indicators in the user interface that show if a biped is using a shared motion flow. If it is, a white circle surrounds the Shared Motion Flow button when you edit that biped. If you edit that biped's motion flow graph, the title of the graph dialog will say "Shared Motion Flow Graph", followed by the name of the shared motion flow.
Example: To share a random motion flow among multiple bipeds:
 (Motion Flow Mode).
 (Shared Motion Flow).
3ds Max creates a new shared motion flow.
 Parameters group, click Add.
The bipeds are added to the list. If you add clips to the motion flow graph they will be shared by the bipeds.
 (Show Graph).
 (Create Multiple Clips) and add three or four clips (or more) to the Motion Flow Graph.
3ds Max opens a file dialog, where you can choose the location of your BIP files.
 (Move Clips) and arrange the clips so they are not so close to one another. This will make it easier to see the transitions
later.
(Move Clips) and arrange the clips so they are not so close to one another. This will make it easier to see the transitions
later.
 (Select Clip/Transition) and region-select all the clips.
 (Create All Transitions), and click Yes when asked if you want to create a transition from each selected clip to itself.
 (Select Random Start Clips).
All the transitions linking clips are weighted at 100, meaning all the transitions have a even chance of being chosen randomly.
The clips all turn purple and each is assigned a weighting of 100. Now all the clips have an even chance of starting first.
 Scripts group, click
  (Create Random Motion).3ds Max opens
Failure to do this will result in the motion flow being added only to the selected biped.
A Unify Options dialog appears once for each of the bipeds in the scene. Click OK to accept the defaults.
After the Unify Options dialogs, an alert dialog asks if you want to put all the bipeds into Motion Flow mode. Click Yes.
3ds Max creates a random script for each of the bipeds that shar the motion flow. Footsteps appear in the viewports, and the bipeds’ initial poses might change.
 (Play Animation) or scrub the time slider to view the effect of the randomized script.
To apply a shared motion flow to a different group of bipeds:
character studio can save and load shared motion flow setups. With this facility, you can create and refine a crowd simulation using bipeds that don't have meshes attached, thus avoiding the computational overhead that Physique requires. Once the simulation is ready, you can save the shared motion flow setup, apply it to a similar set of bipeds with Physique applied, and then render the final animation with no further crowd setup required.
For best results, the two sets of bipeds should have the same number of members and be of comparable structure and size, and the biped structures should have the same root names.
For details, see Using bipeds in a crowd simulation.
Make sure the bipeds have the same root names (for example, Bip001, Bip002) as those in the original setup.
 Select one of the bipeds. On the
  Motion panel, turn on (Motion Flow Mode), and then click (Shared Motion Flow).
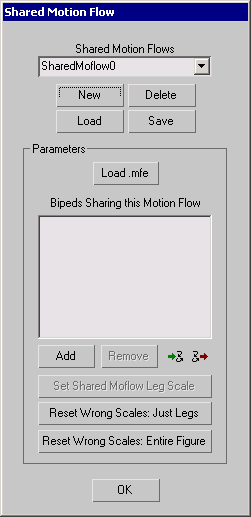
The shared motion flow is loaded and applied to the new set of bipeds. The biped names appear in the dialog list. If “(wrong scale)” appears after any biped names, use the Reset Wrong Scales buttons to correct the scales.
 (Put Multiple Bipeds In Motion Flow) to place all of the bipeds in the list in Motion Flow mode, and then click OK to exit
the dialog.
Play the animation to ensure that it's correct, and then render.
(Put Multiple Bipeds In Motion Flow) to place all of the bipeds in the list in Motion Flow mode, and then click OK to exit
the dialog.
Play the animation to ensure that it's correct, and then render.
Refer to Working with Crowd Animation for information regarding crowd animation.


