Command entry:
Track View or Mini Curve Editor (on track bar)

Highlight Sound track (or any child track).
Right-click
Properties
ProSound is a real-time, multitrack audio solution for 3ds Max that includes full support for and integration with Track View. For best results, use Track View in Dope Sheet mode.
With ProSound, you can:
- Add up to 100 independent audio tracks.
- Animate the volume of each track.
- Normalize the output audio volume to handle soft or transient tracks.
- Manipulate sound tracks and audio samples independently in Track View or with the ProSound controls.
- Use PCM audio in both AVI and WAV files with up to six output channels: front left, front right, back left, back right, center,
and low frequency. (Note: Multichannel audio must pre-exist in sound files.)
- Export audio to a WAV file, or add it to an existing AVI.
- Play back the audio accurately at 1/4, 1/2, 1, 2, and 4 times recorded speed to match viewport settings.
- Render audio to match playback speed.
- Manage multiple sound-effects directories.
- Access all features from MAXScript with 46 audio-related functions.
NoteProSound is the default audio controller in
3ds Max. A simpler alternative controller, which you set with the Preferences dialog
Animation panel
Sound Plug-In option.
Editing ProSound Tracks in Track View
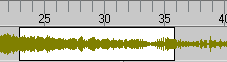
 When working with ProSound tracks in Dope Sheet mode, use Edit Ranges to drag an audio clip and its endpoints. Dragging a range changes its start and stop times by the same amount, while dragging
an endpoint makes it shorter (by truncating the clip) or longer (by repeating the clip). You can change the length of individual
clips (must be set to End Frame, not Loops) but not of the Master Waveform track, which serves as a composite of all the individual clips. Dragging an endpoint
of the Master Waveform track is the same as dragging the range.
When working with ProSound tracks in Dope Sheet mode, use Edit Ranges to drag an audio clip and its endpoints. Dragging a range changes its start and stop times by the same amount, while dragging
an endpoint makes it shorter (by truncating the clip) or longer (by repeating the clip). You can change the length of individual
clips (must be set to End Frame, not Loops) but not of the Master Waveform track, which serves as a composite of all the individual clips. Dragging an endpoint
of the Master Waveform track is the same as dragging the range.
NoteTruncating a clip always takes place from the end of the clip, not the start, no matter which end you drag.
To open the ProSound interface with a specific track highlighted, showing its parameters, simply right-click the track (either
the waveform or the range bar) in the graph area of Track View - Dope Sheet.
Procedure
To use ProSound:
- In the Track View Controller window, click the
 Sound track to highlight it.
TipThe Sound track does not appear in Curve Editor by default. To unhide it, open the
Filters dialog and, in the Show group, turn on both Sound and Global Tracks. Alternatively, just switch to Dope Sheet temporarily from the
Modes menu.
- Right-click the Sound track and choose Properties.
3ds Max opens the ProSound dialog.
- Click Add, load one or more audio files (WAV, AVI), and then use the remaining controls to adjust the sound. For details,
see the Interface section, following.
Interface
The ProSound dialog is modeless, so you can keep it open while using other parts of the program.
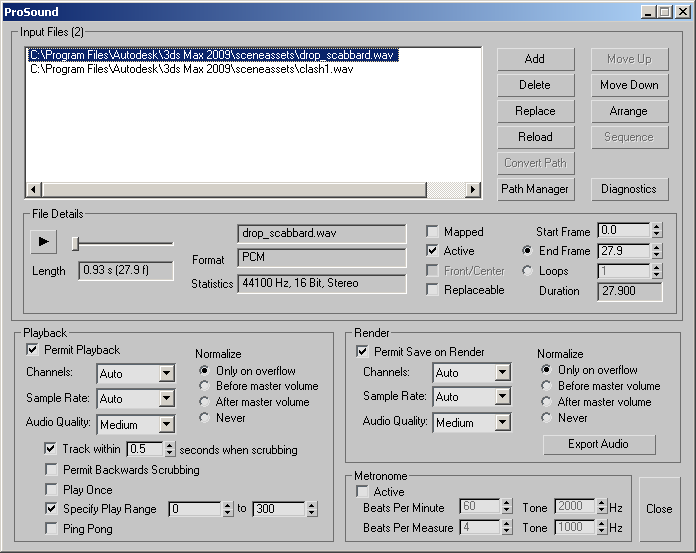
Input Files group
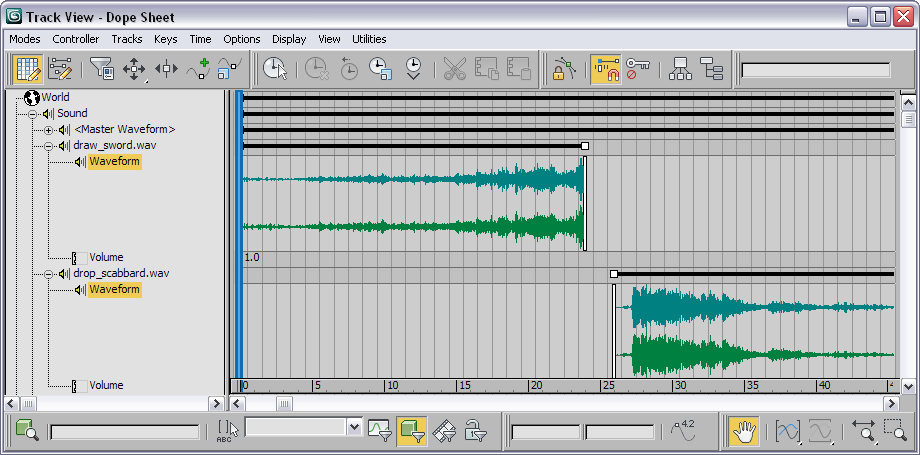
Controls in this group let you manage the audio samples available in the scene. The number of loaded samples appears next
to the group box title; in the preceding illustration, it’s 2.
- [file list]
-
Shows all loaded samples with file paths. All of these are automatically loaded into the scene, play back when the animation
is played, and are saved with rendered animations. You can control each track’s playback with the controls in the File Details
group (see following).
- Add
-
Imports samples into ProSound. Each sample creates a track in the Track View with start and end keys that you can manipulate,
as with the default sound track in 3ds Max. You can add multiple files in one action with standard Windows methods: Use the Shift key to select a range of files or the Ctrl key to toggle individual files.
- Delete
-
Removes highlighted samples from ProSound. You can highlight multiple files for deletion.
- Replace
-
Lets you replace a single highlighted sample with another, from an external file.
- Reload
-
Loads the highlighted sample from its file. If the file contents have changed, the new sound replaces the previous one.
- Convert Path
-
Use this function when opening a 3ds Max scene file that points to samples in a different location from your system and ProSound has loaded the sample from a directory
you added with Path Manager (see following). Convert Path adjusts the file's path in the file list to match that of your system.
If you use Convert Path, save the scene, and then reopen it on the original machine, the location of the file on the original
system must be added with Path Manager or ProSound will not find the sample.
Example: On another computer, a scene is saved with samples located in D:\Sound\Samples. These same samples are located in E:\Samples on your machine and you have added this directory with Path Manager. When you load the scene, your machine will find the
samples and no changes will be made to the path in the Input Files section of ProSound. If you highlight these samples and
use Convert Path, the paths as listed change from D:\Sound\Samples to match their location on your system: E:\Samples. If you then save the scene and open it on the original system, the original location of the samples (D:\Sounds\Samples) must be added with Path Manager so ProSound can find the samples.
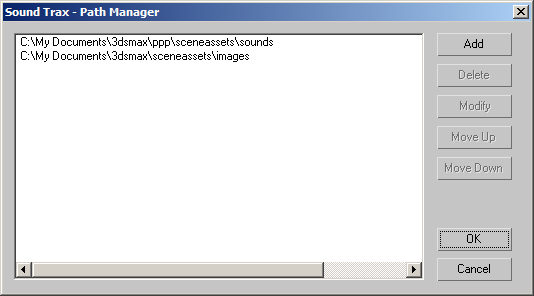
- Path Manager
-
Lets you manage disk locations where ProSound looks for samples. This is useful when loading MAX scenes created on another
system where samples might be in different directories. Adding directories in the Path Manager gives ProSound more places
to look for samples. For example, if one person saves a scene with a sample located in D:\Sounds\Samples, but your copy of the sample is in E:\Samples, adding E:\Samples to the Path Manager means ProSound will find the sample on your system without additional input from you.
Clicking Path Manager opens a dialog, shown in the preceding illustration, comprising a list and the following controls:
- Opens a file dialog named Add Sound Path that lets you navigate to a file path and use it.
If you highlight a path before clicking Add, the Add Sound Path dialog opens to that path, and the added path appears in the
Path Manager list after the highlighted path. If no path is highlighted when you click Add, the Add Sound Path dialog opens
to the last-used path, and the added path appears at the end of the Path manager list.
- Removes the highlighted item from the Path Manager list.
- Opens a dialog that lets you replace the highlighted item with a different path.
- Repositions the highlighted item in the list. Path Manager searches paths in the order listed.
- Accepts changes and closes the dialog.
- Ignores changes and closes the dialog.
- Move Up
-
Raises the highlighted track above the preceding one.
Rearranging tracks also affects their order in Track View.
- Move Down
-
Lowers the highlighted track below the following one.
Rearranging tracks also affects their order in Track View.
- Arrange
-
Opens a dialog that lets you sort the highlighted tracks by filename, full path name, or start frame. Choose the sort order
and then click OK. Applies to highlighted tracks only.
Rearranging tracks also affects their order in Track View.
- Sequence
-
Alters the Start Frame and End Frame times to play each clip one time, in the order listed. The first clip plays to its end,
then the next clip plays, and so on.
WarningClicking this button once instantly resets the start and end frame settings for all highlighted clips, and is not undoable.
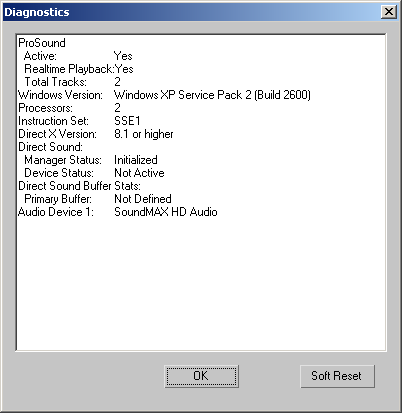
- Diagnostics
-
Click to open a dialog with diagnostic information.
- Sometimes, after repeated playback, the sound tracks stop playing in 3ds Max. When this happens, click Soft Reset to reset the playback buffers and hear sound tracks once again.
File Details group
Displays information about the currently selected sample in the Input Files list.
-

 [Play/Pause]
-
Plays the current sample as loaded from the external source; that is, without any modification from ProSound settings. Clicking
the button again during playback pauses the preview.
To the right of the Play button is the position indicator, which displays the current position of playback. You can move the
slider to change the position of playback; this stops the audio output. To begin playback from the new position, click Play
again.
- [file name]
-
To the right of the Preview controls (above Format), ProSound displays the file name of the highlighted sample.
- Length
-
Indicates the total length of the current sample in time and frames; for example, 3.48 s (104.5 f) indicates 3.48 seconds
or 104.5 frames. The number of frames is rounded off; for example, a length of 318.688 frames would be rounded up to 318.7.
- Format
-
Indicates the audio file format of the current sample. ProSound supports two formats: WAV and AVI.
- Statistics
-
Indicates the sample rate and bit depth of the highlighted sample and whether the audio is mono or stereo.
- Mapped
-
When on, indicates that ProSound has had to load a sample from a directory other than the one used in the scene. For example,
this would be on if you loaded a scene that contains a sample originally located in D:\Sound\Samples, but ProSound had to load it instead from E:\Samples as mapped with Path Manager on the current machine.
- Active
-
Indicates whether the current sample is to be included in playback as well as rendering of the output audio. For example,
you could turn off Active for three of five samples so that only the other two are heard during playback of the animation,
or included in the rendered animation.
- Front/Center
-
When on, places samples in the front-center channel when using five- or six-channel audio. Applicable only to one-channel
(Mono) samples.
- Replaceable
-
When on, the software is permitted to replace a sample if necessary. This is used when loading samples via MAXScript and tells
ProSound which samples may be replaced. The first sample with this option enabled will be replaced. If no samples have this
option enabled, any samples loaded via MAXScript are appended to the Input Files list.
- Start Frame
-
The frame at which the sample is to start playing. Samples start at frame 0.0 by default.
- End Frame/Loops
-
Choose either of the following to determine the length of the sample:
- The frame at which playback is to stop. By default, this is frame 0.0+(sample length in frames). For example, a sample 50
frames in length will have a Start Frame of 0.0 and End Frame of 50.0 by default. If you manipulate tracks or keys for the
sample in Track View (move, slide, etc), these numbers will adjust automatically.
- The number of times the sample repeats. If Loops is active for a sample, you cannot change its length in Track View.
- Duration
-
The true length of the current sample in frames. This value is not rounded, as in Length (preceding).
Playback group
These settings are global for all audio output, not individual samples (to control playback of individual samples, use the
Active option in the File Details group). Also, these options do not affect how the audio is rendered for export.
- Permit Playback
-
Toggles preview of the audio within 3ds Max. When off, the audio will not play when you play the animation or scrub the time slider.
- Channels
-
The number of channels for the audio file.
- Sample Rate
-
The sample rate to use when previewing audio output in 3ds Max. If set to Auto, ProSound examines the source files and determines the best setting.
- Audio Quality
-
Affects how ProSound alters sample rates. If, for example, Sample Rate is set to 44Khz and you are using source files of 22Khz,
changing Audio Quality affects the quality of the upsampling.
- Normalize
-
Adjusts the output of the audio so the peak amplitude is optimal - it's loudest point is the loudest possible peak for a sound
clip. This insures that the audio file doesn't clip and distort if the volume is overdriven. Normalization can be set to work
in four different modes:
- ProSound normalizes only when the amplitude of the output is too great.
- ProSound normalizes the audio before any volume adjustments by you. In other words, this option normalizes the audio from
ProSound before any adjustments are made in the Master Volume track in Track View.
- The audio output is normalized after volume adjustments made in the Master Volume track in Track View.
- Tells ProSound not to normalize the output.
- Track within # seconds when scrubbing
-
Adjusts the amount of time between when a frame is reached and the corresponding point in the audio is triggered. For example,
if you move the time slider forward and this parameter is set to 0.05, as you reach each frame there is 0.05-second delay
before the audio at that point is triggered.
Practically speaking, this amounts to more-accurate tracking because the lower the number, the faster you can scrub and have
the audio keep up. If this option is disabled, when you scrub quickly, the audio simply plays back in real time until it reaches
the current frame. For instance, if you start at frame 0 and scrub to frame 75 very quickly, audio plays back in real time
until it reaches frame 75, and then stops, thus lagging the animation by a significant amount.
- Permit Backwards Scrubbing
-
When on and you scrub backward (that is, drag the time slider to the left), the audio plays in reverse.
- Play Once
-
When on and you play the animation in 3ds Max, playback stops after the last frame instead of repeating, as it normally does.
- Specify Play Range
-
Toggles a limited playback range, as specified by the two numeric fields separated by “to,” within the full length of the
time slider. This "focus area" is highlighted in the time slider area. This mode can be helpful for fine-tuning lip sync of
a single word or phrase.
NoteTo see the focus area in the time slider area, it’s necessary to display the sound track: Right-click the track bar to display
the context menu, and then turn on Configure
Show Sound Track.
- Ping Pong
-
Toggles automatic forward-then-reverse playback when you play the animation. If a Specify Play Range is active, the ping pong
mode will play back and forth within this range. If Play Once is active, playback will play to the animation or play range
end, then play backwards to the beginning or play range start.
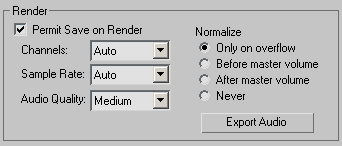
Render group
These options adjust various parameters of the rendered audio for export. These are not heard within 3ds Max unless you export the audio and reload it as a sample. Most of the options in this section have identical functionality to
the same options in the Playback group. The other options in this section are as follows.
- Permit Save on Render
-
Indicates that audio output should be included when you render the scene. To set options for the exported audio, click Export
Audio.
NoteThis option applies only when you render to a single animation file, such as AVI or MOV.
- Channels
-
The number of channels for the audio file.
- Sample Rate
-
The sample rate to use when previewing audio output in 3ds Max. If set to Auto, ProSound examines the source files and determines the best setting.
- Audio Quality
-
Affects how ProSound alters sample rates. If, for example, Sample Rate is set to 44Khz and you are using source files of 22Khz,
changing Audio Quality affects the quality of the upsampling.
- Normalize
-
Adjusts the output of the audio so the peak amplitude is optimal; its loudest point is the loudest possible peak for a sound
clip. This ensures that the audio file doesn't clip and distort if the volume is overdriven. Normalization can be set to work
in four different modes:
- ProSound normalizes only when the amplitude of the output is too great.
- ProSound normalizes the audio before any volume adjustments by you. In other words, this option normalizes the audio from
ProSound before any adjustments are made in the Master Volume track in Track View.
- The audio output is normalized after volume adjustments made in the Master Volume track in Track View.
- Tells ProSound not to normalize the output.
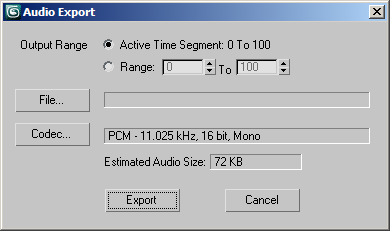
- Export Audio
-
Click to open a dialog where you can set options (Range, Codec, etc.) for the exported audio. You can also export the audio
separately directly from this dialog:
- Sets the length of the exported audio in frames.
- Sets the name of the exported file.
- Choose the codec (if available) and relevant attributes for the file.
- Click to export the audio separately from the video file.
Metronome group
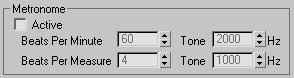
The Metronome track produces a regular beat using two tones. The following settings are available for controlling the metronome:
- Active
-
When on, the metronome plays during animation playback.
- Beats per Minute
-
Sets the frequency of beats. The beats display in the Metronome tracks as black vertical bars. Default=60.
- Beats Per Minute > Tone
-
The beep pitch indicating each beat.
- Beats per measure
-
Sets which beat is emphasized with a higher pitch tone. Emphasized beats display in the Metronome track as black pluses. For
example, a setting of 4 generates a higher pitched tone every fourth beat. Default=4.
- Beats Per Measure > Tone
-
The beep pitch indicating each measure.