The Track View Controller window displays all elements in your scene in a hierarchical fashion.
You highlight items in the Hierarchy list to:
 Toggling the Controller Window
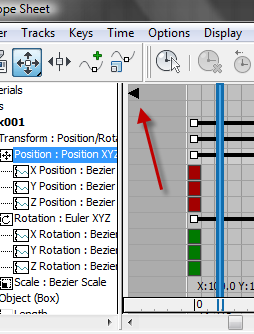
Available in the Key window of the Track View dialog (in both Curve Editor and Dope Sheet modes) is a control for toggling the Controller window. The control takes the form of a black triangle that points to the left when the Controller window is visible and to the right when it is hidden, as shown in the preceding illustration. To toggle the Controller window, click the triangle. By using this feature to hide the Controller window, you can maximize the available space for editing keys.
 Category: Track View.
To select objects in the scene using the Track View Controller window:
When objects are selected in the scene, their icons are also highlighted in Track View.
All objects in your scene are always displayed in Track View. However, selecting object icons in Track View follows the same rules as selecting objects in the scene:
To select and deselect item labels by clicking:
Right-clicking an item displays a right-click menu for globally selecting items in the Hierarchy list.
To select items in the Controller window with the right-click menu:
When working with function curves, you can also select a controller icon (instead of the label) to select that function curve for vertex editing.
To select a material or map as the active material in the Material Editor:
 Material Editor.
The selected material becomes the active item in the Material Editor. This is one way to navigate and select a material for editing.
Example: To navigate the modifier stack in the Modify panel:
 Modify panel, add a Bend and a Twist modifier to the cylinder.
Example: To highlight all tracks containing animation:
 (Auto Key), go to frame 10, and
  move the sphere in X.
move the sphere in Y.
move the sphere in Z.
move the sphere in X.
move the sphere in Y.
move the sphere in Z.
In the Track View Controller window, locate the box and sphere objects. Notice that both their icons are highlighted as well as the sphere's XYZ position tracks. The box’s tracks aren’t highlighted because they don’t contain any animation.
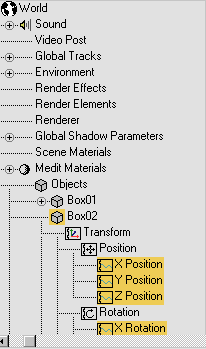
 World
WorldWorld is the root of the scene hierarchy. This track collects all keys in your scene as a single range for quick global operations.
By default, the World track shows the range of the Sound, Environment, Medit Materials, and Scene Materials branches. Modify Subtree in Edit Ranges mode causes the World track to include the range of all tracks in the Objects branch as well.
 Sound
SoundYou can accompany your animations with audio tracks via either of two plug-ins: Default Sound and ProSound. For details, see Sound .
Allows you to store controllers for global use. Using expression controllers, for example, you could point to a controller in the Global Tracks from several other tracks. By altering the expression in the Global Tracks, all of the other tracks are changed.
By pasting an instance of a controller in Global Tracks to a number of other tracks, you can change many tracks by altering the controller in Global Tracks.
By default, Global Tracks contains List tracks of the different controller types. To assign a controller, open one of the List tracks, highlight the available track, and then click Assign Controller. Once the controller is assigned, you can point to it from an expression controller assigned to any other track, or you can copy and paste it to any number of matching controller types.
Use these tracks to change or animate shadow parameters for any light that has the Use Global Settings parameter turned on
in the Shadow Parameters rollout. (Select a light, then open the Modify panel Shadow Parameters rollout to toggle the Use Global Settings parameter).
You can change shadow parameters for multiple lights simultaneously. Tracks include Map Size, Map Range, Map Bias, and Absolute Bias.
Contains the definitions for all materials in the scene. It is empty until you begin assigning materials to objects. When you select materials in this branch, you are working with instances of materials assigned to objects in your scene. These materials might not be in any of the Material Editor samples.
 Medit Materials
Contains global material definitions. The Medit Materials branch contains the 24 material definitions in the Material Editor . When you select materials from this branch, you are working with global material definitions that might not yet be assigned to objects in your scene.
 Objects
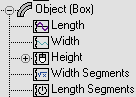
Contains a hierarchy for all the objects in your scene.
When Manual Navigation is on, many of these categories display a small plus or minus button to expand/collapse the contents.
Each type of item in the Hierarchy list is represented by an icon. You can use these icons to quickly identify what each item represents.
ObjectsThey contain the animation values for parameters and are the only item in the Hierarchy list that can have a track containing keys. Every controller has an individual icon
Examples of controller icons
Certain types of controllers can contain other controllers. Examples of these are Transform Controllers and List Controllers.
Controllers or Constraints submenus automatically have list controllers assigned. Controllers assigned using the Track View
Controller menu or right-click Assign Controller choice on the quad menu do not apply list controllers automatically.
 Modifier
Controller Window Right-Click menu
Right-click any item in the Controller window to display the Hierarchy Right-Click Menu. Use Alt + right-click to display an alternate navigation menu.
The Hierarchy right-click menu provides ready access to commands for working with controllers, locking and unlocking tracks for use with containers, navigating the Hierarchy list of the Controller window, loading and saving animation files, and more.
The Properties command opens the Properties dialog for the selected item in the Track View. For example, this command opens the Key Info dialog for selected keys, or the ProSound_dialog for an item in the Sound Track.
The Sound track lets you add audio to your animations by either of two options: Default Sound (Sound Options dialog) and ProSound. To assign the sound option, use Preferences Animation Sound Plug-In. To access the sound settings, open Track View, click and then right-click the Sound track, and choose Properties.


