Command entry:
Select a NURBS object.


Modify panel
Create Curves rollout
Dependent Curves group box
Fillet button
Command entry:Select a NURBS object.
Modify panel
NURBS toolbox

(Create Fillet Curve)
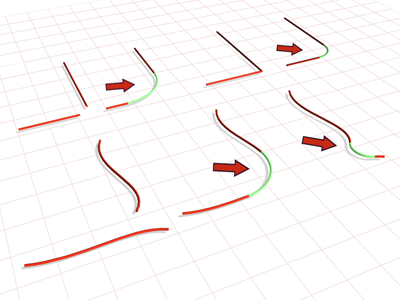
Fillet creates a curve that is a rounded corner between two parent curves.
Procedures
To create a fillet curve:
The NURBS object must contain at least two curves.
- In the NURBS toolbox, turn on (Create Fillet Curve).
- Click one curve near the end that you want to connect. The end that will be connected is highlighted. Without releasing the
mouse button, drag to the end of the other curve that you want to connect. When the end that you want to connect is highlighted,
release the mouse button.
A fillet curve is created. It trims the ends of the parent curve to match the fillet. The fillet is not necessarily placed
at the endpoints of the parent curves: placement depends on the value of the Radius parameter.
Changing the position or the curvature of either parent curve can change the fillet as well.
The parent curves must be coplanar.
- Adjust the fillet parameters.
Interface
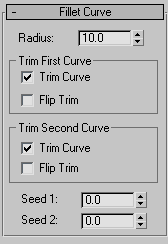
Fillet Curve rollout (creation time)
- Radius
-
The radius of the fillet arc in the current 3ds Max units. Default=10.0.
This parameter is animatable.
TipIf the fillet you initially create is in an error state, often this is because the radius is not large enough to bridge the
distance between the two curves. Increasing the Radius value gives you a correct fillet. The fillet becomes an arc displayed
in the dependent object color (green by default). When the fillet is in an error state it is displayed as a straight line
in the error color (orange by default).
Trim First Curve and Trim Second Curve groups
These two group boxes let you control how the parent curves are trimmed. The controls are the same in each. "First" and "second"
refer to the order in which you picked the parent curves.
- Trim Curve
-
When on (the default), trims the parent curve against the fillet curve. When off, the parent isn't trimmed.
- Flip Trim
-
When on, trims in the opposite direction.
- Seed 1 / Seed 2
-
Change the U location of the seed value on the first and second curves. If there is a choice of directions, the direction
indicated by the seed points is the one used to create the fillet.
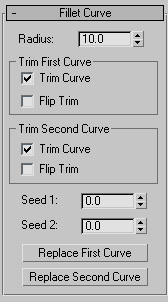
Fillet Curve rollout (modification time)
- Radius
-
The radius of the fillet arc in the current 3ds Max units. Default=10.0.
TipIf the fillet you initially create is in an error state, often this is because the radius is not large enough to bridge the
distance between the two curves. Increasing the Radius value gives you a correct fillet. The fillet becomes an arc displayed
in the dependent object color (green by default). When the fillet is in an error state it is displayed as a straight line
in the error color (orange by default).
Trim First Curve and Trim Second Curve groups
These two group boxes let you control how the parent curves are trimmed. The controls are the same in each. "First" and "second"
refer to the order in which you picked the parent curves.
- Trim Curve
-
When on (the default), trims the parent curve against the fillet curve. When off, the parent isn't trimmed.
- Flip Trim
-
When on, trims in the opposite direction.
- Seed 1 / Seed 2
-
Change the U location of the seed value on the first and second curves. If there is a choice of directions, the direction
indicated by the seed points is the one used to create the fillet.
- Replace First Curve / Replace Second Curve
-
Let you replace the parent curves. Click a button, then click the curve to replace the original first or second curve.