


You can use 3ds Max bones, with or without the IK controller, with Biped for various effects. You can use bones with Physique to add extra links and envelopes to any character, or to animate assemblies on a robot or mechanical character. Bones can also be added to animate extra appendages, a hat, a jaw and so on.


Two examples of compressible bones.
In the top image, 3ds Max bones are used to animate the linked piston assemblies. The bottom image shows 3ds Max bones used for added control when Physique is applied. In both cases the bones compress automatically as the biped is positioned.
 One way to use bones with the biped is to use the Select And Link tool on the 3ds Max toolbar to link the root of the bone to one part of the biped and have the bone End Effector follow another part of the biped.
As the biped moves these bones compress and expand.
One way to use bones with the biped is to use the Select And Link tool on the 3ds Max toolbar to link the root of the bone to one part of the biped and have the bone End Effector follow another part of the biped.
As the biped moves these bones compress and expand.
In the image of the mechanical leg, piston objects are linked to the bones. As the bones compress and expand, they also animate the linked piston assembly. As the bones compress and expand in the abdominal area in the bottom image, the envelopes created by Physique for the bones compress and expand to animate this area on the mesh.
In the IK Controller Parameters rollout, you specify the accuracy of the IK solution and the frame duration of the solution. For bones that compress, you generally want an accurate solution to ensure that the bone follows the end effector perfectly, without any drift. In the image of the rollout Position has a value of 0, the least amount of allowable distance (Rotation is at its default value of 1, the Rotation End Effector is not used in this example). Iterations is set high, ensuring that that the solution is accurate, even if the character is scaled down a great deal. Start and End Time should span the animation.

There are many ways to use bones with the biped. You could automatically animate the bending of a hose that is attached to a character’s shoulder and mouth when the biped head rotates, for example. Bones attached to the biped create links and envelopes when Physique is applied; these extra Physique links offer localized skin control if necessary.
To make compressible bones (bones with end effectors):
Link the root of the bone to the appropriate biped object.
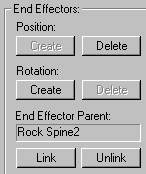
 Motion Panel, specify an End Effector Parent.
 Select another part of the bones system.
Motion Panel, set the Position Threshold to 0.
Select another part of the bones system.
Motion Panel, set the Position Threshold to 0.
 Hierarchy panel
  IK Sliding Joints rollout, turn on all the sliding parameters.
The bones expand and compress with the motion of the character.
To add a bone after Physique is applied using Reinitialize:
 (Figure Mode).
Link the root node of the bone to the biped.
(Figure Mode).
Link the root node of the bone to the biped.
 (Reinitialize).
 (Figure Mode).
If you want the end of the bone to follow the biped, select the bone and delete the bone end effector in the Motion Panel

This bone is used to animate the character's nose.
To add a bone after Physique is applied using Add (Add Bone):