


To address vertex-linking anomalies, the first step is to resize or reposition the envelope about the problem link. Most often, the problem is an envelope that is too small to surround, and thus influence, certain vertices.
This can happen because your biped character misaligns slightly with the mesh, or the link lengths used to create envelopes with unbounded bones systems links were insufficient to surround all vertices attached to the link.
Another potential source of problems is overlapping inner bounds. This can sometimes create too strong a deformation at the joint.
You'll note problems with vertices as you preview motion. It sometimes looks like vertices got left behind when the link they were supposed to be attached to moves in 3D space. In fact, that's just what is happening: they weren't assigned to any link at all, and remain where they were at the initial skeletal pose: the pose of the mesh and its skeleton at the time Physique was applied and initialized.
The other case would be vertices being moved too much, resulting in a dent in the mesh. You'd fix this by decreasing the overlap of the envelopes affecting a joint.


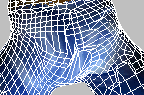
Stray vertices (above) reassigned to correct link(s) by modifying envelope shape (below).
To adjust the default envelope shape:
 Selection Level group, activate
  (Link). In a viewport, pick any link.
To adjust envelopes around the biped’s pelvis:
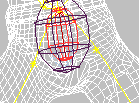

The Biped Triangle Pelvis option was used in this model. Triangle Pelvis creates additional links from the legs to the lower spine.
Top: The default envelope from the pelvis to the lower spine object is too small.
Middle: Mesh appears “scrambled” because the pelvis doesn't control all the vertices that surround it.
Bottom: Increasing the envelope size corrects the mesh problem in the pelvis area.
(Link). In a viewport, pick the middle link.
To select and edit cross sections:
 (Cross Section).
 (Select Object), and in a viewport, click the cross section you want.
As you move the cursor over a selectable cross section, it changes to a plus shape, letting you know the object at that location is selectable.
By default, selected cross sections are yellow. (You can customize this color with the Blending Envelope Display Options dialog.)
You can use Ctrl+click to add other cross sections to the selection set.
 (Next) or
  (Previous).
To copy an envelope and its settings to a mirrored link (for example, from one thigh to the other):
 Select the source link.
Select the mirror link, and then in the Edit Commands group, click Paste.
Select the source link.
Select the mirror link, and then in the Edit Commands group, click Paste.
The envelope is applied to the opposite link, but without mirroring. It is now the currently selected envelope.
 Rotate transform to rotate the selection to its final orientation.
 (Control Point) level to individually transform cross section control points.