Command entry:
Main toolbar


(Render Setup)
Render Setup dialog
Common panel
Assign Renderer rollout
Choose Quicksilver Hardware Renderer as the active production renderer.
Renderer panel
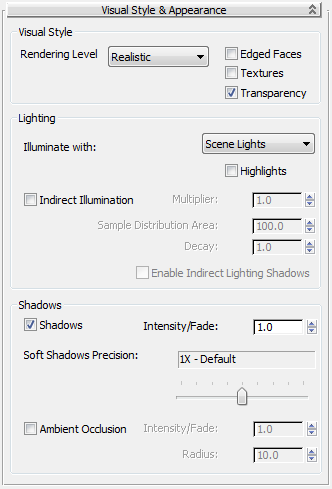
Visual Style & Appearance rollout.
These controls choose the visual style of the rendering, and how the renderer handles lighting.
Interface
Visual Style group
 Rendering Level
-
Choose the style of rendering. The choices include options that are not photorealistic.
These are rendered versions of Nitrous viewport display options: See Visual Style group.
These are the non-photorealistic rendering styles: See Non-Photorealistic Styles.
- Edged Faces
-
When on, the rendering shows face edges. Default=off.
- Textures
-
When on, the rendering shows texture maps. Default=off.
- Transparency
-
When on, objects with transparent materials are rendered as transparent. Default=on.
Lighting group
- Illuminate with
-
Choose how the rendering is illuminated: with Scene Lights or Default Lights (that is, viewport lighting). Default = Scene
Lights.
- When on, the rendering includes highlights that come from the lighting. Default=off.
- Indirect Illumination
-
When on, enables indirect illumination. Indirect illumination improves the quality of lighting by taking into account bounced
light. When indirect illumination is enabled, the controls for it become available. Default=off.
Shadows group
- Shadows
-
When on, the scene is rendered with shadows. Default=on.
- Controls the intensity of shadows. The higher the value, the darker the shadows.
- Scales the sampling value of area lights in the scene. Range: No Area Shadows – 16X - Very High Quality. Default = 1X - Default.
TipTo reset this slider to its default value, right-click the slider.
- Ambient Occlusion
-
When on, enables ambient occlusion (AO). AO improves shadow quality by taking into account the proximity of objects. When
AO is enabled, the controls for it become available. Default=off.
- Controls the intensity of the AO effect. The higher the value, the darker the shadows.
- Defines the radius, in 3ds Max units, within which the Quicksilver renderer looks for occluding objects. Larger values cover larger areas.
NoteAmbient occlusion is based on geometry, so when it displays faceted objects, shadows can appear at the edges of the facets
even when the Smooth option (available for many primitives) is turned on. The Smooth option interpolates normals to give the
illusion of smoothness, but it doesn't affect geometry. (Direct3D viewports reduce this effect by averaging the AO shadows,
which become more even but less accurate.) To reduce the "streaking" effect, increase the number of segments in the geometry
and don't rely on the Smooth option.
For more information about ambient occlusion, see Built-in Ambient Occlusion (the version of AO used by the Architecture & Design Material has somewhat different controls).