Animated characters can participate in MassFX simulations as kinematic rigid bodies. This means that they can affect the simulation, but cannot be affected by it. For example, a character could knock down an obstacle in its way, but a large box falling on it would not change its behavior in the simulation.

The skeleton in MassFX is basically a convenience for creating and managing rigid bodies. However, it has one feature not currently available through any other means: When bones are associated with a skinned mesh, the Skeleton helper can generate custom rigid body meshes based on the skinned vertices.
To create a skeleton, select any bone in a set of linked bones (including bipeds and CAT objects), or a graphical mesh with a Skin modifier referencing the bones, and invoke the Create Kinematic Skeleton command (for details, see Skeleton Helper). The bones do not have to be humanoid, or even represent a living being.
Kinematic skeletons are for motion-capture (or otherwise animated) skeletons where you want the body to push around other objects in the environment. Often, not all the bones in the skeleton need to have rigid bodies, so by default, kinematic skeletons have no associated bones. Use the Add button to add bones to the skeleton (applying rigid bodies to them).
The Remove Skeleton command is a convenience for deleting both the Skeleton helper as well as all the MassFX Rigid Body modifiers applied to the bones in it, as well as any constraints between them.
Simplifying and Grouping Bones
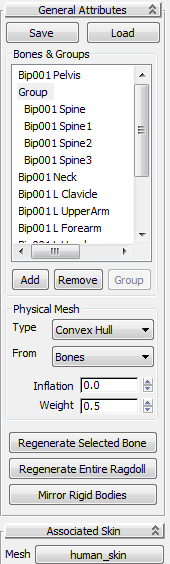
You might sometimes find that your skeletons have many bones that are important for the graphical animation, but are unimportant for the MassFX simulation or too fine to take effect individually.
For example, a skinned character might have individual bones for chin, lips, cheeks, eyebrows, and so on. If you know that your character's head will not play a direct role in the simulation, highlight all those bones in the Bones & Groups list and click Remove. This removes the MassFX Rigid Body modifiers from the bones, but does not remove the bones from the scene.
As an example of too-fine bones, a skinned character might also have a bone for the wrist, another for the hand, three bones for each finger, and two for the thumb. If your character's hands interact in the simulation only in a general manner, highlight all the hand bones and click the Group button. This treats all bones in the group as a single MassFX Rigid Body, improving performance.
Tweaking Collision Shapes and Limits
You can edit the rigid bodies created by the skeleton individually by selecting the bone and adjusting the modifier settings as with any other rigid body or constraint. The Physical Mesh group box of the Skeleton helper interface also lets you batch-set common options on bones.
To apply common settings to one or more bones in a skeleton:
After tweaking physical meshes for bones on one side of the mesh, you can use the Mirror Rigid Bodies button to mirror settings from one side of the skeleton to the other.
For more information, see Skeleton helper.
Selecting the Associated Skinned Mesh
Sometimes you might want to choose a different graphical skin mesh for the sets of bones which you have defined for the skeleton.
This button shows you the current skinned mesh associated with the bones. If you have more than one set of meshes in the scene, you can click this button and select a different mesh in the viewport to select it as the skin mesh for the skeleton.


