The Extended Parameters rollout for a Raytrace material controls the material's special effects, transparency properties, and advanced reflectivity.
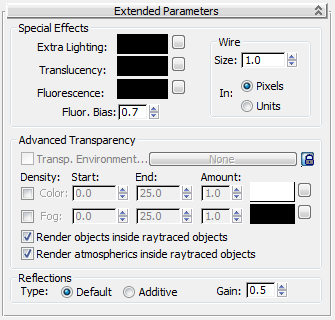
Except for the wireframe controls, the controls in the Extended Parameters rollout for Raytrace material are specific to the Raytrace material.
The controls in this group are special effects. They are powerful, but you might need to experiment to use them effectively.
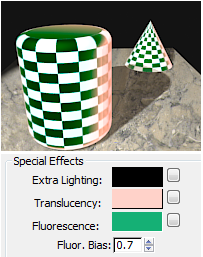
Object with raytrace material using translucency and fluorescence
Adds light to the surface of objects with the Raytrace material. You can view this as an ambient lighting color that you can control on a per-material basis, but don't confuse it with the ambient absorption from the Basic Parameters rollout.
Click the map button to assign a map to the Extra Lighting component. This button is a shortcut: You can also assign an Extra Lighting map on the Maps rollout.
By assigning a map to this parameter, you can simulate radiosity: the ambient light that results from reflected light in a scene. One effect of radiosity is color bleeding. For example, in strong light a white shirt next to an orange wall will show a reflected orange color.
Creates a translucent effect. The Translucency color is a non-directional diffuse reflection. The diffuse color on an object depends upon the angle between the surface normal and the position of the light source. By ignoring the surface normal alignment, this color component simulates translucent materials.
Click the button to assign a Filter Color map. This button is a shortcut: You can also assign a Filter Color (Translucency) map on the Maps rollout.
For thin objects, the appearance can be like shining a light on the back of a piece of rice paper. You can cast shadows onto the back of the paper and see them projected through the paper; this works well with a projector light. On thicker objects, you can get some good wax-like effects.
Creates an effect similar to black light on a black light poster. The light from a black light is largely ultraviolet, outside the visible spectrum. Under black light, fluorescent paints flare or glow. The fluorescence in Raytrace material takes whatever light it sees in the scene, applies the Bias to it, and then, regardless of the color of the lights in the scene, illuminates the fluorescent material as if it were lit by white light.
At 0.5, The Bias makes Fluorescence behave just like diffuse coloring. Bias values higher than 0.5 increase the fluorescent effect, making the object brighter than other objects in the scene. Bias values lower than 0.5 make the object dimmer than other objects in the scene. You can get some chromatic shifting effects with this.
Click the map button to assign a map to the Fluorescence component. This button is a shortcut: You can also assign a Fluorescence map on the Maps rollout.
Sets the size of the wire in wireframe mode. You can set either pixels (the default) or current units.
The controls in this group let you further tune transparency effects.
Similar to the Environment map in Basic Parameters, but overrides the scene's environment map for transparency (refraction) only. Transparent objects refract this map, while reflections still reflect the scene (or the local Environment map, if you use the Basic Parameters rollout to assign one).
Click the map button to assign the Transparency Environment map. This button is a shortcut: You can also assign a Transparency Environment map on the Maps rollout.
Turn off the  lock button, then use the check box to toggle the effect of the map.
The lock button to the right of the Transparency Environment map button locks the Transparency Environment map to the local Environment
map (found on the Basic Parameters rollout). When on, the Transparency Environment map controls are disabled, and a map applied to the Raytrace Environment applies
to the Transparency Environment as well. When off, the Transparency Environment map controls are enabled, and the Transparency
Environment can have a different map assigned to it. Default=on.
Changing this button’s setting here also changes it on the Basic Parameters rollout and the Maps rollout.
Sets a transmission color based on thickness. While filter (Transparency) color tints objects behind the transparent object, the density color gives the appearance of color within the object itself, like tinted glass.
To use, first make sure the object is transparent. Click the color swatch to display the Color Selector. Choose a color, and then turn on the check box.
The Amount controls the amount of density color. Reducing this value reduces the density color effect. Range=0 to 1.0. Default=1.0.
A thin piece of tinted glass is mainly clear, while a thick piece of the same glass has more color. The Start and End controls help you simulate this effect. They are expressed in world units. Start is the position in the object where the density color begins to appear. (Default=0.0.) End is the position in the object where the density color reaches its full Amount value. (Default=25.0) To have a lighter effect, increase the End value. To have a heavier effect, reduce the End value.
The object must be at least as thick as the Start value before the density color is visible.
Click the map button to assign a map to Color Density. This button is a shortcut: You can also assign a Color Density map on the Maps rollout.
Density fog is also a thickness-based effect. It fills the object with a fog that is both opaque and self illuminated. The effect is like smoke trapped in a glass, or wax at the tip of a candle. Colored fog in tubular objects can resemble neon tubes.
To use, first make sure the object is transparent. Click the color swatch to display the Color Selector. Choose a color, and then turn on the check box.
The Amount controls the amount of density fog. Reducing this value reduces the density fog effect and makes the fog translucent. Range=0 to 1.0. Default=1.0.
The Start and End controls let you adjust the fog effect based on the object's dimensions. They are expressed in world units. Start is the position in the object where the density fog begins to appear. (Default=0.0.) End is the position in the object where the density fog reaches its full Amount value. (Default=25.0) To have a lighter effect, increase the End value. To have a heavier effect, reduce the End value.
Click the map button to assign a map to Fog Density. This button is a shortcut: You can also assign a Fog Density map on the Maps rollout.
Controls in this group give you finer control over reflections.


 Material Editor