Editable Patch (Patch)


Command entry:Select an editable patch Modify panel Modifier stack display Expand the Editable Patch entry. Patch sub-object level
Command entry:Select an editable patch Modify panel Selection rollout (Patch)
Command entry:Select an editable patch Right-click the patch Tools 1 (upper-left) quadrant of the quad menu Sub-objects Patch

A patch is an area of a patch object, defined by three or four surrounding edges and vertices. Controls described in this topic let you manipulate a patch object at the patch level. As well as moving and rotating patches, you can create a separate element by holding down the Shift key during a move operation. This creates a separate element of the selected patches.

Texture Mapping Patches: Interpolation in Curved Space

Patches can now be mapped in curved space; this means simplified texture mapping for patches. A planar map on a complex patch object will not be distorted. At the Patch sub-object level there is a parameter in the right-click quad menu (Tools 1 quadrant) called Linear Mapping. If you leave Linear Mapping off, then textures are interpolated in curved space and behave much like texture mapping a mesh object, predictably.

In the old method, patch mapping is interpolated between the knot points. This works well with procedural maps but not so well with bitmaps, since each patch is linear in UV space.

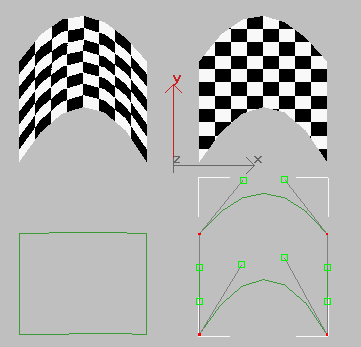
A complex patch (on right) no longer deforms a bitmap

The two leftmost patches show Linear patch mapping. The top left patch is a patch with planar mapping and the bottom left shows its UVW space representation. The patch on the right is a curved projection where the vectors are used in UVW space projection. Notice the bottom right represents the UVW space and notice how the handles and knots contribute to the shape of the UVW space.

In short, leave the Linear option off for predictable planar maps. Leave the linear mapping option on for backward compatibility.

NoteThe Unwrap UVW modifier now supports the new patch curve mapping. Spline handles can be manipulated in the Edit dialog in the Unwrap UVW modifier.

Interface

Selection rollout

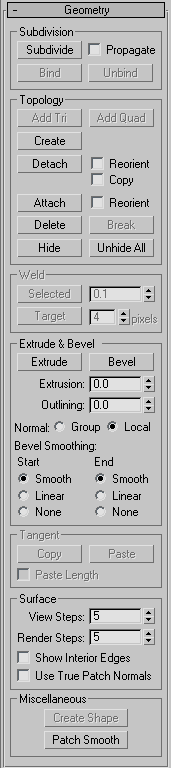
For information on the controls in this rollout, see Selection Rollout (Editable Patch).

Soft Selection rollout

See Soft Selection Rollout for information on the Soft Selection rollout settings.

Geometry rollout

See Geometry Rollout (Patch) for detailed descriptions of these controls.

Surface Properties rollout

These controls let you work with patch normals, material IDs, smoothing groups and vertex colors.

Normals group

Flip

Reverses the direction of the surface normals of the selected patches.

Unify

Flips the normals of an object so that they all point in the same direction, usually outward. This is useful for setting an object's patches to appropriate orientations, thus eliminating apparent holes in the object surface.

Flip Normal Mode

Flips the normal of any patch you click. To exit, click this button again or right-click anywhere in the 3ds Max interface.

TipThe best way to use Flip Normal Mode is to set up your viewport to display with Smooth+Highlight and Edged Faces on. If you use Flip Normal Mode with default settings, you'll be able to flip a patch away from you, but you won't be able to flip it back. For best results, turn off Ignore Backfacing in the Selection rollout. This lets you click any patch and flip the direction of its normal, regardless of its current direction.

Material group

These controls let you use multi/sub-object materials with patches.

Set ID

Lets you assign a particular material ID number to selected patches for use with multi/sub-object materials and other applications. Use the spinner or enter the number from the keyboard. The total number of available IDs is 65,535.

Select ID

Selects patches or elements corresponding to the Material ID specified in the adjacent ID field. Type or use the spinner to specify an ID, then click the Select ID button.

[Select By Name]

This drop-down list shows the names of sub-materials if an object has a Multi/Sub-Object material assigned to it. Click the drop arrow and choose a sub-material from the list. The patches or elements that are assigned that material are selected. If an object does not have a Multi/Sub-Object material assigned, the name list is unavailable. Likewise, if multiple objects are selected that have an Edit Patch, Edit Spline, or Edit Mesh modifier applied, the name list is inactive.

NoteSub-material names are those specified in the Name column on the material's Multi/Sub-Object Basic Parameters rollout; these are not created by default, and must be specified separately from any material names.
Clear Selection

When on, choosing a new ID or material name deselects any previously selected patches or elements. When off, selections are cumulative, so new ID or sub-material name selections add to the existing selection set of patches or elements. Default=on.

Smoothing Groups group

Use these controls to assign selected patches to different smoothing groups, and to select patches by smoothing group.

To assign patches to one or more smoothing groups, select the patches, and then click the number(s) of the smoothing group(s) to assign them to.

Select by SG (Smoothing Group)

Displays a dialog that shows the current smoothing groups. Select a group by clicking the corresponding numbered button and clicking OK.

Clear All

Removes any smoothing group assignments from selected patches.

Edit Vertex Colors group

Use these controls to assign the color, illumination color (shading), and alpha (transparency) values of vertices on the selected patch(es).

Color

Click the color swatch to change the color of vertices on the selected patch(es).

Illumination

Click the color swatch to change the illumination color of vertices on the selected patch(es). This lets you change the color of shadows without changing the vertex colors.

Alpha

Lets you assign an alpha (transparency) value to vertices on the selected patch(es).

The spinner value is a percentage; zero is completely transparent and 100 is completely opaque.