The Group Parameters rollout appears after you use Make Group on a vertex selection to create at least one group. Thereafter, highlight the group in the Group rollout list to display and edit the group's settings with the Group Parameters rollout.
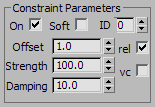
If the currently highlighted group is unassigned (that is, not a constraint), then controls in this group are not available.
Uses a Material ID to attach the group to an object. This option applies only to Surface and Cloth constraints. If, when the constraint is created or initialized, the cloth vertices are not over a triangle, then the constraint will be created to the center of the nearest triangle that has the requisite Material ID. This could mean that several vertices might be constrained to the center of the same triangle. In this case, you should only use soft constraints. A hard constraint would pull all those cloth vertices to the same exact point on the triangle, which would look strange.
The variance in the distance between a constrained group and its constraining, or target, object. The default value is 1.0 with Rel on (see following). This sets the constrained group to maintain its original distance from the target object. When set to 0.0, the constraint seeks to set the distance to the target object to zero.
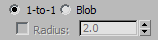
When the mesh density is changed in Garment Maker, the group selection is reassigned. The Blob option selects the original vertex and the ones created within a certain radius of it. The radius can be left at default or auto, or it can be set manually.

Indicates the correct "order" of cloth pieces that might come in contact with each other. Range=–100 to 100. Default=0.
If your garments and/or panels are all correctly orientated to begin with, then cloth-to-cloth collision detection should keep items from interpenetrating. However, the initial state of a garment/panel might have some interpenetration that cannot be resolved. For example, suppose you make a jacket with Garment Maker where the front right panel is supposed to sit on top of the front left panel. When you sew together the garment (generally with self-collision off), the front panels will interpenetrate, so to make sure that the right panel sits outside the left panel, you might have to use constraints or Live Drag. Using the Layers option on the panels can help here.
Here is the logic of layers: When two pieces of cloth (A and B) are in collision-detection range, their layers (layerA and layerB) are compared and the following rules are applied:
The sign of the Layer value indicates what the "outside" of that piece of cloth is. A positive sign means "The side that the normals face is the outside".
When on, preserves the shape of the mesh based on the Bend % and Stretch % settings. In normal operation, when Cloth creates a simulation, it tries to "flatten out" the cloth. Default=off.
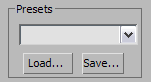
Sets the Cloth Properties parameters to the preset selected in the drop-down list. Any presets that are built into the system or that have been loaded will show up here.
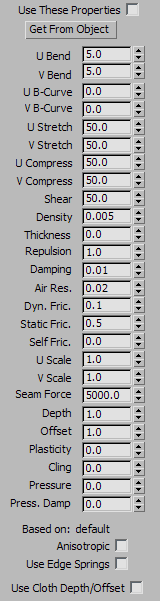
The remaining Properties controls are the same as those found in the Cloth Properties group of the Object Properties dialog for Cloth.

The Soft Selection controls apply on a per-group basis to permit soft selection of vertices neighboring the explicitly selected group members. This works the same as soft selection of vertices in other parts of 3ds Max. For details, see Soft Selection Rollout. Alternatively, you can select vertices for a group based on a texture map.
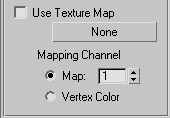
When on, Cloth uses a texture map to specify a soft selection of vertices that belong to the current group. Click the button (by default, labeled “None”) to choose a texture map. Use the Mapping Channel controls to choose a map channel or vertex color channel.
You can add a grayscale texture map in this slot to blend between unselected and fully selected pixels in the group. Black represents unselected and white represents fully selected. Any grayscale value blends between the two. You can drag a texture map onto this button.


 Modify panel