


The Flat Mirror map produces a material that reflects surrounding objects when it is applied to a collection of coplanar faces. You assign it as a material's Reflection map.

Flat mirror map reflects the ice-cream shop's interior.
Reflect/Refract maps don't work well for flat surfaces because each face reflects part of the environment based on where its surface normal points. Using this technique, a large flat face can reflect only a small part of the environment. Flat Mirror automatically generates a reflection that encompasses a larger part of the environment, to better simulate a mirror-like surface.
Flat Mirror cannot generate reflections correctly unless you observe these rules:
There are two ways to do this. You can make the Flat Mirror material a sub-material of a Multi/Sub-Object material, or you can use the Apply To Faces With ID control.
In other words, if you want two different planes of an object to have flat reflections, you must use a Multi/Sub-Object material. Assign Flat Mirror to two different sub-materials, and assign different material IDs to the to different planar faces.
If you assign Flat Mirror using Apply to Faces with ID, faces without that ID display the nonreflective components (diffuse color, and so on) of the material with the Flat Mirror reflection map.
To assign a flat mirror to one face of an object:
 Render group, turn on Apply To Faces With ID, and choose the material ID number the mirrored face will have.
To assign the mirror to a flat surface:
 Select an object.
 Modify panel, apply Edit Mesh to the object.
To assign a flat mirror using a Multi/Sub-Object material:
Alternatively, use the Slate Material Editor to wire the sub-material to that component ((1), (2), (3), and so on).
Alternatively, use the Slate Material Editor to wire the Flat Mirror map to the Reflection component.
Flat Mirror controls are similar to those for automatic reflection and refraction.
Using a Multi/Sub-Object material, you can apply Flat Mirror to different faces of the object that are not coplanar. However, faces that are not coplanar must use different sub-material slots, otherwise 3ds Max doesn't correctly generate the flat mirror reflections.
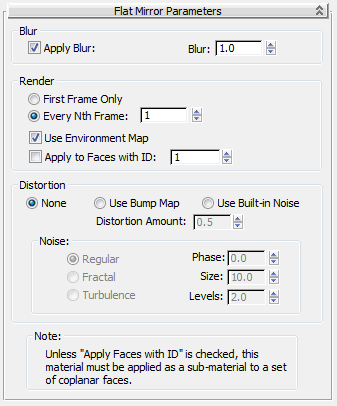
Affects the sharpness or blurriness of the generated map based on its distance from the object. The farther away the map is, the greater the blurring. Blur is primarily used to avoid aliasing. It's a good idea to use a small amount of blurring for all maps in order to avoid the scintillation or aliasing that can occur when pixel details are reduced off in the distance. Default=1.0.
The renderer creates the automatic flat mirror based on the frame rate set by the spinner.
When off, environment maps are ignored by the mirror during rendering. It's useful to turn this off when you have mirrors in the scene and you're rotoscoping against a flat screen environment map. A screen environment map does not exist in 3D space the way the other environment-map types do, and will not render properly. Default=on.
Specifies the material ID number where you want the mirror assigned.
You can assign a flat-mirror material to an object without having to make it a component of a Multi/Sub-Object material. The restriction is that the other faces on the object must be able to use the nonmirrored properties of the same material (its diffuse color, and so on). If the other faces need completely different material characteristics, you need to use a Multi/Sub-Object material.
For example, if you have an object, such as a box, with unique material IDs for each side, you can use Apply To Faces With ID to specify the side of the box that will show the mirror reflection. The remaining sides of the box will have the same material characteristics, but without the reflection.
To simulate irregular surfaces, you can distort the flat-mirror reflections. Distortion can be based on a bump map or on noise controls built into Flat Mirror material.
Adjusts the amount of distortion to the reflected image. This is the only value that affects the amount of distortion. No matter how high the Bump map's Amount spinner is set, or how extreme the Noise settings, if this Distortion Amount is set to 0, no distortion appears in the reflection itself. This control is inactive when None is chosen.


 Material Editor