Command entry:
Create panel


(Cameras)
Target button or Free button
Parameters rollout
Multi-Pass Effect group
Choose Motion Blur effect.
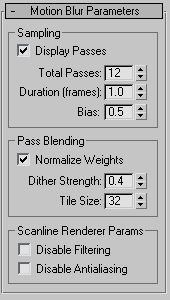
Motion Blur Parameters rollout
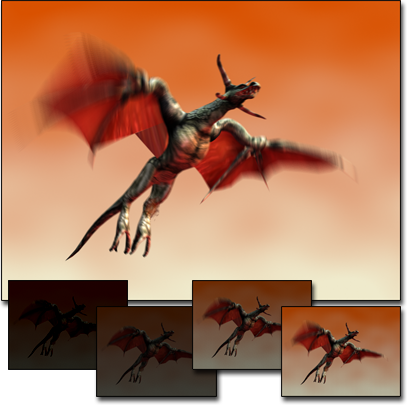
Cameras can generate motion blur effects. Motion blur is a multi-pass effect. You turn it on in the Parameters rollout for cameras. Motion blur simulates the motion blur of a camera by offsetting rendering passes based on movement in the scene.
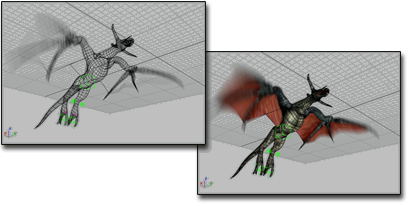
You can preview motion blur in viewports.
TipTo reduce the visible effect of multiple camera passes, try setting the antialiasing filter to Blend, with a Width value in
the range 4.0 to 5.0, and a Blend value in the neighborhood of 0.1. (You choose the antialiasing filter and adjust its settings
on the
Default Scanline Renderer rollout.) Also, try reducing the Dither Strength value, in the effect's Pass Blending group, to the neighborhood of 0.2.
Interface
NoteThe multi-pass motion blur parameters are animatable.
Sampling group
- Display Passes
-
When on, the rendered frame window displays the multiple rendering passes. When off, the frame window displays only the final
result. This control has no effect on previewing motion blur in camera viewports. Default=on.
- Total Passes
-
The number of passes used to generate the effect. Increasing this value can increase the effect's accuracy, but at a cost
of rendering time. Default=12.
- Duration (frames)
-
The number of frames in the animation to which the motion blur effect will be applied. Default=1.0.
- Bias
-
Changes the blurring so that it appears to derive more from frames before or after the current frame. Range=0.01 to 0.99.
Default=0.5.
By default, the blurring comes equally from frames before and after the current frame; that is, a blurred object appears at
the center of the blurred area. This is the closest to what an actual camera would capture. Increasing the Bias value moves
the blurring behind the blurred object, in relation to its direction of motion. Decreasing it moves the blurring in front
of the blurred object.
Extreme values move most of the blurring very close to the blurred object, which makes it difficult to see. For best results,
use intermediate Bias values in the range 0.25 to 0.75.
Pass Blending group
The multiple motion blur passes are blended by dithering, which you can control by the parameters in this group.
These controls apply only to renderings of the motion blur effect, not to previews in viewports.
- Normalize Weights
-
Passes are blended with random weighting to avoid artifacts such as streaking. When Normalize Weights is on, the weights are
normalized, giving a smoother result. When off, the effect is a bit sharper but usually grainier. Default=on.
- Dither Strength
-
Controls how much dithering is applied to the rendered passes. Increasing this value increases the amount of dithering, and
can make the effect grainier, especially at the edges of objects. Default=0.4.
- Tile Size
-
Sets the size of the pattern used in dithering. This value is a percentage, where 0 is the smallest tile, and 100 is the largest.
Default=32.
Scanline Renderer Params group
These controls let you disable antialiasing or antialias filtering when you render the multi-pass scene. Disabling these rendering
passes can improve render time.
These controls apply only to renderings of the motion blur effect, not to previews in viewports.
- Disable Filtering
-
When on, disables the filtering pass. Default=off.
- Disable Antialiasing
-
When on, disables antialiasing. Default=off.