


An important part of the character animation process is to organize the many parts of the character. There are several tools in Softimage to help you organize a character, each one doing different things: models, groups, scene layers, and character key sets are some of the more important organization tools that you can use.
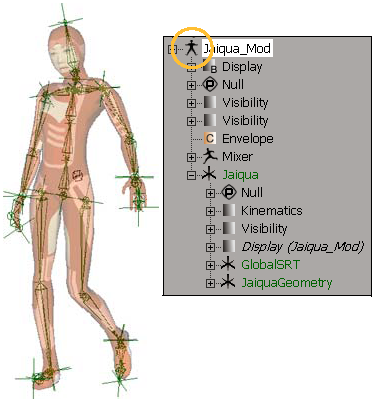
Models are containers, like mini scenes, that make it easy to organize elements that need to be kept together. A character's skeleton hierarchy, rig controls, envelope geometry, textures, animation, and groups are often kept together within a model.
The main reason for using models with character animation is that they provide the easiest way to import and export characters between scenes, and to copy animation between characters, which involves the animation mixer.
For more information on this, see Models and the Mixer [Nonlinear Animation in the Animation Mixer].
Referenced models are models that have been created in Softimage and exported from it, but which are referenced from elsewhere — somewhere on your hard disk or the network. If you're using referenced models for character animation, you can refine your rigs and envelopes over the course of a production without fear of lost animation.
For example, animators can start roughing out animation with a simple rig and a low-resolution version of the envelope model while other creative work is still being done. When the high-resolution envelope is ready, that model can be re-exported, and the animators can reload it. As long as the rig controls' names and their coordinate space are kept consistent, all the animation, including action sources, done with the low-res version of the envelope is preserved and applied to the high-res version.
For more general information on creating and using models and referenced models, see Models [Data Exchange].
There are different ways of organizing character elements, each one being useful for different types of organization.
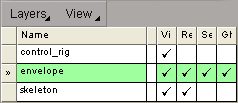
Layers let you divide up different scene elements into groupings whose visibility, selectability, and renderability can be controlled. You can use layers to break a character down into sections so that you can quickly change selectability and visibility each layer.
For example, separate the model's geometry, the skeleton, and the constraining objects for the rig each into different layers. This makes it easy to select and key only the elements that you want to.
Layers, however, live only at the scene level, so if you're importing and exporting models between scenes, they're not going to include any layer information. This is where groups can be of help.
For more information, see Scene Layers [Scene Elements].
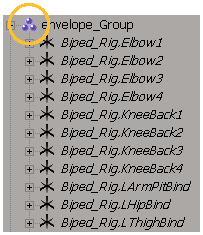
Groups also let you put certain scene elements together, such as all skeletons elements to be enveloped, for easy selection as well as setting properties. Groups can be children of models and exported or imported with them.
For more information, see Grouping Objects [Scene Elements].
Transform groups let you quickly set up a hierarchy for any selected objects with a null as a parent. This can be handy for quickly creating hierarchies for your skeletons or for the control objects in a rig.
For more information, see Transform Groups (Parenting with Null Objects) [Animation].
Use consistent naming conventions such as including a "g_" as a prefix for all of your geometry nodes. That way you can select entire groups of geometry objects just by typing g_* in the Selection text box. It also lets you write name-based utility scripts.
For example, you can write scripts that seek out all left-side elements ("l_") and duplicate them and rename them to right-side elements ("r_"), or vice versa. This can be a huge time-saver!
Another reason to use naming conventions is to make selection easier. For example, if you add a "c_" as a prefix for all rig control elements, you know which parts are okay to animate. Then when you want to store poses and actions, you can select all the controls by typing c_* in the Selection text box.
A useful tool to help make keying quick and easy is the character key set. You create the character key set for different objects in your character you want to animate, then select which parameters of that object should be keyed (such as its Position and Rotation parameters). Then to key these parameters, you simply press K or click the keyframe icon and all the parameters in it are automatically keyed — you don't even have to select anything first.
For more information, see Keying with Character Key Sets [Animation].
 Except where otherwise noted, this work is licensed under a Creative Commons Attribution-NonCommercial-ShareAlike 3.0 Unported License