After you create an action source, the next step is to bring it into the animation mixer as an action clip (see Action Sources and Clips for information). Doing this is sometimes referred to as instantiating the action source.
When you create an action clip on a mixer's track, the stored animation drives the corresponding parameters over the range of frames covered by the clip. The action clip takes precedence over any other animation for the model at that frame — see Actions and Other Animation on an Object for more information.
If you selected Add Source as a Clip in the Mixer when you created the source, a clip is already created in the mixer.

Once you have instantiated a clip, you cannot reconnect the animation to a different parameter. Instead, delete the clip and instantiate a new one using a different connection-mapping template.
To add an action clip to a track
Open the animation mixer in a viewport or floating window (press Alt+0).
Select the model or one of its children and click Update on the mixer's command bar. If this is the first time you have opened the model's track container, two animation tracks are created by default.
If you want to add the clip to a new track, first create a new track by right-clicking any existing track and choosing Add Track  Animation (or press Shift+A).
Clips cannot overlap on the same track, but you can add clips to the same track to play them in sequence. To mix clips, you must place them on separate tracks and overlap them.
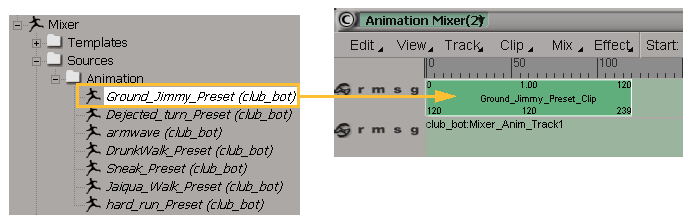
In the explorer, drag one or more action sources from the Sources model folder for the scene (press O) to an action track in the mixer.
You can also drag an action source from the model's Mixer Sources Animation folder, but you have access to all the action sources from all models in the scene in the Sources/Clips folder.
You can also use this technique to copy an action from another model — see Copying Action Sources between Models.
Right-click the location of the track where you want the clip to start and choose Insert Source. Select from one of the model's stored actions from the sources available for the current scene are displayed in an explorer.

Right-click the track and choose Load Source From File to load a preset action (see Loading Action Source Presets), an external action source file (see Saving Action Sources to a File), or a SOFTIMAGE|3D animation file (see Importing Action Sources).
A clip is created on the track, representing an instance of the action source. You can modify clips independently of each other without affecting the animation stored in the original action source.
For more information on using clips in the animation mixer, see Working with Clips.
Actions and the Animation Icon
When a parameter is driven by an action in the mixer, its animation icon in the explorer changes to look like a little plug.

For more information about this and other states of the animation icon related to actions, see The Animation Icon [Animation].
Selecting Action Clips and Objects
To select objects animated by the current clip
To make it easy to see what elements are being animated by a clip at any given time, you can select one or more clips and
choose Clip Select Driven Objects from the mixer's command bar (or right-click the clip and choose the same command).

Chain elements are highlighted in white to show that they are being driven by the selected clip (outlined in white).


