Select to create an image of the current view. To ensure the image is the highest quality, first make sure the current rendering
mode and quality level shows the desired image on screen.
Note
The Save Image function will use the current camera view and rendering mode (either Hardware rendering or Ray Tracing) for
the image creation. The options presented for creating and saving the image will vary based on rendering mode.
Ensure the interactive scene is in the rendering mode desired
Before taking an image, you should ensure that the current display is showing the rendering mode, quality and effects that
are desired for the image:
- Set output to Ray Tracing or Hardware Rendering as described in About rendering modes.
Note
In some cases the visual difference between Interactive Ray Tracing that has progressively improved and Hardware Rendering
can be difficult to determine without altering the view. Check the menu item to avoid moving the camera or refreshing the
on screen image.
- Select . The Performance and Quality window appears.
- For , check that the current Quality Range is showing the effects you expect in your image.
- For , check that the Minimum Anti-aliasing is set to High.
Save Image As...
Create an image file of the current view
- Enter the rendering mode you wish to use for creating the image.
- Select .
The Save Image As window appears.
Note
The available options in the Save Image As dialog box are determined by what rendering mode is active, and whether the view
is Orthographic or Perspective. See About rendering modes for more information.
- For a custom output image size, specify the dimensions and resolution in the units of your choice.
Or, expand the menu to choose from a list of standard presets. (If you choose a paper or photo preset, you’ll be able to specify whether
you want it to be saved portrait or landscape.)
Note
You can create an image up to 15,000 x 15,000 pixels, depending on the amount of available memory on your machine, and the
specifications of your graphics card if in Hardware rendering mode.
- Click .
A browser window appears.
- Browse to the location where you want to save the image file.
- Select the file format for the image from the available options for the current rendering mode. (See Image file formats for saved images.)
- Type in the name of the file (the file format extension will be added automatically).
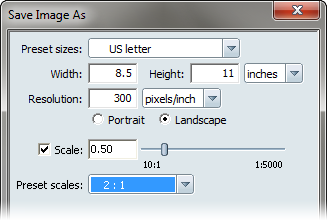
Scale the image accurately on a page
For orthographic view renderings, an accurate scale can be used for the image output. This adjusts the zoom of the image to
fit the object dimensions to the physical size of the output image, based on resolution (the number of pixels per actual unit).
To save an image to an accurate scale at a specific resolution:
- View the scene with an orthographic camera.
- Check the option in the dialog box.
- Select a Preset Scale from the drop-down menu, or move the Scale slider to an appropriate ratio.
The view of the scene will change on screen to reflect the scale of the objects within the specified resolution.
Specify a Quality preset and sampling for Ray Tracing output
If Ray Tracing is enabled, the Save Image As... dialog box shows the Ray Tracing Properties for the output. To insure that
“what you see” is “what you get” the current preset used in the dialog box for Interactive Ray Tracing is chosen, but the Sampling quality defaults to 1 (or higher if the preset is locked
to a higher amount).
Note
Sampling qualities of less than 1 are sub-sampled, meaning they are rendering the scene smaller than specified and increasing
the pixel scale. If this is desired, the scene can be rendered at a smaller initial resolution to save time and memory.
To save an image using specific Ray Tracing settings:
- Press R to enable Ray Tracing.
Note
Ray Tracing can be enabled or disabled for the current Save Image by pressing the key while the Save Image As dialog box is open.
- Choose a (defines the overall quality and ray tracing effects used in the rendering) from the drop-down menu of presets if the current
one is not desired.
- Set the slider (controls the smoothness of the pixels in the final image) to the desired amount.
- Click to initiate the offline rendering. A browser will appear to set the filename and image output type, then a progress bar will
indicate the rendering progress.
Note
While an offline Ray Tracing rendering is progressing, the interactive Ray Tracing is disabled. Input for navigating the scene
will be ignored until the rendering is complete.
-
The rendering can be cancelled at any time during its progress.
Image file formats for saved images
Images can be saved in various file formats to make it easier to email or print the images, or to open the image in an image
editor and alter it for presentation later. The list of file formats is different based on which rendering mode Showcase is
in when the option is selected.
Hardware rendering image formats
- JPEG: Joint Photographic Experts Group format. Common format used for web and email. Small file size, but can show compression
artifacts.
- TIFF: Tagged Image File Format. Common format used for publishing and archiving. Larger file size, but without compression.
Note
TIFF images will include an extra “alpha channel” that is a grayscale mask of the objects in the scene, with transparency,
to separate them from the environment or background colors.
- BMP: Bitmap format. Common Windows image format.
- PSD: Photoshop Document. File format used by Adobe Photoshop.
Note
PSD images will include two layers. One is the objects in the scene, with transparency, separate from the environment or background,
and the other is the environment or background color and shadows without the objects.
Ray Tracing image formats
- JPEG: Joint Photographic Experts Group format. Common format used for web and email. Small file size, but can show compression
artifacts.
- BMP: Bitmap format. Common Windows image format.
- HDR: Radiance RGBE format. Contains greater brightness, contrast and color ranges than other file formats, but has limited compatibility
with most image editors. Preserves highlights and shadows beyond what is displayed on screen.
Note
HDR images may appear to have less contrast or be lighter than the image viewed interactively on screen. This is due to limitations
in the image editor software. Because the file format contains more dynamic range than most monitors can show, many image
editors display HDR images without monitor gamma correction or any tone mapping. To achieve the same visual results, either
tone map the image to an LDR or force gamma correction on display.
- TIFF HDR: Variant of TIFF that contains greater brightness, contrast and color ranges than other file formats, but has limited compatibility
with most image editors. Preserves highlights and shadows beyond what is displayed on screen.
- TIFF: Tagged Image File Format. Common format used for publishing and archiving. Larger file size, but without compression.
Note
TIFF images (both regular and HDR) will include an extra “alpha channel” that is a grayscale mask of the objects in the scene,
with transparency, to separate them from the environment or background colors.