Use the scale-independent environment to position objects in front of an imported image. Scale-independent environments are
useful for quickly compositing a decorated model against an image.
Create a cube scale-independent environment from an HDR panorama
This is similar to creating a geometry environment. The lighting and Cube background can be derived from a single HDR image.
See Create or obtain images for custom environments.
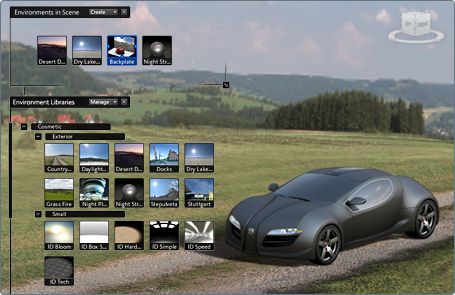
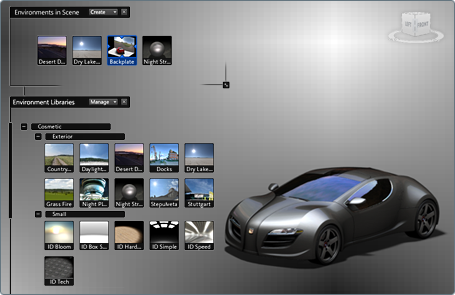
- If the Environments interface is not already visible, press the E key (or select ).
- Click the button at the top of the Environment interface.
- Browse to an HDR panoramic image.
After a few moments, the Create Environment dialog box will appear and a preview of your environment image will be displayed
- Adjust the image so that it looks good in the preview using the following tools:
- : adjusts the overall brightness of the input HDR scene when creating IBL maps and the background image. The slider has a
range of -3 to +3, but values beyond these can be entered numerically. This is useful when the IBL effect is either too dark
or too bright.
- : sets the overall saturation of the scene. More saturation results in fuller and brighter colors, while less results in more
muted lighting.
- : adjusts both the brightness and saturation of the image at the same time, in a non-linear amount. Useful if the image is
extremely dark and contrasted, or light and lacking contrast.
- Click the button to begin the process of creation.
After the process completes, the new environment will be shown in the scene and automatically saved to a temporary folder.
The Create Environment dialog box remains open for adjustments and recreating the environment with new settings.
Edit scale-independent environment properties
- If the Environments interface is not already visible, press the E key (or select ).
- Right-click on the icon for the environment you wish to edit. From the menu that appears, choose . (Or, select .)
The Environment Properties window opens.
- Alter the following parameters to adjust the environment:
-
-
Determines what type of scale-independent environment is presented.
- —The default when a new scale-independent environment is created from an HDR panorama. Maps a Vertical Cross backdrop to a
cube of infinite dimensions always centered on the camera location. Useful for placing objects inside a panoramic scene.
- —Maps any 2D image to a plane that is infinitely distant and always facing the camera. Useful for positioning objects against
a photograph of a scene.
Note
The Mapping can only be altered when the current backdrop file is a Vertical Cross. If the mapping disabled, and Cube is desired,
load a Vertical Cross panorama.
-
-
Determines how a scale-independent environment image is resized when the main window is resized.
- —The image resizes to fit the window's horizontal dimension. The image may be cropped vertically, or there may be a blue band
at the top or bottom edges.
- —The image resizes to fit the window's vertical dimension. The image may be cropped (or there may be a blue band) at the side
edges.
- —The image resizes to fit the window's vertical dimension. The image may be cropped (or there may be a blue band) at the side
edges.
-
-
Scales the image or cube to better fit the objects in the scene. Move the slider or type a value to resize the image.
-
-
With a Planar scale-independent environment, offsets the image left or right. With a Cube scale-independent environment, rotates
the panorama around the camera.
-
-
With a Planar scale-independent environment, offsets the image up or down. With a Cube scale-independent environment, moves
the panorama up or down along the vertical axis of the camera.
Tips for increasing scale-independent photographic realism
For the best lighting effects, a matching HDR panorama and photographic “location” image is recommended. For more information
on where to find these files, see: Create a custom environment
To create a scale-independent planar environment with matching HDR panoramic lighting:
- Click the button at the top of the Environment interface, or choose the menu item .
- Create a scale-independent cube environment from an HDR panorama as defined in the preceding section.
- When the Cube is shown with correct lighting and reflections, click the folder icon under and browse to your photographic image from the same location.
Create and edit a scale-independent planar environment from the Library
- If the Environments interface is not already visible, press the E key (or select ).
- In the lower section, "", click on the “Scale-independent” environment to add it to the scene.
- In the upper section, "", click the icon for the scale-independent environment you just loaded
The 3D view changes to show the default scale-independent environment.
- Double-click the field to type a new name for your environment.
- Right-click on the environment icon. From the menu that appears, choose . (Or, select .)
The Environment Properties window opens.
- Click on the folder icon beside the Use field.
The Import File window appears.
- Browse to the image you want to use, select it, and click .
- The image appears in your 3D view.
- Use the Environment Properties for the scale-independent environment to resize or offset the image.
- Pan, zoom and tumble (Alt, plus the mouse buttons) to fit the model into the image.
Note
For Planar environments, camera pans, zooms, and tumbles only appear to change the objects in the scene. This is because Planar
environments stay “locked” to face the camera and an infinite distance away.